We often recommend using Filestack to upload files. But why is Filestack really better than building your own file uploader from scratch? Does Filestack actually save you time and provide more capabilities?
First things first… What is Filestack?
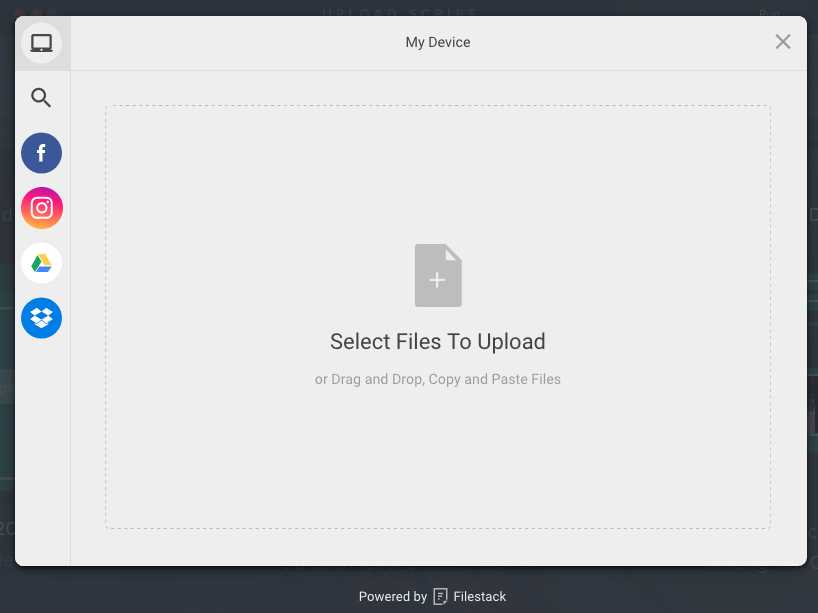
If you’re not familiar with Filestack, it is an end-to-end file upload and management solution. Through our JavaScript library or RESTful API, you can upload any filetype from 20+ cloud and local sources such as Facebook, Google Drive, Webcam, and more, and then store the file in your AWS bucket or with other cloud storage.
For developers who need the best, Filestack also offers a Content Ingestion Network (CIN) to ingest files 10x faster than normal upload methods, a built in CDN to deliver content with blazing speed, an image processing engine to manipulate images and convert other filetypes on the fly and more. However, if you’re just looking for a basic way to ingest content on your application, you have options.
In this blog post, I will demonstrate how to build your own file uploader where you can set a max file size, specify filetypes to allow, restrict the number of files to upload, and choose sources to pick from and store to. I will show you both how to build the file uploader from scratch using JQuery and Node.js, and how to implement the same functionality using Filestack. (Note: If you happen to want to build a pure ajax file upload without JQuery, we have a post for that as well.)
JQuery Ajax Request
Typically, creating a file uploader involves both frontend and backend sides of the application, as we need a nice UI for users to select files to upload, and a server able to receive the uploaded file and store them in either a public folder or in cloud storage.
In this demo, we will create a sample file uploader using jQuery on the frontend and Node.js on the backend.
JQuery can be used to create a very simple front end for a file uploader.

Let’s kick off by writing a form containing the input file element:
<form enctype="multipart/form-data">
  <input type="file" name="logo">
  <button type="submit">Upload</button>
  <div id="response" style="color:red;"></div>
</form>
Notice the specific enctype set to multipart/form-data that specifies how to encode the form data before submitting it to the server.
Nothing exotic here, so we continue with the real function in charge to send the AJAX request. The submit button triggers submit from JQuery and we simply prepare the data and write the AJAX call with specific parameters:
$('form').submit((e) => {
  e.preventDefault();
  const data = new FormData(document.querySelector('form'));
  $.ajax({
    url: '/upload',
    type: 'POST',
    contentType: false,
    data: data,
    enctype: 'multipart/form-data',
    processData: false,
    success: function (res) {
      console.log(res.message);
      $('#response').text(res.message);
    }
  });
});
These few lines are enough to send the file via POST request but cannot be compared to Filestack pick.
In fact, things get complicated as soon as we decide to limit the file uploader.
Now, our constraints are 10Mbs as maximum file size and only images are allowed. Both can be achieved in JavaScript but client validation can be easily circumvented…
A smart user could change the extension of the file and still send it to the server!
Obviously, client-side validation cannot substitute the server-side one but this also requires more efforts for the backenders.
With Filestack we can set those two constraints with a simple object definition:
const options = {
  accept: 'image/*',
  maxSize: 10 * 1024 * 1024,
};
Now, let’s say we want to allow users to upload pictures from a different source such as their Facebook profiles:
You may end up researching for third-party libraries or spending time reading Facebook APIs for code integration. Go ahead, but you are going to end up doing the same for Instagram and other social networks as well.
The Filestack team is well-aware of the social media popularity, and the Filestack file picker comes with several sources without the need of customizing the option parameter. Facebook, Instagram, Dropbox are available out of the box, and the list can be extended further through the fromSource option.
const options = {
  fromSource: [/*other sources*/],
};
Still skeptical?
Filestack provides minFiles and maxFiles to manage the amount of files one can upload at once. Not an easy task accomplished with only jQuery!
That covers the frontend. Let’s move on to Node.js!
Node.JS and Multer
There is no shadow of a doubt multer is the most popular package to handle multipart/form-data in the node community. The package is basically a middleware taking care of users’ files.
It’s not to difficult to setup in a node server as it accepts a few parameters to customize its behavior.
Suppose we want to receive our uploaded images and save it in /public/uploads and keep the original name. Multer provides diskStorage:
const storage = multer.diskStorage({
  destination: (req, file, cb) => cb(null, './public/uploads'),
  filename: (req, file, cb) => cb(null, file.originalname),
});
we can pass it an object containing destination and filename which are nothing but other functions defining multer behavior.
Easy as pie.
However notice we are allowing users to upload files that are going to be directly stored within the server where our app resides. This may not be the optimal choice in terms of security such as
- Upload huge files may cause file space denial of service.
- Send file using malicious path or name may overwrite a critical file.
- Transfer file containing “tags” that can get executed as part of being “included” in a web page.
and so forth.
Moreover, it’s gonna be annoying to save the images on cloud object storages like s3 from Amazon: We still need to use either Amazon SDK or the command line to communicate with s3.
Filestack, on the other hand offers an easier way to store files directly in your s3 storage buckets. If you are curious about it, don’t miss the clear description of the steps in the documentation.
Remember we limited the upload to images only? Well, here it comes the server-validation and multer accepts a function as fileFilter property. Here is the Node.js code required to make sure the file accepted is an image:
const fileFilter = (req, file, cb) => {
  if (!file.originalname.match(/\.(jpg|jpeg|png|gif)$/)) {
    cb('Only image files are allowed!', false);
  }

  cb(null, true);
};
The code looks for the extension of the file and whenever it’s not an image the second parameter of the callback will be false.
At this point we have all we originally needed and we can define upload:
const upload = multer({ storage, fileFilter }).single('logo');
Notice single with the name of the field in the form logo… We are uploading a single file don’t we? Alternatively the documentation states we are allowed to pass an array to the array function but it’s hard to come up with something dynamic.
Filestack, as mentioned before, allows for complete customization of the number of files users can upload at once.
To conclude the code, we have a route handling POST requests to /upload:
app.post('/upload', (req, res) => {
  upload(req, res, (err) => {
    if (err) {
      res.json({ message: err });
    }
    res.json({ message: 'Image Successfully Uploaded!' });
  });
});
Conclusions
When it comes to uploading files, Filestack is fast to implement and versatile in its use. While JQuery and Node.JS are great options, they require some effort to reach the same flexibility Filestack provides innately.
As a frontend library, Filestack requires no real effort from backend developers. Additionally, it is fully customizable with option parameters, saving us the hassle of creating our own rules for file size and extension limitations.
Through a simple API we can unleash a very powerful uploader that has everything we need, from a catchy UI to a robust codebase allowing users to fully customize its behavior.
So what does it mean in practical terms?
Well, in less than 30 minutes you get a complete file uploader AND whole team of Filestacker support ready to help you.
Filestack is a dynamic team dedicated to revolutionizing file uploads and management for web and mobile applications. Our user-friendly API seamlessly integrates with major cloud services, offering developers a reliable and efficient file handling experience.
Read More →