In the last tutorials, I gave an overview of Filestack’s ability to manipulate documents and audio files: We built a fanfiction website to showcase documents and a soundstack-like app to show the powerful audio transcoding function of Filestack’s API. Nonetheless, I often highlight Filestack’s value when it comes to uploading and manipulating pictures, so it’s about time we work with pics.
Filestack provides users with endless possibilities to deal with pictures so a single tutorial is definitely not enough to cover them all:
Today we are going back to the roots to see how easily we can upload pictures and immediately apply small manipulations with nothing more than a pick() function call.
As usual in my posts, I provide you the link for source code here. The app is written in Node.js with JQuery and React.js (Yep, I love Javascript if it wasn’t clear).
NB: I will go through the tutorial explaining every action in detail, as working with images is of primary concern for our clients.
The App – ImageStack
So what kind of app we are going to write today? An image gallery app of course. The idea behind is very simple (…and predictable):
Our users love to capture great moments of their lives and share them on the web, so we provide them our ImageStack platform app.
In addition, we aim to provide an easy way to upload pictures and immediately share them on the web.
Does this description sound familiar?!
Here is the homepage:

That’s a very clean UI for the users thanks to Bootstrap and minimum css customization. Users just need to click on start to jump to the upload section:
Setting Up Filestack
We want to integrate Filestack in the app for easy picture uploading, so we start by including the script in our html page:
<script src="//api.filestackapi.com/filestack.js"></script>
When you first create your API key you will receive a widget to include in the page to immediately start using Filestack. This will pop up when you sign into the developer portal. In our case, we are going to create the upload button manually for total customization.
After we grab our API key, we can include it in our page by setting the key globally:
filepicker.setKey("AfcnFThTU4ebKMjxRMngSz");
In many situations there is no need to have set it globally, but rather we can attach it to the URL of the API call. Personally, I prefer to set it once and for all when possible.
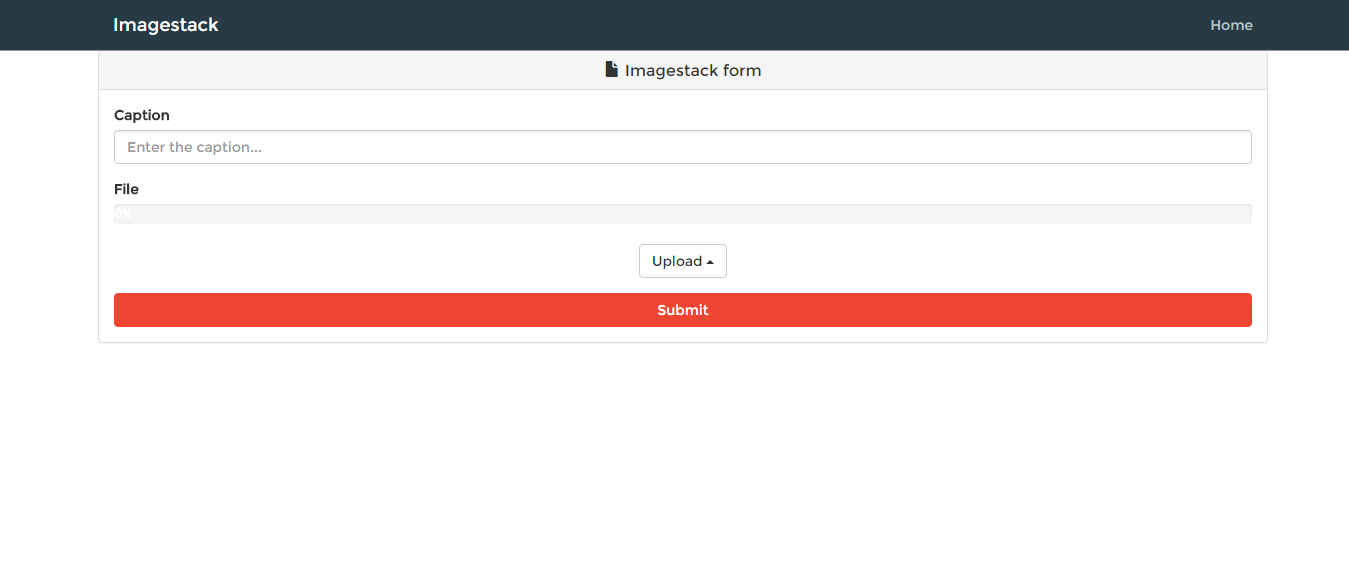
Uploading a Picture
Great, in two steps we setup all that’s needed to start using Filestack. Now, let’s start thinking about the uploader itself:
What kind of files are allowed to be uploaded?
This is one of the primary things that you should consider when implementing file upload functionality. Not only does this set expectations for what types of files you’d like your app or website to process. It also protects your servers and users from potentially harmful files. If you’re creating an image upload app, it’s only right to limit the file types to JPG, PNG, and other image formats. You shouldn’t let users upload text files, .doc files, or (*gulp*) .exe files.
Filestack lets you easily filter the types of files that your users can upload to your application or website. I’ll show you more about this shortly.
What source to upload from are allowed?
Knowing which upload sources to allow is another important consideration for file upload. Back then, people uploaded only from their computers’ own files. But now, people can upload files from almost anywhere. These sources, along with device files, include social media, cloud storage solutions (e.g., Dropbox), or other sites. Users can even upload directly from the camera of their devices.
Filestack allows you to choose the upload sources that are allowed in your application or website, including the ones above. Additionally, it lets you define a custom source as your source of uploads. And it won’t take you long to accomplish all this.
What are the maximum picture sizes to be uploaded?
When it comes to file uploads, size matters a lot. This is because larger files tend to take too long to upload. Now, let’s say that you didn’t pick a maximum limit for your image uploads. Furthermore, let’s say that you also don’t have a limit for the number of files per upload. If one user uploads a large number of files, each with a large file size, you will be subject to a DoS (denial of service) attack. These attacks occur when the requests made to a server overwhelm its resources. When that happens, the attack renders the server and the applications it supports unusable.
By setting a maximum file size (and number of files) for each upload, you’ll add an extra layer of protection to your app. You’ll also give your users a smoother experience with fewer delays or waiting times. Thankfully, Filestack also lets you easily set a maximum size for files, including images.
Filestack has everything we need for complete control over the uploading process. Just take a look at the documentation for the pick() function and you will be amazed by the number of options available.
So let’s take a look at my option object properties for a brief explanation:
{
  mimetype: 'image/*',
  hide: true,
  maxSize: 2*1024*1024,
  imageQuality: 90,
  imageDim: [800, null],
  services: ['COMPUTER', 'WEBCAM'],
  openTo: 'COMPUTER'
}
1. mimetype
The mimetype defines the first contraint, we only want to allow pictures here, so image/* is the perfect solution. There is also another option called extension which is very similar to mimetype but requires the extension of the files instead and infer the mimetypes from them.
NB: mimetype and extension cannot be used together!
2. hide
The hide property hides the modal once the picture is chosen: Since we are going to show a cool uploading bar for the users instead, the uploading is done in background and a onProgress() function is fired to provide us feedback about the current action.
3. maxSize
A constraint on the image maxSize is good practice so we chose 2MBs (which is the same constraint for WordPress too).
4. imageQuality
Here it comes, an initial image compression: imageQuality defines the compression ratio of the pictures. For the purpose of the app we do not want compress to much so a value of 90/100 is acceptable for users.
NB: this only applies to JPEG images.
5. imageDim
imageDim defines the dimensions of the picture. Since we want to keep the width/height ratio constant, we only defined 800 for width and left auto for height.
NB: This works only on local images or webcam captures.
6. services
The sources for our files are the local device or the webcam as we want to use imageDim.
7. openTo
openTodefines the first choice for uploading a picture, computer in this specific case.
It’s done, our constraints are more or less or fulfilled and this process just requires to create an option object as first parameter for the function pick().
What are the other parameters then? Well, pick() also provides onSuccess, onProgress, onError functions.
Here is the code for onSuccess:
function(Blob) {
  setTimeout(previewImage(Blob.url), 2000);
  console.log(JSON.stringify(Blob));
  _this.data("doc-url", Blob.url);
}
Pretty straightforward! We first end the animation of the progress bar after 2 secs to change its color to green and show a preview of the picture in the page. Then, we log the Blob content which is received from Filestack and attach the URL of the newly uploaded picture to the upload button.
Here is the code for onProgress instead:
function(FPProgress) {
  console.log(parseInt(FPProgress.progress));
  progressPercentage = parseInt(FPProgress.progress) + '%';
  $('.progress-bar').css('width', progressPercentage).text(progressPercentage);
}
The onProgress function continuously receives feedback from Filestack regarding the uploading progress through a JSON file FPProgress. So we log the progress number and transform it in a percentage to be used to animate the progress bar.
Finally the onError function is nothing more than just logging the error as shown in the documentation:
function(FPError) {
  console.log(FPError.toString());
}
Now that we inspected every block of code. I’ll provide you with the complete code for the pick function fired by clicking on the upload button:
$('.filepicker').on('click', function() {
  var _this = $(this);
  filepicker.pick(
    {
      mimetype: 'image/*',
      hide: true,
      maxSize: 2*1024*1024,
      imageQuality: 90,
      imageDim: [800, null],
      services: ['COMPUTER', 'WEBCAM'],
      openTo: 'COMPUTER'
    },
    function(Blob) {
      setTimeout(previewImage(Blob.url), 2000);
      console.log(JSON.stringify(Blob));
      _this.data("doc-url", Blob.url);
    },
    function(FPError) {
      console.log(FPError.toString());
    },
    function(FPProgress) {
      console.log(parseInt(FPProgress.progress));
      progressPercentage = parseInt(FPProgress.progress) + '%';
      $('.progress-bar').css('width', progressPercentage).text(progressPercentage);
    }
  );
});
In few lines of code and thanks to Filestack we have complete control on the page dynamic behavior!
ImageStack In Action
So now we can try to upload a picture. Take a look at the video. Isn’t it great that we have all the animations thanks to Filestack?
And then let’s go back to the homepage to check the result:
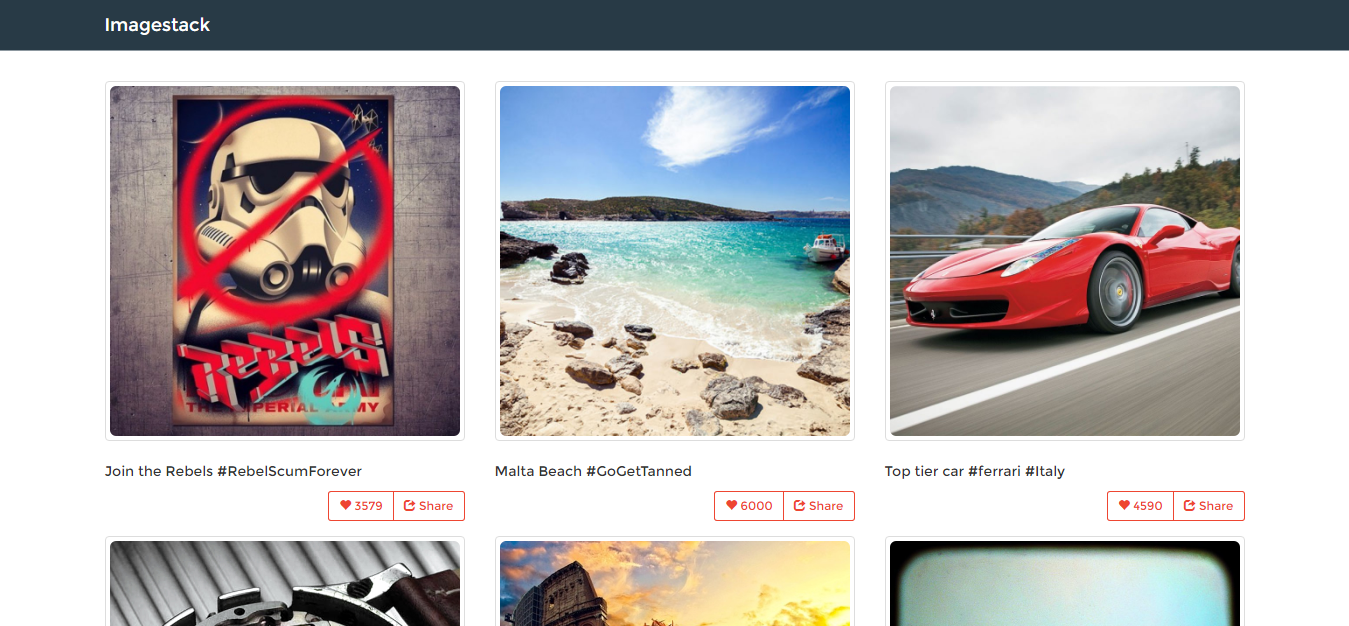
Perfect! However the pictures in the homepages are responsive thanks to Bootstrap so let’s take a look at the width and height of it:
The original picture is 500×500 pixels but our uploader is setup to change the width to 800px and the height accordingly to maintain the ratio: So the new picture is supposed to be 800×800 right?
Let’s see:
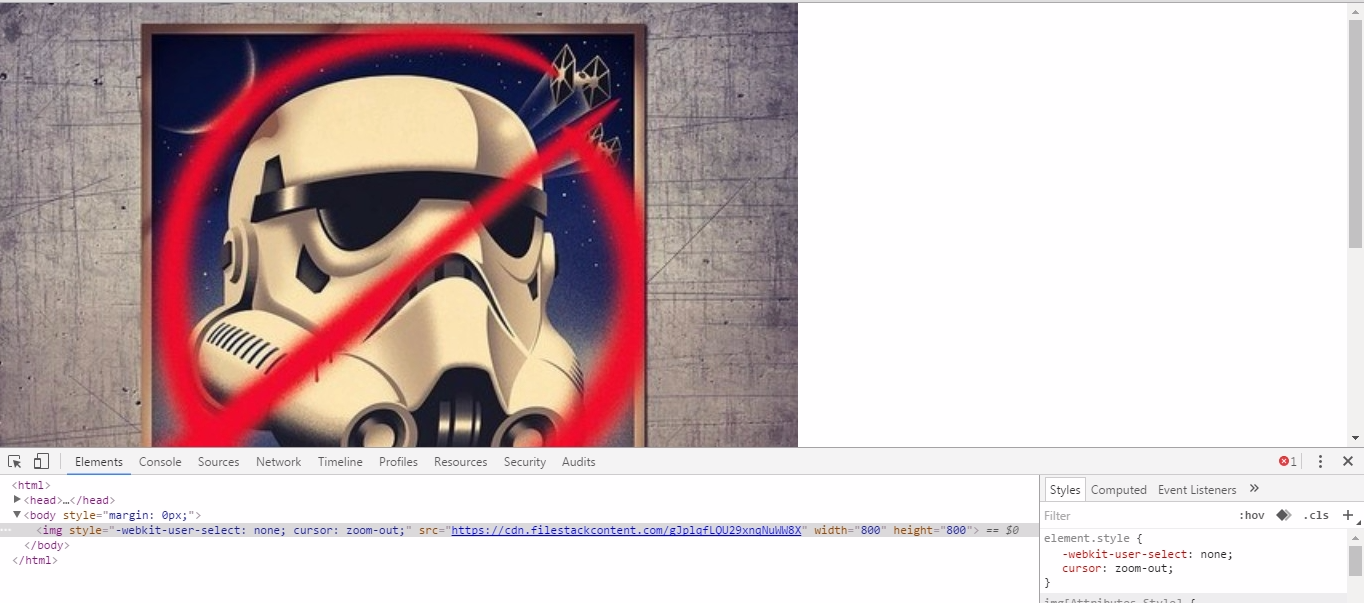
It actually resized it to 800×800 as expected!
Conclusion
This time we tested Filestack in its most popular function, handling pictures. We showed you how you can build your very own image app in very little time.
Since our clients commonly request a reliable images uploader we created a sample app to show some of Filestack capabilities: We defined a set of common constraints on the uploader to show how fast and easy Filestack customization is.
In addition to this, we covered in detail the pick() function and exploited the onProgress function parameter to create a catchy UI.
Filestack is a dynamic team dedicated to revolutionizing file uploads and management for web and mobile applications. Our user-friendly API seamlessly integrates with major cloud services, offering developers a reliable and efficient file handling experience.
Read More →