In this tutorial, we’ll walk you through how to create your own YouTube-like app. The final application will allow users to upload and share videos to the public. We will use React for the client side, Node.js for the server side, and Filestack to upload and transcode the videos.
Although we’re highlighting YouTube-like apps, this tutorial will be helpful if you are building any type of application in which users upload and share videos, whether that be a social network, an educational platform, or anything else!
Please note, this tutorial will use Filestack’s V3 File Picker.
Alright, ready? Let’s do this…
Filestack
If you are not familiar with Filestack, it provides a fully customizable file uploader accessible through javascript in the client side.
There are several reasons why its loved and trusted by developers:
- Simple to integrate in your codebase, just link to the js file or add the package through npm (from version 3).
- The uploader function
pickreceives an options object where you can define a set of constraints such as file type, maximum file size, the source to upload files from etc. - Filestack returns a CDN link of the file which improves the overall performance of your apps.
- You don’t need to focus on the security so you’ll spend no time thinking about how to protect your backend from malicious files uploading as Filestack does it for you.
- Through the Filestack process API you have access to loads of image transformations like filters, cropping, face detection and even audio and video transcoding.
In this specific tutorial we will provide users a file uploader and the video transcoding, two features that usually would require a lot of development time which becomes a matter of minutes with Filestack.
Prerequisites
The following tutorial is essentially a Javascript app written in React and Node.js so we assume:
- A basic knowledge of the two ecosystems.
- The latest Javascript standards, up to ES2017.
But don’t be afraid! The codebase is pretty easy to follow along.
Since the tutorial is focused on Javascript, we’re am going to skip all webpack and babel setup part. You can clone the repo on our Github profile and copy the webpack related files.
Finally, we deployed the app on Heroku for you to try, you can find it here.
Setup the Project
From my repository let’s take a look at the `package.json` file:
{
"name": "react-youtube",
"version": "1.0.0",
"description": "React&Redux youtube like app.",
"main": "server.js",
"repository": "https://github.com/samuxyz/react-youtube.git",
"author": "samuxyz <zaza.samuele@gmail.com>",
"license": "MIT",
"scripts": {
"watch-dev": "NODE_ENV=development webpack-dev-server --hot --inline",
"api": "PORT=3000 nodemon server.js",
"start": "NODE_ENV=production webpack && node server.js"
},
"engines": {
"node": "6.9.1"
},
"devDependencies": {
"babel-cli": "^6.23.0",
"babel-core": "^6.23.1",
"babel-eslint": "^7.1.1",
"babel-loader": "^6.3.2",
"babel-plugin-transform-class-properties": "^6.23.0",
"babel-polyfill": "^6.23.0",
"babel-preset-latest": "^6.22.0",
"babel-preset-react": "^6.23.0",
"css-loader": "^0.26.1",
"eslint": "^3.15.0",
"eslint-loader": "^1.6.1",
"eslint-plugin-react": "^6.10.0",
"html-webpack-plugin": "^2.28.0",
"nodemon": "^1.11.0",
"react-hot-loader": "next",
"style-loader": "^0.13.1",
"webpack": "^2.2.1",
"webpack-dev-server": "^2.3.0",
"webpack-merge": "^3.0.0"
},
"dependencies": {
"body-parser": "^1.16.1",
"cors": "^2.8.1",
"express": "^4.14.1",
"filestack-js": "^0.4.2",
"morgan": "^1.8.1",
"react": "^15.4.2",
"react-dom": "^15.4.2",
"react-router": "^3.0.2"
}
}
– The devDependencies are just a set of packages to help writing modern Javascript, loaders and plugins for webpack, eslint for code styling etc.
– Notice nodemon, this is an exception as we are going to actively use it to run our server in development mode (watch-dev command) and it automatically restart the server whenever a change to the backend codebase is applied.
– The dependencies section is what we are going to rely on to write backend and client. The server packages are express, body-parser, cors and morgan while the client ones are react, react-dom and react-router. Throughout the tutorial we will see them in action.
Plus, filestack-js, the new picker V3 API.
So, if you are using yarn package manager, in the terminal move to the cloned folder and run
yarn
to create the node_modules folder and install all the packages inside.
Filestack API and Webhook
Before starting with the server we need to grap the API key that grant us the permission to communicate with Filestack API. Go to the official website and login/register:
Once we completed the process we should be redirected to the developer portal where we can get a free API key. Let’s store it for later and checkout the panel on the left, the last option is webhook:

This is where we can set the endpoint Filestack will use to send the transcoded URL for the video a user uploaded. Let’s set it up with the endpoint of your app:
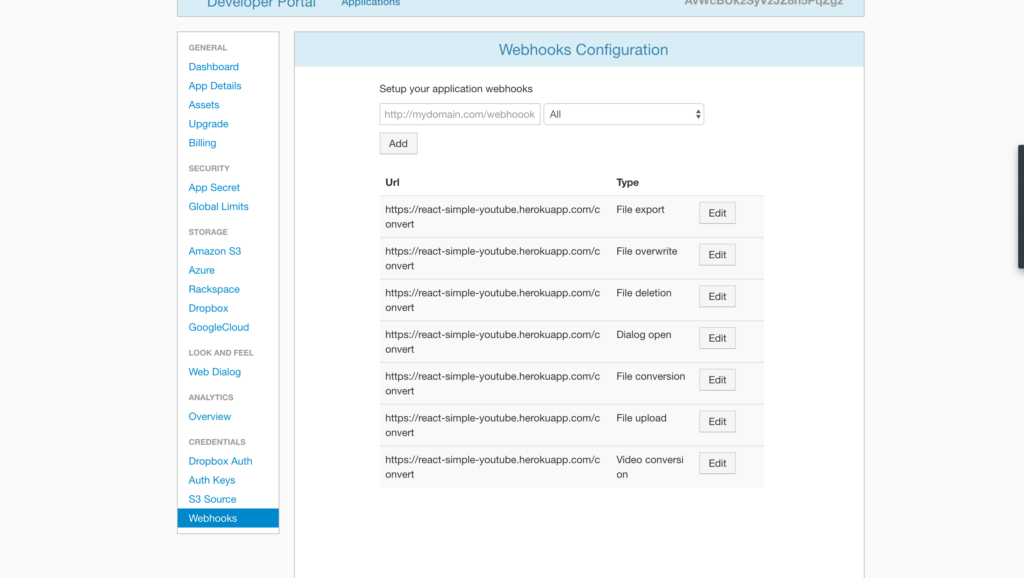
For simplicity we added the URL and chose all so all the webhooks points to the youtube app on Heroku.
NB: We are using a free API key so we have a limited amount of monthly conversion, more than enough for the current tutorial but for a commercial app it is definitely not enough.
We are finally ready to play with the server.
Node.js Server
Our express server is very easy, it consists of four routes:
- GET
/api/v1/videos: Get all the videos. - POST
/api/v1/videos: Save a new video in the DB. - POST
/convert: Webhook for Filestack to send the new URL. - GET
/convert: Shows the latest response object from Filestack.
The last route GET /convert is actually optional but it helps understanding the transcoding process:
- Throughout the process Filestack sends responses to update the server regarding the process by POST requests to /convert.
- We are saving the response and return in with GET requests to /convert.
In particular, once the process is completed, the response body is going to be similar to this example:
{
"status":"completed",
"message":"Done",
"data":{
"thumb":"https://cdn.filestackcontent.com/f1e8V88QDuxzOvtOAq1W",
"thumb100x100":"https://process.filestackapi.com/AhTgLagciQByzXpFGRI0Az/resize=w:100,h:100,f:crop/output=f:jpg,q:66/https://cdn.filestackcontent.com/f1e8V88QDuxzOvtOAq1W",
"thumb200x200":"https://process.filestackapi.com/AhTgLagciQByzXpFGRI0Az/resize=w:200,h:200,f:crop/output=f:jpg,q:66/https://cdn.filestackcontent.com/f1e8V88QDuxzOvtOAq1W",
"thumb300x300":"https://process.filestackapi.com/AhTgLagciQByzXpFGRI0Az/resize=w:300,h:300,f:crop/output=f:jpg,q:66/https://cdn.filestackcontent.com/f1e8V88QDuxzOvtOAq1W",
"url":"https://cdn.filestackcontent.com/VgvFVdvvTkml0WXPIoGn"
},
"metadata":{
"result":{
"audio_channels":2,
"audio_codec":"vorbis",
"audio_sample_rate":44100,
"created_at":"2015/12/21 20:45:19 +0000",
"duration":10587,
"encoding_progress":100,
"encoding_time":8,
"extname":".webm",
"file_size":293459,
"fps":24,
"height":260,
"mime_type":"video/webm",
"started_encoding_at":"2015/12/21 20:45:22 +0000",
"updated_at":"2015/12/21 20:45:32 +0000",
"video_bitrate":221,
"video_codec":"vp8",
"width":300
},
"source":{
"audio_bitrate":125,
"audio_channels":2,
"audio_codec":"aac",
"audio_sample_rate":44100,
"created_at":"2015/12/21 20:45:19 +0000",
"duration":10564,
"extname":".mp4",
"file_size":875797,
"fps":24,
"height":360,
"mime_type":"video/mp4",
"updated_at":"2015/12/21 20:45:32 +0000",
"video_bitrate":196,
"video_codec":"h264",
"width":480
}
},
"timestamp":"1453850583",
"uuid":"638311d89d2bc849563a674a45809b7c"
}
Of all the returned information take a look at the following properties:
"status": "completed"
...
"data": {
...
"url":"https://cdn.filestackcontent.com/VgvFVdvvTkml0WXPIoGn"
}
...
"uuid": "638311d89d2bc849563a674a45809b7c"
The status equal to completed is what we are going to compare to know the file is transcoded, data.url provides the new URL for the video and uuid is a unique identifier for the video:
1. Before saving the video to Database we make a GET request to the Filestack process API with the video handler to request the transcoding.
2. Filestack returns the uuid we are going to save along with the video information sent by the user.
3. We get back the uuid again after the transcoding completion, so we use it search in the DB for the completed video, then update the URL and show it to the users in the homepage!
Trust us, it’s easier to write the code than explain it!
Checkout the code in server.js:
const express = require('express');
const morgan = require('morgan');
const bodyParser = require('body-parser');
const cors = require('cors');
const port = process.env.PORT || 8080;
const app = express();

// Save the latest response of Filestack API
let filestackResponse = '';

// in-memory DB
const db = require('./api/db.json').videos;

// Parse the body and accept json
app.use(bodyParser.json());
app.use(bodyParser.urlencoded({ extended: true }));
app.use(bodyParser.text());
app.use(bodyParser.json({ type: 'application/json'}));

// Enable CORS for development
app.use(cors());

// Static files
app.use(express.static(`${__dirname}/dist`));

// Log HTTP requests in the terminal
app.use(morgan('tiny'));

// videos API
app.route('/api/v1/videos')
  .get((req, res) => {
    res.json(db.reverse()); // Reverse order to show the newest on top
  })
  .post((req, res) => {
  // Push a new video to the DB
  const video = Object.assign({}, req.body, { id: db.length });
  db.push(video);
  res.json({ message: 'Successfully added!' });
  });
  // convert API to communicate with Filestack
  app.route('/convert')
    .post((req, res) => {
      const { status, uuid, data: { url } } = req.body;
      // Once the transcoding is completed then show the video
      if (status && status === 'completed') {
        // status should be 'completed'
        db.forEach(video => {
        /* Search for the video to update the URL and
           make it visible to users */
          if (video.uuid === uuid) {
            video.url = url; // Update the URL
            video.converted = true; // Make the video visible to users
          }
        });
      }
      // Update the response
      filestackResponse = req.body;
    })
    .get((req,res) => {
      // Shows Filestack latest response
      res.json({ response: filestackResponse });
    });
app.listen(port, () => console.log(`JSON Server is running on port ${port}!`));
- We required all the server related packages on the top of the file as well as created the express server.
- Then, we read from
/api/db.jsona set of default videos an create the in-memory db, just an array of videos after all! - Thanks to body-parser the server is gonna parse the body of the requests to get the video information. Also, the server accepts
application/jsontypes. - In development mode the express server is gonna serve the API to webpack-dev-server so we enabled CORS.
- morgan logger is used to show useful info in the terminal whenever a request is received.
- We have the videos API with GET and POST routes to /api/v1/videos to send the videos or to create a new and store it in the DB.
- Finally, /convert routes are in charge of handling Filestack responses. Notice the POST route, we get the status and when equal to completed the video with the same uuid gets updated and finally allowed to show up in the client.
Now, to complete the backend part we just need to create the db.json file containing the default videos. In /api create db.json and paste the following code:
{
"videos": [
{
"id": 1,
"uuid": 1,
"url": "https://cdn.filestackcontent.com/dWbyg4oUQBVH8Rznqkfl",
"title": "A day at Work",
"author": "Sam",
"views": 1000,
"uploadAt": "1",
"converted": true
},
{
"id": 2,
"uuid": 2,
"url": "https://cdn.filestackcontent.com/0d83iq6TNa4OS5WPBHlE",
"title": "Scooping Icecream",
"author": "Bethany",
"views": 50,
"uploadAt": "3",
"converted": true
},
{
"id": 3,
"uuid": 3,
"url": "https://cdn.filestackcontent.com/Bu9TkaFTvSddg6c1PaWf",
"title": "Synthesizer",
"author": "Andrew",
"views": 145000,
"uploadAt": "12",
"converted": true
},
{
"id": 4,
"uuid": 4,
"url": "https://cdn.filestackcontent.com/XD3TCygEQSyo8d3C7PQ3",
"title": "Wasp on Wood",
"author": "Sam",
"views": 600,
"uploadAt": "15",
"converted": true
},
{
"id": 5,
"uuid": 5,
"url": "https://cdn.filestackcontent.com/nLKdSd0T7OiSg3v9VlmZ",
"title": "Ticking Clock",
"author": "Andrew",
"views": 2389,
"uploadAt": "20",
"converted": true
},
{
"id": 6,
"uuid": 6,
"url": "https://cdn.filestackcontent.com/bqy4w086SDE9KIfJxFAg",
"title": "People at Temple",
"author": "Andrew",
"views": 720,
"uploadAt": "21",
"converted": true
},
{
"id": 7,
"uuid": 7,
"url": "https://cdn.filestackcontent.com/9s8EDwrQEaDEQVz7EHsQ",
"title": "Planet Earth Revolving",
"author": "Bethany",
"views": 99999,
"uploadAt": "22",
"converted": true
},
{
"id": 8,
"uuid": 8,
"url": "https://cdn.filestackcontent.com/SLaOvbGTR8asBBLCn1u9",
"title": "Juggling Balls",
"author": "Bethany",
"views": 7,
"uploadAt": "23",
"converted": true
}
]
}
- We created 8 videos to populate our client and their converted property is set to true.
- Moreover,
viewsanduploadAtare nothing more than random integers between [1, 100000] and [1, 23] (hours) respectively.
And the Server side is done! Let’s start the server by running
yarn api
and try to make some requests with Postman.
Test /api/v1/videos
GET localhost:3000/api/v1/video
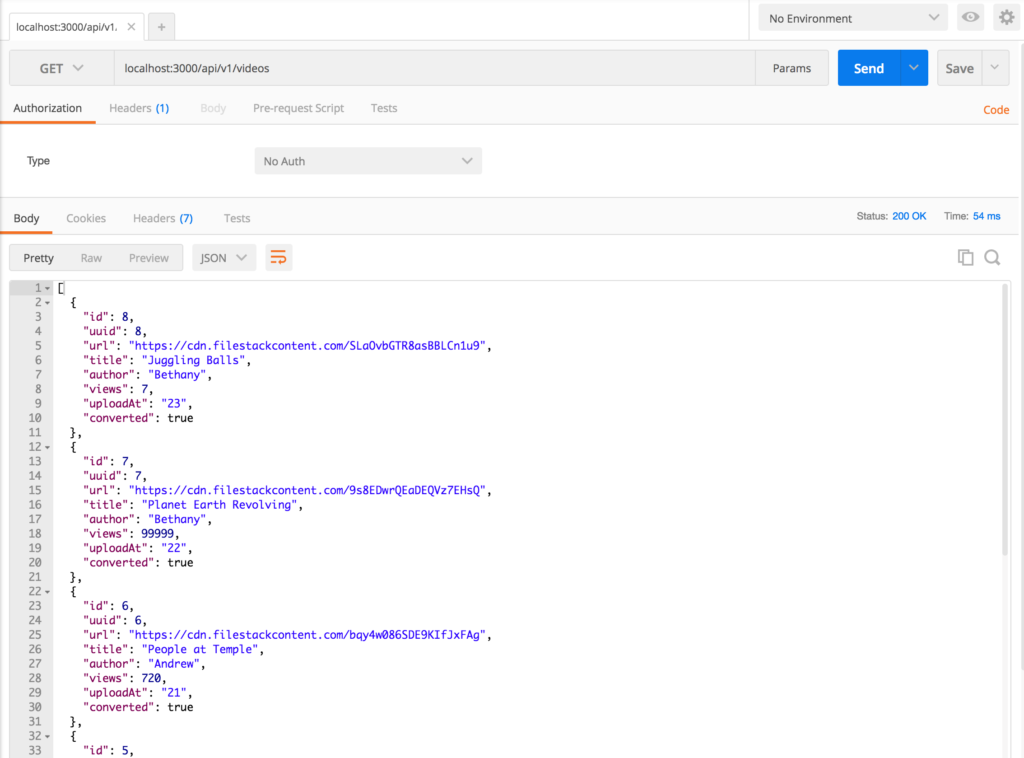
Notice we receive all the videos in the DB.
POST localhost:3000/api/v1/video
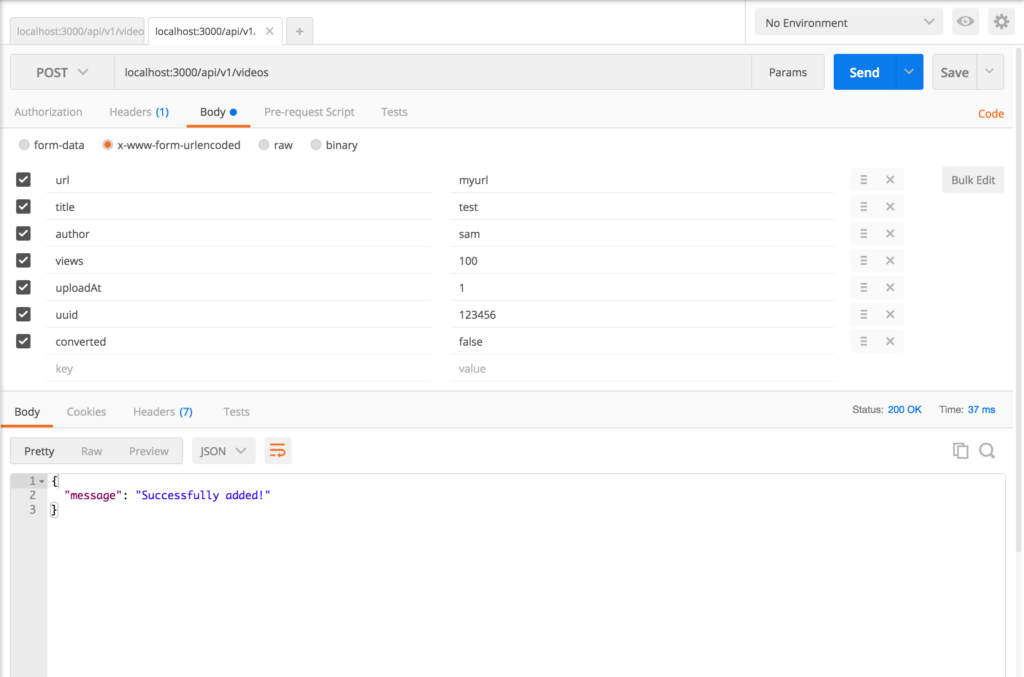
We tried to send fake video information to the server and apparently the video was created and stored.
Let’s make another GET request to /api/v1/videos and see if it was really added to the collection:
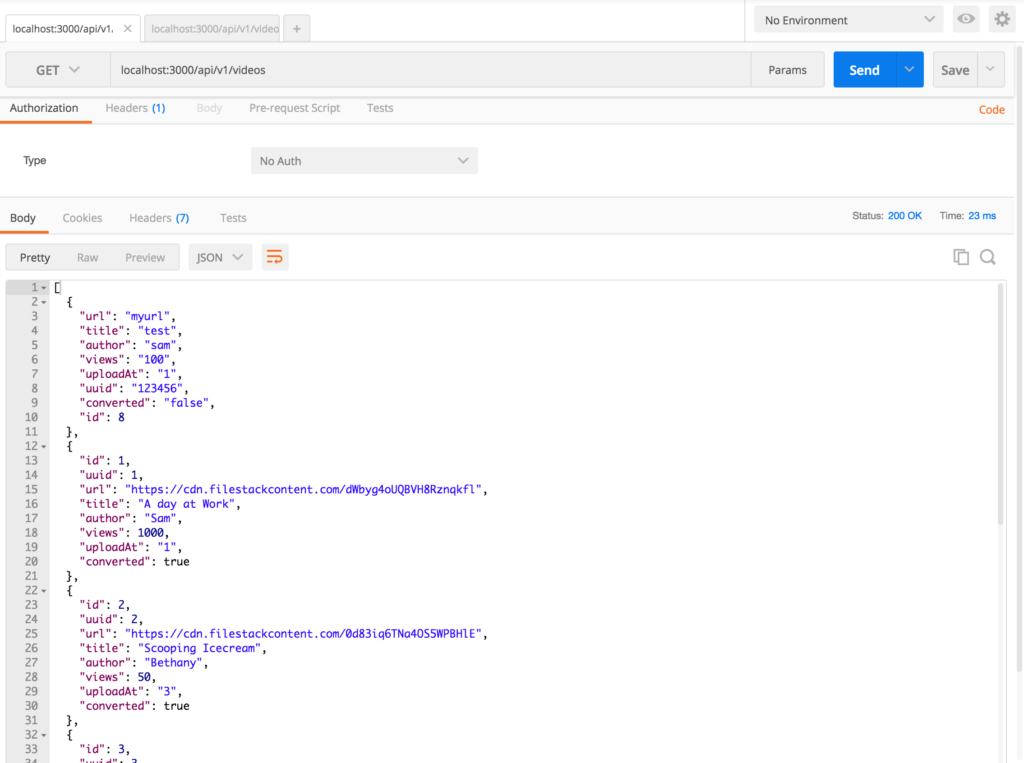
Awesome, it shows as first one! Don’t forget we revert the DB order so that the latest video is always at the top of the list.
The remaining routes of /convert are not for read and write the DB but just to accept Filestack responses.
Let’s now write the client!
React Client
First of all, let’s take a look at the two views:
Homepage: /
Upload form: /add
- Both shares the navigation bar so we can have a Layout component which renders the navigation bar and the two children.
- The two children are going to be containers, we can call them Home and Add respectively.
Let’s start by creating routes.js in /src and paste the following code:
import React from 'react';
import {
  Router,
  Route,
  IndexRoute,
  hashHistory,
} from 'react-router';
import Layout from 'components';
import { Home, Add } from 'containers';

// App routes
const Routes = (
  <Router history={hashHistory}>
    <Route path="/" component={Layout}>
    {/* IndexRoute renders Home container by default */}
      <IndexRoute component={Home} />
      <Route path="Add" component={Add} />
    </Route>
  </Router>
);

export default Routes;
We defined our Router that renders the Layout component at path / which includes /add too. In fact, for / we render Layout along with Home container as it is the component prop of the IndexRoute.
Time to create the other components! Let’s start by Layout, in /src/components create Layout.jsx and paste the following code:
import React from 'react';
import { Nav } from 'components';

const Layout = (props) => {
  const { children } = props;
  return (
    <div>
      <Nav />
      {children}
    </div>
  );
};

export default Layout;
This is just a stateless functional component that renders Nav and the children as expected.
Let’s now create Nav.jsx in /src/components and paste the following code:
import React from 'react';
import { Link } from 'react-router';

const Nav = () => (
  <nav className="navbar navbar-default navbar-fixed-top">
    <div className="container">
      <div className="navbar-header">
        <button
          type="button"
          className="navbar-toggle collapsed"
          data-toggle="collapse"
          data-target="#navbar"
          aria-expanded="false"
          aria-controls="navbar"
        >
        <span className="sr-only">Toggle navigation</span>
        <span className="icon-bar" />
        <span className="icon-bar" />
        <span className="icon-bar" />
        </button>
        <Link className="navbar-brand" to="/">React YouTube</Link>
      </div>
    </div>
  </nav>
);

export default Nav;
Again, this is just a navigation bar created with bootstrap and self-explanatory.
We like to export our components at once and import them within a single import, so let’s create index.js in /src/components and paste the following code:
import Nav from './Nav';
import Layout from './Layout';

export default Layout;
export {
  Nav,
};
We are going to update this file throughout the remaining part of the tutorial in order to export all the created components.
It’s now time to work on the two containers `Home` and `Add`.
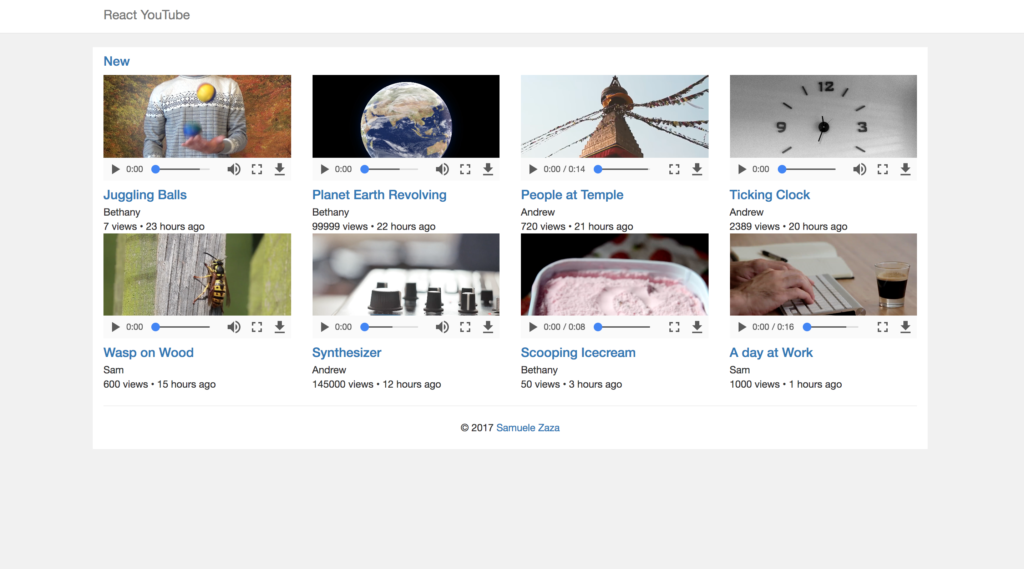
Home Component
The Home component is in charge to fetch the videos from the server and show them in homepage of our app.
Obviously it has a few children components, take a look at our choice:
pic9
VideosListis the component in charge on the videosList array to map each video to Video component. Morever, it shows the new link to change view to /add.Videoshows the video and related informationFooteris a simple component which renders the company name at the bottom of the page.
Let’s create Home.jsx in /src/containers and paste the following code:
import React, { Component } from 'react';
import { VideosList, Footer } from 'components';
import { API } from '../config';

export default class Home extends Component {

  constructor (props) {
    super(props);
    // Set the videoList to empty array
    this.state = { videosList: [] };
  }

  async componentDidMount () {
    // Calls GET /api/v1/videos to populate videosList
    try {
      const response = await fetch(API);
      const videosList = await response.json();
      this.setState({ videosList });
    } catch (e) {
      console.log(e);
    }
  }

  render () {
    const { videosList } = this.state;
    return (
      <main className="container" id="container">
      <VideosList videos={videosList} />
      <Footer />
      </main>
    );
  }
}
That’s a typical container where we set the state in the constructor and populate videosList through fetch in componentDidMount.
Notice that the URL comes from /src/config.js as we are going to use it in Add container as well. In fact config.js exports all the constants we need throughout the app, the URL of the endpoint as well as Filestack API key.
Let’s create it in /src and paste the following code:
const API = __DEV__ ? 'https://localhost:3000/api/v1/videos' : '/api/v1/videos';
const API_KEY = 'YOUR_API_KEY';

export {
  API,
  API_KEY,
};
__DEV__ is a global variable we defined with a plugin in webpack because while in development we serve the client from webpack-dev-server, in production on Heroku we instead serve the client directly from Node.js. Obviously the URL endpoint is going to be slightly different.
NB: Don’t forget to substitute YOUR_API_KEY with the real key you received from Filestack.
Let’s continue writing the children components of Home, in /src/components create VideosList.jsx and paste the following code:
import React from 'react';
import { Link } from 'react-router';
import { Video } from 'components';

const VideosList = ({ videos }) => (
  <div>
    <div className="row">
      <div className="col-md-12">
        <h4><Link to="/add">New</Link></h4>
      </div>
    </div>
    <div className="row">
      {
        videos
        // Videos are shown only when converted === true
        .filter(video => video.converted)
        .map((video, i) => <Video key={i} {...video} />)
      }
    </div>
    <hr />
  </div>
);

export default VideosList;
videosarray is a prop received by its parentHome. Before mapping the video object to theVideocomponent the videos are filtered because we want to show in the homepage videos that were previously converted by Filestack.- This explains why once the user uploads a video it will not immediately show in the homepage but instead it will take some time, precisely the time Filestack API needs to transcode it.
We miss the Video component, let’s create a file Video.jsx in /src/components and paste the following code:
import React from 'react';

const Video = (props) => {
  const { url, title, author, views, uploadAt } = props;
  return (
    <div className="col-md-3">
      <div className="embed-responsive embed-responsive-16by9">
        <video controls>
          <source src={url} type="video/mp4" />
          Your browser does not support the video tag.
        </video>
      </div>
      <div className="video-info">
        <h4><a href="#">{title}</a></h4>
        <p>{author}</p>
        <p>{views} views • {uploadAt} hours ago</p>
      </div>
    </div>
  );
};

export default Video;
This is another stateless function component that shows the video and its information to the users.
Notice that I used the video HTML5 element which shows the video inside a player. In case the Browser does not support the element it will unfortunately show the string your browser does not support the video tag.
The last child component for the Home container is Footer, let’s rapidly create Footer.jsx in /src/components and paste the following code:
import React from 'react';

const Footer = () => (
  <footer className="footer">
    <div className="text-center">
      © 2017 <a href="https://github.com/samuxyz" target="_blank">Samuele Zaza</a>
    </div>
  </footer>
);

export default Footer;
Feel free to write your own information inside the footer!
Finally, let’s update src/components/index.js to export the latest components we created:
import Nav from './Nav';
import Footer from './Footer';
import VideosList from './VideosList';
import Video from './Video';
import Layout from './Layout';

export default Layout;
export {
  Nav,
  Footer,
  VideosList,
  Video,
};
We need an index.js file for the containers as well, if you remember in /src/routes.js we imported them this way:
...
import { Home, Add } from 'containers';
...
Let’s create it in /src/containers
and export Home:
import Home from './Home';

export {
  Home,
};
it’s now time to move to the last container, Add!
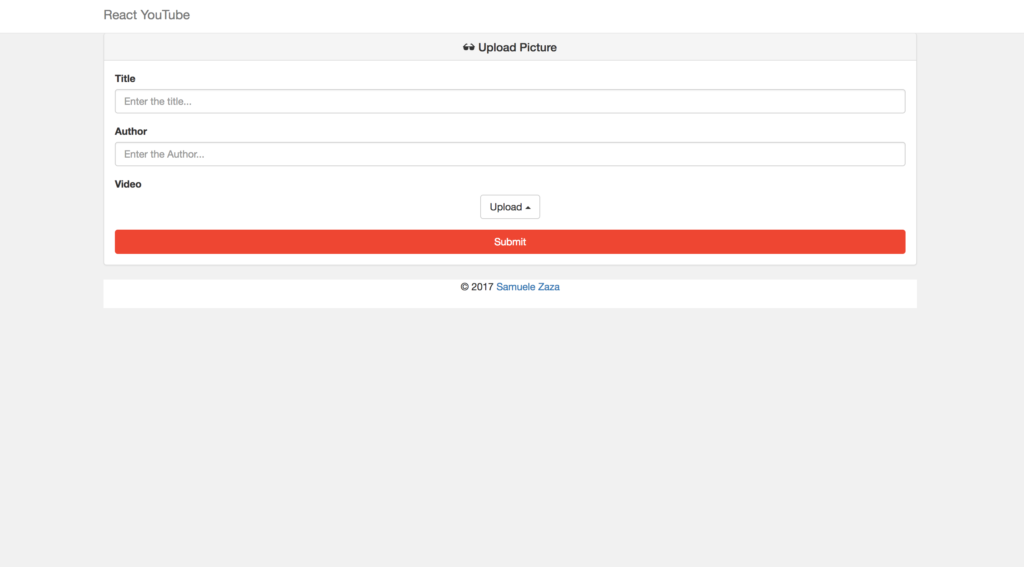
Add Container
This is where users can upload their favorite videos. When they click on submit we first ask for transcoding and then save the video information along with the uuid returned by Filestack.
How does this process actually work?
Filestack provides the so-called process API to apply different enhancements on the uploaded files.
In the documentation Filestack shows 2 possible ways:
pic10
pic11
The difference is just that with the first method there is no need to send the API key as it only processes files uploaded on Filestack, while the second method can process any file given the URL.
In our case we are going to use the second method. To apply video processing, the conversion task is video_convert. Again, the documentation provides a clear example:
https://process.filestackapi.com/AhTgLagciQByzXpFGRI0Az/video_convert=height:260,width:300,preset:webm/Q5eBTKldRfCSuEjUYuAz
where
AhTgLagciQByzXpFGRI0Azis the API key (you would want to use your own).video_convertis the conversion task with a few options for the size (height, width) and the format (preset).Q5eBTKldRfCSuEjUYuAzis the Filestack Handle, this is returned whenever a file is uploaded as part of the CDN URL. For instance, https://cdn.filestackcontent.com/Q5eBTKldRfCSuEjUYuAz.
We are going to use the same structure in our app and once we receive the response the video is sent to the server to be stored.
Enough talking, let’s create Add.jsx in /src/containers and paste the following code:
import React, { Component } from 'react';
import { hashHistory } from 'react-router';
import { API, API_KEY } from '../config';
import filestack from 'filestack-js';
import { Footer } from 'components';

// set the API key
const client = filestack.init(API_KEY);
// Filestack URLs
const filestackCDN = 'https://cdn.filestackcontent.com';
const filestackAPI = 'https://process.filestackapi.com';

export default class AddContainer extends Component {

  constructor (props) {
   super(props);
   // Set the URL to empty string
   this.state = { url: '' };
   // Bind to this
   this.handleClick = this.handleClick.bind(this);
   this.handleSubmit = this.handleSubmit.bind(this);
   this.sendToServer = this.sendToServer.bind(this);
  }

  async handleClick () {
    // The URL returned by Filestack is set in the state
    try {
      const { filesUploaded } = await this.filestack();
      const url = filesUploaded[0].url;
      this.setState({ url });
    } catch (e) {
      console.log(e);
    }
  }

  filestack = () => {
    return client.pick(
      {
        accept: 'video/*',
        maxSize: 1024 * 1024 * 100,
      }
    );
  };

  async sendToServer (uuid) {
    const { state: { url }, title, author } = this;
    // POST to /api/v1/videos to insert a new video in the DB
    try {
      const response = await fetch(API, {
        method: 'POST',
        headers: {
          'Accept': 'application/json',
          'Content-Type': 'application/json',
        },
        body: JSON.stringify({
          url,
          title: title.value,
          author: author.value,
          // Random values for simplicity
          views: Math.floor(Math.random() * 100000) + 1,
          uploadAt: Math.floor(Math.random() * 23) + 1,
          uuid,
          converted: false,
        }),
      });
      return await response.json();
    } catch (e) {
      console.log(e);
    }
  }
  async handleSubmit (e) {
    e.preventDefault();
    const { url } = this.state;
    const curl = `${filestackAPI}/${API_KEY}/video_convert=preset:webm,aspect_mode:preserve/${url.substring(url.lastIndexOf('/') + 1)}`;
    /* First we call the process API
     * to start the trascoding and get the uuid
     */
    try {
      let response = await fetch(curl);
      response = await response.json();
      const server = await this.sendToServer(response.uuid);
      hashHistory.replace('/');
    } catch (e) {
      console.log(e);
    }
 }

  render () {
    const { url } = this.state;
    return (
      <div className="container">
        <div className=".col-md-offset-4 media-list">
          <div className="panel panel-default">
            <div className="panel-heading">
              <h2 className="panel-title text-center">
               <span className="glyphicon glyphicon-sunglasses" /> Upload Picture
              </h2>
            </div>
            <div className="panel-body">
              <form name="document-form" onSubmit={this.handleSubmit}>
                <div className="form-group">
                  <label htmlFor="title">Title</label>
                  <input
                    className="form-control"
                    placeholder="Enter the title..."
                    ref={(input) => this.title = input}
                    type="text"
                  />
                </div>
                <div className="form-group">
                  <label htmlFor="title">Author</label>
                    <input
                      className="form-control"
                      placeholder="Enter the Author..."
                      ref={(input) => this.author = input}
                      type="text"
                    />
                 </div>
                 <div className="form-group">
                   <label htmlFor="video">Video</label>
                   { // When the URL is returned we show the preview
                     url &&
                       <div className="embed-responsive embed-responsive-16by9">
                         <div className="thumbnail">
                           <video controls>
                             <source src={url} type="video/mp4" />
                             Your browser does not support the video tag.
                           </video>
                         </div>
                       </div>
                   }
                   <div className="text-center dropup">
                     <button
                       className="btn btn-default filepicker"
                       onClick={this.handleClick}
                       type="button"
                     >
                       Upload <span className="caret" />
                     </button>
                   </div>
                 </div>
                 <button
                   className="btn btn-filestack btn-block submit"
                   type="submit"
                 >
                   Submit
                 </button>
               </form>
             </div>
           </div>
         </div>
         <Footer />
       </div>
     );
   }
 }
-
- In the
constructorwe set the URL to empty string. handleClickcallsfilestackfunction to communicate with its API and then set the URL in the state.filestackfunction returns a promise. Notice thepickfunction, it receives an option object to customize the uploader:
The uploader shows up as a model where only videos are allowed to be uploaded (mimetype property).handleSubmitis the core function of the view. The curl variable is the process API string we discussed before. We convert the video withpreset:webmandaspect_mode:preserveto keep the original size of the video and formatted to webm. In addition to this, we concatenate the handle which is latest part of the URL in the state.- Finally, the render function which shows the form to the user, the components are all uncontrolled so that we can use a ref to get form values from the DOM. Once the video is uploaded a preview will be shown.
- In the
As last step, let’s update /src/containers/index.js to export Add:
import Home from './Home';
import Add from './Add';

export {
  Home,
  Add,
};
And we finished the app! To try it locally just start the api with
yarn api
And serve the client with
yarn watch-dev
Now open the browser to https://localhost:8080 and the homepage should show up!

However, we suggest you to deploy it to really see Filestack transcoding in action.
Conclusions
In this tutorial, we created a YouTube-like app where users can upload and share their favorite videos. The process consists of uploading and transcoding the video using the Filestack API.
We used Node.js (express) to write the server side while we wrote the client side with React. In both cases we entirely wrote Javascript code which is great as we don’t have to move from more than one language when writing an app.
Moreover we have seen the new Filestack V3 in action. We leveraged its ability to apply transformation to the uploaded files to transcode videos.
Lastly, we integrated the uploader and customized it to limit the upload to videos only.
I hope this tutorial went well for you! If you haven’t yet – sign up for a free Filestack account today to start taking control of your end user content with ease.
Filestack is a dynamic team dedicated to revolutionizing file uploads and management for web and mobile applications. Our user-friendly API seamlessly integrates with major cloud services, offering developers a reliable and efficient file handling experience.
Read More →