With social media platforms like Facebook, Instagram, Snapchat and Twitter becoming staples in our lives, we regularly share moments in our lives through casual images on the web.
Think about selfies: The simple term for a self-portrait photograph is a very common snapshot that invaded Facebook, Instagram and Twitter whose popularity is never decreasing.

The fact is, the rise of accessible technology has made us all photographers and put cameras in all of our pockets.
However, a smartphone does not make us all professional photographers, and outcomes are often not expected: We often shoot in the dark or in overly light scenarios or shots are not sharp enough resulting in poor quality images.

To overcome the situation we have hundreds of apps and image editors at our disposal. They let us play with color contrast, filters and so on to enhance our photos before throwing them to the public on our social media profiles. Some of them are simple to use, others do require at least basic training (who said Photoshop?) but it’s still easy to end up with grotesque results.
The good news is that Filestack Image Enhancement API is able enhance your favorite images without you manually manipulating color and filter settings: It smartly analyzes a photo and performs color correction and other enhancements to improve the overall quality of the image.
This saves us the hassle and potential mistakes, plus its integration in the client-side of your app is easy as pie.
Let’s see how to do it!
React App
For the purpose of the tutorial we are using React. As always, you can clone/fork it from my github.
The sample app has two views: A main page where the enhanced photos are listed and a /add view to enhance and send the photo to the server.
localhost:8080

Both the original and enhanced pictures are stored in the json database and shown beside each other to highlight the enhancement.
localhost:8080/add
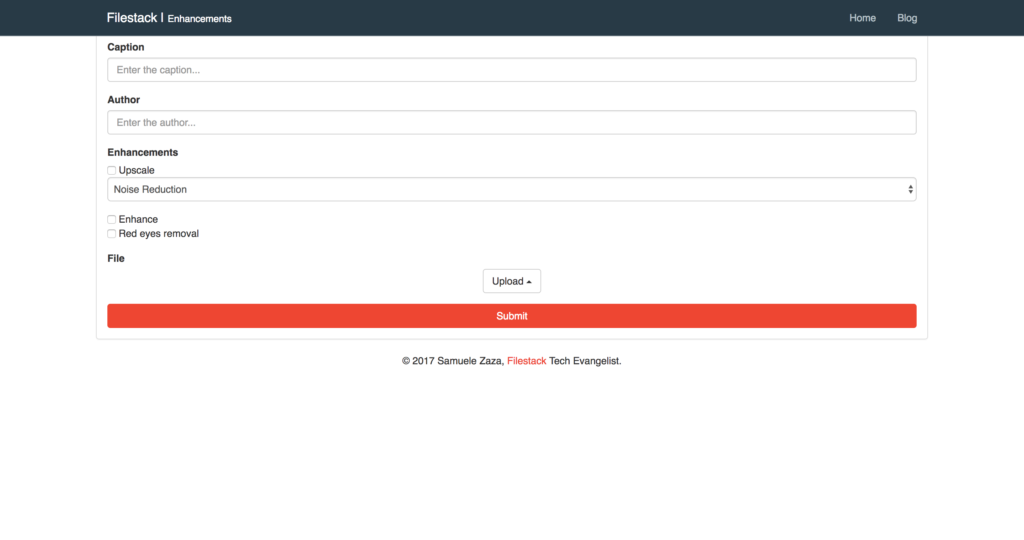
The /add view offers users the 3 image enhancements from the documentation, red-eye removal, enhancement and upscale.
Upload A Picture
There is no image enhancements without the possibility of uploading the a picture. We are going to use filestack-js, the new npm package you can simply install from the terminal.
npm install filestack-js
filestack-js provides the official client to upload images thanks to pick. Whenever the user clicks on the upload button, a function uploadImage calls pick to open a dialog:
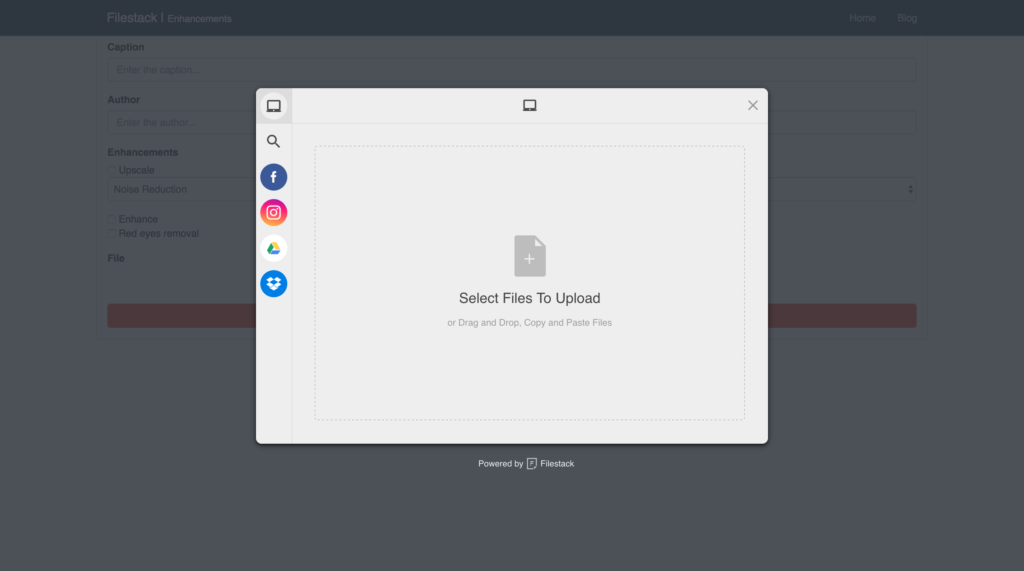
The minimalistic UI allows for drag-and-drop or file uploading from different sources listed on the left, some are actually listed by default like Facebook.
Here is the code:
filestack = () => {
  return client.pick(
    {
      accept: 'image/*',
      maxSize: 1024 * 1024 * 10,
    }
  );
};

async uploadImage () {
  try {
    const { filesUploaded } = await this.filestack();
    const handle = filesUploaded[0].handle;
    this.setState({ handle, transformation: this.setTransformation() });
  } catch (e) {
    console.log(e);
  }
}
Since pick returns a promise uploadImage can be easily written as async function. Let’s list the 3 steps for uploading and showing the picture in the view:
- We first call
filestackin charge to runpick. We set 2 constraints in the options parameter; the uploader only accept images whose size is within 10Mbs. - Once the promise resolves we receive a response carrying information about the newly uploaded photo. We take
handle. you can seehandleas a unique string representing the specific photo. - Finally, the handle is set in the app state along with the transformation.
Enhance the Picture
Perhaps you are wondering what setTransformation actually does! We have Filestack handle and thanks to the CDN url we can render the picture:
https://cdn.filestackcontent.com/ + handle
However, this renders only the raw image but we want to enhance it. Thus, we need to complete the photo URL with the specific process API syntax.
The official documentation shows the final url:
https://process.filestackapi.com/enhance/ + filestack_handle
or
https://process.filestackapi.com/API_KEY/enhance/photo_url
This is where setTransformation comes handy as it dynamically create the final url given the chosen enhancements:
setTransformation = () => {
  // users can also select red-eye and enhance
  const { getUpscale, getEnhance, getRedEyes } = this;
  return processApi + getUpscale() + getEnhance() + getRedEyes();
}
Finally, getEnhance returns the /enhance string whenever the user clicks on the specific checkbox in the form:
getEnhance = () => {
 const { enhance } = this;
 return enhance.checked ? '/enhance' : '';
}
AND THAT’S ALL!
More Image Transformations
Here is a complete list of image transformations supported by Filestack.
- Compress
- Facial Detection
- Crop
- Rotate
- Border and Effects
- Filters
- Collage
- Image Enhancements
- URL Screenshot
- Image to ASCII
- File type conversions
- Security
Filestack is a dynamic team dedicated to revolutionizing file uploads and management for web and mobile applications. Our user-friendly API seamlessly integrates with major cloud services, offering developers a reliable and efficient file handling experience.
Read More →