
When you build a printing application, one of the first challenges you face is also one of the hardest to control. Users upload files in wildly different color spaces, formats, and quality levels. Whether it’s a design created on a phone in Display P3, a JPEG exported from Photoshop without an ICC profile, or a PNG in RGB meant for a CMYK press, every file arrives with its own quirks. And without a reliable way to normalize these inputs, the result is often the same: color shifts, incorrect prints, costly reprints, and frustrated customers.
Color profile handling isn’t just a “nice to have” in print production. It’s a requirement for consistent, predictable output. But managing that workflow manually is slow, error-prone, and nearly impossible to scale. That’s where Filestack helps. By automating color space correction, format normalization, and print-prep transformations at the moment of upload, Filestack removes unpredictable variables and gives developers a stable foundation to build accurate print pipelines.
In this guide, you’ll learn why color accuracy is so difficult to control, how different color profiles affect print output, and how Filestack Workflows can automate the entire print-ready preparation process. From upload to validation to delivery, Filestack becomes the layer that standardizes every file before it ever reaches your production environment.
Key takeaways
- Color accuracy issues start at upload, not at print. User-submitted files arrive in different color spaces, formats, and quality levels, making consistency difficult without automation.
- Manual color checks don’t scale. Reviewing and fixing files by hand leads to delays, reprints, and inconsistent customer experiences as upload volume grows.
- Standardizing color early prevents costly errors. Normalizing color space, format, and resolution before production reduces color shifts and print failures.
- Filestack Workflows automate print preparation. Metadata inspection, color conversion, format normalization, and validation happen automatically at upload time.
- Preparation plus delivery creates a complete pipeline. Filestack Workflows handle print accuracy, while Filestack’s image CDN ensures fast, reliable asset delivery.
Why color accuracy is a critical issue in printing apps
Color accuracy is one of the biggest challenges in print workflows because users upload files from everywhere. One customer may upload an RGB PNG from their phone. Another might send a CMYK JPEG, a Display P3 photo, or a file with no embedded profile at all. Every upload behaves differently once it enters a print pipeline.
These inconsistencies often lead to visible color shifts. A bright red on screen may print dull or washed out. A design that looked vibrant online can suddenly appear muted on paper. When this happens, customers request reprints, refunds, or support, slowing down your production workflow.
The operational impact is even bigger.
Teams spend hours manually checking files, correcting mistakes, or explaining to customers why the print doesn’t match the preview. This leads to:
- Inconsistent output quality
- Time-consuming manual fixes
- Unpredictable customer experiences
For any printing app, these problems grow quickly as file volume increases. Without a way to standardize color before production, accuracy becomes a constant risk, affecting customer trust and your team’s productivity.
Understanding color profiles in print (quick developer primer)
Color profiles define how colors should look on different devices. They act like a translation guide that tells screens, cameras, and printers how to display or reproduce color. Without a profile, every device has to guess, often incorrectly.
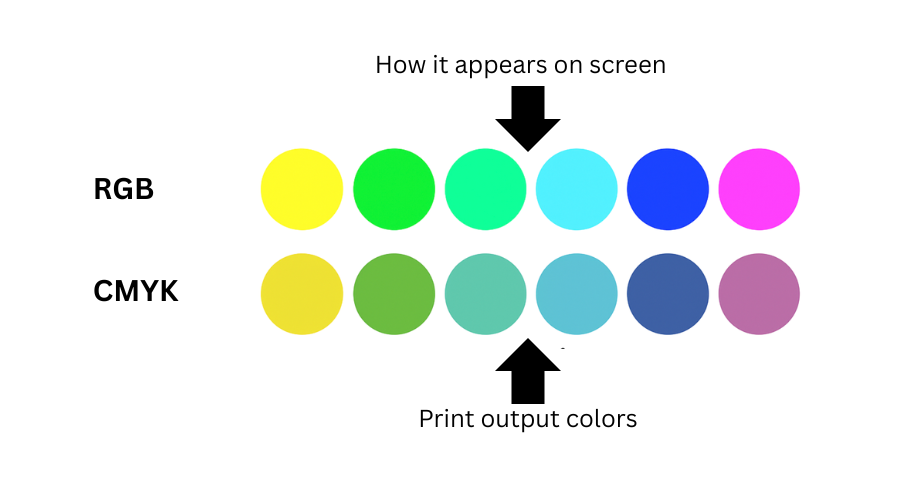
RGB vs CMYK
RGB is the color space used for screens. It’s bright, wide-gamut, and great for digital design.
CMYK is the color space used for printers. It mixes cyan, magenta, yellow, and black inks to create color on paper.
When an RGB file goes straight to a CMYK press without conversion, it rarely matches what the user saw on their screen. That is where most color complaints start.
Embedded vs assigned profiles
Some files include an embedded color profile, which tells your system exactly how the colors were meant to look. Others don’t, leaving you to guess. An embedded profile is like a map.
An assigned profile is your best guess when the map is missing. If the guess is wrong, the print output won’t match the preview.
Why print requires standardization
Print production relies heavily on consistency. Industries use standard CMYK profiles like ISO Coated, FOGRA, US Web Coated, and GRACoL to ensure predictable output across presses and vendors.
A file that’s not prepared for one of these standards can produce unexpected results. This is why normalizing color before printing is essential.
When files break
Color issues appear the moment a file doesn’t match the printing workflow.
For example:
- An RGB PNG sent to a CMYK printer
- A wide-gamut Display P3 image that loses vibrancy
- A JPEG without an embedded profile
- A PDF with mixed color spaces
These mismatches cause the typical symptoms: dull colors, shifts in tone, incorrect blacks, or prints that look nothing like the on-screen design.
The real developer problem: unpredictable user uploads
User uploads are one of the biggest unknowns in any printing workflow. Every customer uses different devices, export settings, and design tools. Thus, every file arrives with its own surprises. And when color accuracy matters, those surprises become expensive.
Here are some of the issues developers run into every day:
- PNG files saved in RGB when the print pipeline expects CMYK
- JPGs with missing or incomplete color metadata, making color behavior hard to predict
- PDFs exported in unexpected color spaces, often RGB instead of CMYK
- Images with low DPI or transparency, which can reduce print quality
- Device-specific profiles like Display P3, causing noticeable desaturation after conversion
- Files with missing or inconsistent metadata, forcing time-consuming manual checks
These inconsistencies make automated print production difficult. Even a single incorrect file can create color shifts, delays, or reprints. Multiply that by hundreds of uploads per day, and the workflow quickly becomes unmanageable.
Filestack helps eliminate this unpredictability. With Workflows, you can automatically:
- Inspect uploads
- Detect available metadata
- Convert images into consistent color spaces (like CMYK)
- Normalize formats before they enter your print pipeline
This means fewer surprises, fewer manual fixes, and a more reliable printing process, no matter what your users upload.
How Filestack simplifies color profile handling
Color management becomes much easier when the heavy lifting happens automatically. Filestack Workflows give developers a way to standardize every file the moment it’s uploaded, so printing pipelines stay predictable and consistent.
Filestack starts by detecting file information through metadata. This lets you quickly identify whether a file is ready for printing or if critical information is missing. Workflows can also inspect format, dimensions, and file properties, making it easy to catch issues before they reach production.
From there, Filestack can automatically convert images into standard color spaces like CMYK. This ensures that even if customers upload files from different devices or apps, your workflow still receives clean, consistent inputs.
Filestack also helps by normalizing file formats. Whether users upload PNG, JPG, TIFF, or HEIC, Workflows can convert them into a format your print system expects. This reduces errors caused by transparency, low-quality compression, or incompatible file types.
If a file doesn’t meet your print requirements, Workflows can reject the upload instantly. This gives users immediate feedback and prevents bad files from moving further down your pipeline.
Developers can also generate image previews and transformations, adjusting quality, resizing, or converting transparency, before the file is finalized.
All of this happens automatically using workflow triggers. Once a file is uploaded through the Filestack File Picker, the print-prep pipeline runs without any manual steps.
Your image CDN may optimize delivery, but Filestack Workflows prepare assets for accurate printing before they ever reach the CDN. This combination creates a smoother, more reliable production process, no matter how unpredictable user uploads may be.
Building a print-ready workflow with Filestack (step-by-step)
A reliable print workflow starts the moment a file is uploaded. Filestack Workflows help you standardize every image before it reaches production, so your pipeline stays predictable even when user uploads are not.
Here’s how a print-ready workflow comes together.
1. User uploads a file through the Filestack File Picker
Your user uploads a file using the File Picker:
<script src="https://static.filestackapi.com/filestack-js/4.x.x/filestack.min.js"></script>
<script>
  const client = filestack.init('YOUR_API_KEY');
  client.picker({
    onUploadDone: (res) => {
      console.log('Uploaded:', res);
    }
  }).open();
</script>
As soon as the upload completes, Filestack triggers your Print Prep Workflow automatically.
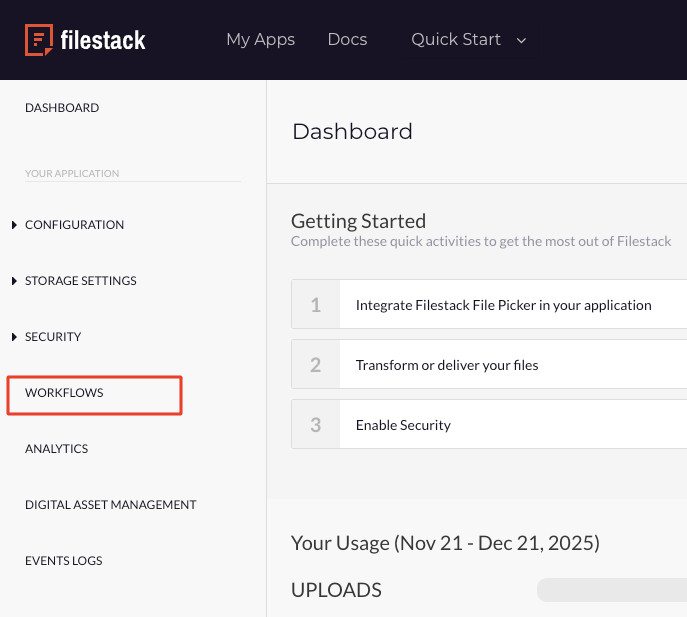
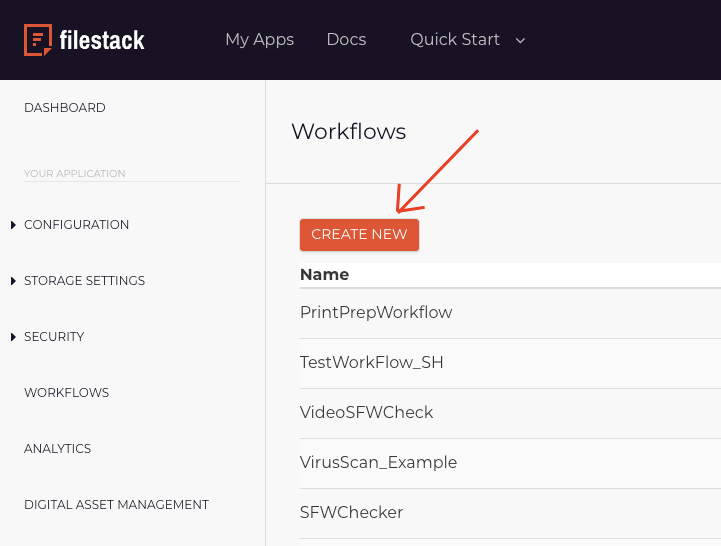
2. Create print prep workflow
Let’s create a print prep workflow with Filestack Workflow tasks. Go to Workflows in your Filestack dashboard. Then create a new workflow.
Sign up for Filestack free to create workflows.
2.1 Inspect file metadata
In your Filestack Workflow, add a metadata task to extract information like width/height, file type, size, EXIF, etc.
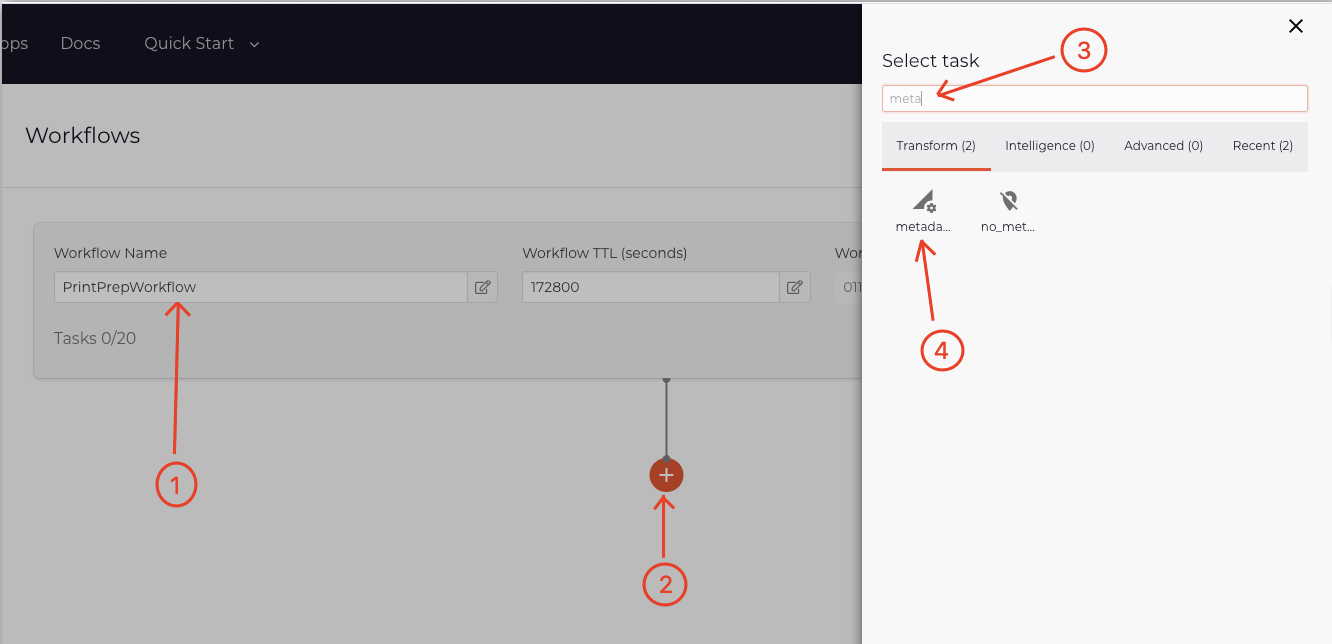
You can now use this metadata to validate or reject files.
2.2 Normalize color & format
This is where Filestack performs:
✔ RGB → CMYK conversion
✔ Format conversion (PNG → JPG / TIFF → JPG)
✔ Quality normalization
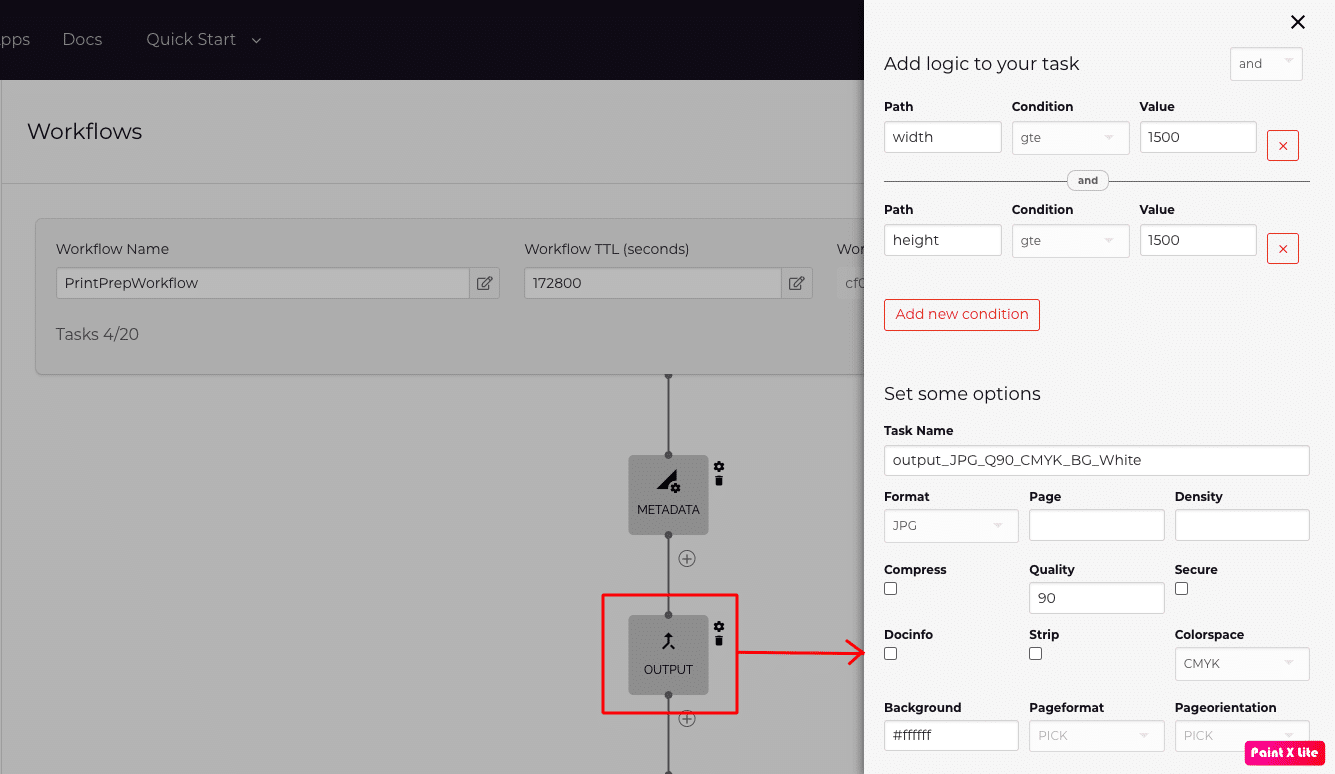
2.2.1 Add the output task to your workflow after the metadatatask.
2.2.2 Add a new condition to the output task to reject the images with low resolution: Only images with a width of 1500 pixels or greater and a height of 1500 pixels or greater are processed. Images below this resolution are rejected to maintain print quality.
2.2.3 Then set the format to JPG, Quality to 90, Colorspace to CMYK and Background to #ffffff (White) to normalize the image for printing.
This ensures consistent output for your print pipeline.
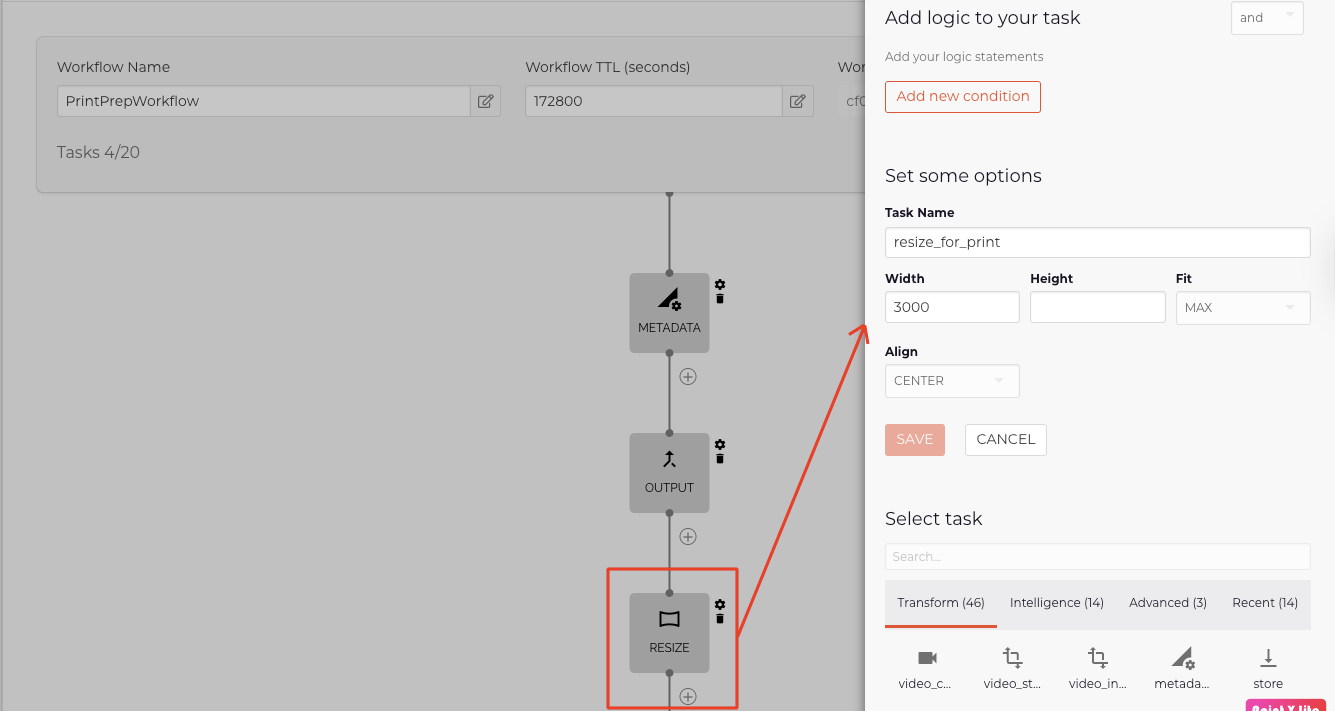
2.3 Apply print-friendly transformations
Filestack cannot flatten transparency or edit ICC profiles, but it can normalize files in print-friendly ways, such as:
- Resize
- Convert transparency → solid background (we have already done this in section 2.2.3)
- Enforce minimum dimensions (this was also done in section 2.2.2)
2.3.1 Add the resize task to your Filestack Workflow to transform your image to a printable version. Set the dimensions as you want for your printing.
2.4 Store the processed image
Finally, add the store task to your workflow. You can see the complete workflow as below:
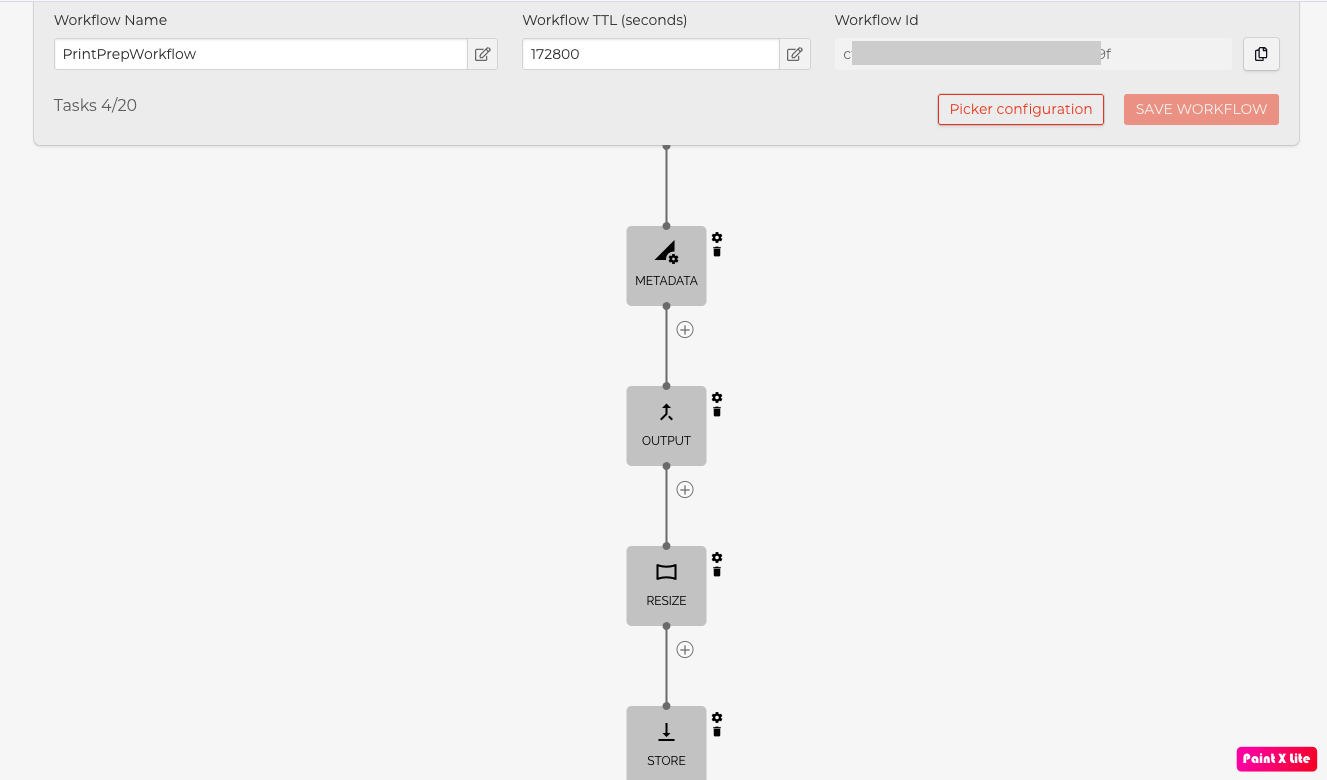
This workflow ensures files meet print dimension and format requirements.
Don’t forget to save your workflow in each step and at the end.
3. Run the workflow
After creating your workflow in Filestack dashboard, you can run it with Filestack Workflows API on your uploaded files and receive the response to your browser.
The base URL for your workflow API is:
https://cdn.filestackcontent.comHere is a sample URL to run the workflow:
https://cdn.filestackcontent.com/security=p:${policy},s:${signature}/run_workflow=id:${WORKFLOW_ID}/${fileHandle}- You can generate a Filestack security policy and signature in the Filestack dashboard or programmatically. Best practice is to create and store them on the server side (I will show you how to do it in my example).
- You can get the Workflow ID from the workflow you created in the Filestack dashboard – workflow section.
- When a file is uploaded through the Filestack File Picker, the response includes the uploaded file’s handle in the filesUploaded array.
When you run the workflow using the Filestack Workflow API, it returns a job ID, which you need to get the status and the file handle of the processed image in the next step.
4. Get the workflow status
After requesting to run your print prep workflow via the Workflows API, your app should send a Workflow Status request to retrieve the workflow’s result, since Filestack Workflows run asynchronously.
/workflow_status/In this print prep workflow case, you can use the URL below to get the result back:
https://cdn.filestackcontent.com/${FILESTACK_API_KEY}/security=p:${policy},s:${signature}/workflow_status=job_id:${jobId}- You can copy and paste the Filestack API key from your Filestack dashboard.
- Use the same security policy and signature that we used in the Workflows API request earlier to run the workflow.
- You will get the job ID to use in this request with the response of the Workflows API request we used in the previous step to run the workflow.
The response to this request includes the file handle of the processed image. You can use this handle to deliver the print-ready image through Filestack’s CDN and send it directly to production.
You can get the complete example in this GitHub repo.
Run this example locally and see how it works.
Learn more in the Filestack documentation.
Conclusion: A reliable color workflow for print developers
Color issues in print don’t start at the press—they start with unpredictable user uploads. Different devices, color spaces, and file formats introduce inconsistencies that lead to color shifts, reprints, and wasted time.
Filestack helps eliminate this risk by automating color space normalization, format validation, and print-prep steps at upload time. With Filestack Workflows, every file entering your pipeline is inspected, standardized, and prepared for print automatically—reducing manual effort and improving consistency.
Paired with Filestack’s image delivery capabilities, including its Free Images CDN, developers get a complete solution for preparing and delivering print-ready assets with confidence.
If you’re building a printing application, Filestack Workflows give you a scalable, predictable foundation for accurate print production.
Sign up free today and start building your print-ready workflow with Filestack.

Shamal is a seasoned Software Consultant, Digital Marketing & SEO Strategist, and educator with extensive hands-on experience in the latest web technologies and development. He is also an accomplished blog orchestrator, author, and editor. Shamal holds an MBA from London Metropolitan University, a Graduate Diploma in IT from the British Computer Society, and a professional certification from the Australian Computer Society.
Read More →