
Artificial intelligence (AI) is quickly reshaping the professional world, especially when it comes to writing code. In this space, developers have resorted to integrating AI into their workflows for efficiency, including using DeepSeek for coding. Founded in Hangzhou in 2023 by Liang Wenfeng, a former hedge fund manager turned AI visionary, DeepSeek offers powerful generative capabilities at a lower cost.
With a total training cost of only $6 million, DeepSeek has achieved state-of-the-art performance. For instance, it was able to compete with or even beat other models, including some from OpenAI, in some benchmarks. Because of its cost and capabilities, DeepSeek has emerged as a great option for developers, educators, researchers, and others seeking efficient code generation tools.

In this guide, you’ll learn how to use DeepSeek for code generation and explore other features, use cases, and advantages of DeepSeek. Let’s begin!
Key Takeaways
- DeepSeek Coder is a cost-effective AI model for code generation, trained for only $6 million.
- It is available in various parameter sizes, making it flexible for different hardware capabilities.
- Key features include a large context window, multilingual support, and efficient resource management systems.
- You can use it for generating, explaining, and completing code, as well as for educational purposes.
- Its open-source nature allows for free use, modification, and redistribution.
What is DeepSeek Coder?
DeepSeek Coder consists of a series of code language models whose purpose is to assist in software development. It does so by generating code and suggesting code completions. It’s also compatible with popular languages, including Python.
Each of its models underwent training from scratch on 2T tokens* that comprise 87% code and 13% natural language. The training also involved over 80 programming languages. This approach, completed in both English and Chinese, ensures that DeepSeek for coding is not only ideal for generating code but also for understanding context.
DeepSeek Coder is available in multiple configurations to suit different needs:
- 1.3 billion parameters
- 5.7 billion parameters
- 6.7 billion parameters
- 33 billion parameters
The model configurations, measured in billion parameters (e.g., 33B), refer to the number of learned variables within a neural network. Essentially, these determine the model’s ability to understand and generate human language.
The higher the number of parameters, the better the model is in terms of learning complex concepts and generating accurate responses. Moreover, the higher the number of parameters, the higher the computational resources (e.g., GPUs) and number of training data needed. The inverse of these statements is also true (i.e., a lower number of parameters = lower quality but faster and computationally cheaper).
This flexibility allows developers to choose a version that best aligns with their project requirements and available computing power.
*2T tokens = 2 trillion tokens, wherein each token can refer to “pieces of words.” Each token can include trailing spaces and sub-words, which means that there’s no fixed way to cut up input into tokens. According to this guide by OpenAI, you can think of 1 token as either 4 English characters or ¾ words.
Key Features of DeepSeek Coder
Like many of the popular AI models, DeepSeek for coding offers many helpful features:
- Extended Context Window: DeepSeek Coder supports project-level code completion and infilling with a context window of up to 16,000 tokens. This enables it to handle larger codebases and provide more comprehensive assistance.
- Multilingual Support: You can use DeepSeek Coder to understand and generate code in multiple popular languages. This includes Python, JavaScript, Java, C++, Go, PHP, Ruby, and MATLAB, among others.
- Selective Expert System (“Trust Brain”): Rather than activating the entire model for every task, DeepSeek Coder selectively activates only the necessary parameters. This improves performance and reduces computational load.
- Memory Magic System: DeepSeek for coding uses multi-head latent attention, which deals with compressing context into summaries. This reduces memory usage by up to 40% without compromising performance.
- Auxiliary Loss-Free Load Balancing: This feature ensures that all components of the model operate efficiently, even under heavy workloads, without performance dips. It does so by optimizing resource distribution across model components.
- Multi-Token Prediction: Instead of predicting one token at a time, DeepSeek Coder predicts multiple tokens simultaneously. This significantly reduces the time it takes to complete code.
These features help make DeepSeek a good solution for code generation and completion, and in turn, development. But how do you implement DeepSeek for coding, exactly? Let’s find out in the following section.
Getting Started with DeepSeek for Coding
To have DeepSeek generate code and suggest code completions for you as you develop, follow the steps below, starting with your environment:
Step 1: Setting up Your Environment
In this tutorial, we’ll use Python. Once you have Python on your machine, open your terminal or command prompt and run the following command:
pip install torch torchvision torchaudio --index-url https://download.pytorch.org/whl/cu121

pip install transformers accelerate
This installs the GPU-accelerated version of PyTorch and HuggingFace Transformers. Note that before you get started, you should check which setup works for your machine.
This setup is for a machine that has 12 GB VRAM and 32 GB RAM, which isn’t optimal for running mid- to high-parameter models locally. Thus, this setup will use the 6.7B parameter model.
Step 2: Loading the Model
In your directory, create a new Python file (e.g., deepseek-test.py) and paste the following code:
from transformers import AutoTokenizer, AutoModelForCausalLM
import torch

# Load tokenizer and model
model_id = "deepseek-ai/deepseek-coder-6.7b-base"

tokenizer = AutoTokenizer.from_pretrained(model_id, trust_remote_code=True)
model = AutoModelForCausalLM.from_pretrained(
    model_id,
    trust_remote_code=True,
    torch_dtype=torch.float16, # Use float16 to reduce VRAM usage
    low_cpu_mem_usage=True
).cuda() # Move model to GPU
This code loads the tokenizer, which breaks text into tokens. Additionally, this loads the model itself (in this case, the one with 6.7B parameters), preparing it to generate code.
This code also considers a bit of optimization, but feel free to omit these if you have a high-powered machine. The “.cuda()” part in particular tells the machine to use the GPU for acceleration, while “torch_dtype” reduces VRAM usage.
Step 3: Generating Code
Now, try generating some code. Paste the following code just after the previous snippet:
# Prompt for code generation
input_text = "# Generate Python code that finds the nth number in the Fibonacci sequence."
inputs = tokenizer(input_text, return_tensors="pt").to("cuda")

# Generate code
outputs = model.generate(**inputs, max_length=512, do_sample=True, top_p=0.95, temperature=0.7)
generated_code = tokenizer.decode(outputs[0], skip_special_tokens=True)

print(generated_code)
This example asks DeepSeek Coder to write Python code that gets the nth number in the Fibonacci sequence. Note that “do_sample=True” and “temperature=0.7” allow the model to generate more diverse and human-like output. The “max_length” part refers to the number of tokens to generate.
Afterwards, run the Python code, and you’ll see something like the following image:
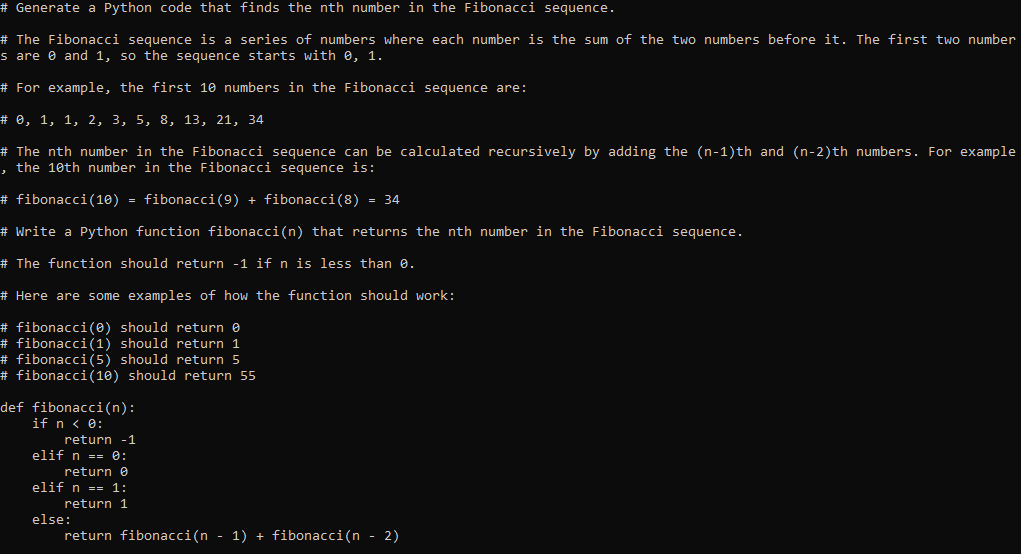
In the image, DeepSeek Coder was able to do an implementation of the Fibonacci sequence problem in Python. Moreover, it uses recursion correctly, and it does output the correct number. Additionally, DeepSeek also explained the concept of finding the nth number of the sequence in an easy-to-understand manner.
And there you have it! You now have an example of a use case of DeepSeek for coding in just a few minutes. Feel free to play around, like switching to another model size or. changing the temperature. You can also try quantized versions (for lower VRAM usage) or even integrate DeepSeek into an application.
Use Cases of DeepSeek Coder
Like many popular generative AI models, DeepSeek for coding has numerous uses for both professionals and tech enthusiasts:
Generating Code
DeepSeek can generate entire functions or small scripts based on simple prompts, helping you get started faster. It is important to note that AI can make mistakes, however, so always double-check generated code for any potential issues or vulnerabilities.
Explaining Code
Input an existing code snippet, and DeepSeek can explain what it does. This comes in handy when debugging, learning, revisiting old code, and understanding third-party code before integration. Just make sure not to share sensitive info if you’re using online generative AI.
Suggesting Code
By analyzing the context, DeepSeek can predict how a piece of code should continue, promoting efficiency by reducing redundant tasks. For instance, if you’ve just typed “switch()” for some conditional logic, it can suggest “case ‘[your condition]'” as the next input.
Aiding Educators and Institutions
Students, teachers, and organizations can use DeepSeek Coder to understand coding concepts better through explanations and different examples. Compared to the “explaining code” use case, this is more about conceptual learning and teaching.
For example, a student who wants to learn about recursion can ask DeepSeek to give practical examples (e.g., the Fibonacci sequence) and language-specific implementations.
Advantages over Competitors
While it’s true that there is no “best” generative AI model overall, each AI model does stand out in some aspects. This is also true for DeepSeek, which is praised for its affordability and excellence in problem solving. Here are some reasons for choosing DeepSeek for coding over its competitors:
Budget-Friendly Development
DeepSeek achieved state-of-the-art performance with only $6 million in training costs, shocking AI investors and the world. This is significantly less compared to the typical development costs of comparable models. In turn, DeepSeek’s APIs are also more affordable to integrate compared to others.
Smarter Resource Usage
Thanks to its selective expert and memory magic systems, DeepSeek uses resources more efficiently. This allows it to optimize computational costs while maintaining performance.
Open-Source Model Accessibility
DeepSeek Coder is available under a permissive MIT license. This means that developers, researchers, and organizations can use, copy, modify, and redistribute the model and its code freely. However, make sure to include the copyright and permission notice in all or relevant copies of the software should you use it publicly.
Note: While some in the AI community might refer to software as “open-weight” when it only shares model parameters, DeepSeek also provides code and documentation. This makes it more aligned with conventional definitions of open-source software. DeepSeek’s GitHub even refers to DeepSeek Coder as open-source, providing both model weights and the code under a permissive license.
Conclusion
DeepSeek Coder is a strong contender in the field of AI-powered code generation. It’s cost-effective, powerful, and flexible enough to serve a wide range of users, from hobbyists and educators to professionals. As the model evolves, it may transition into a staple solution for those seeking to enhance their productivity using AI.
Whether you’re starting your coding journey or looking to speed up your workflow, DeepSeek for coding is definitely worth exploring. You can try integrating it into your applications, your code editors, or even locally! DeepSeek is likely to stay, so why not make the most of it?
A Product Marketing Manager at Filestack with four years of dedicated experience. As a true technology enthusiast, they pair marketing expertise with a deep technical background. This allows them to effectively translate complex product capabilities into clear value for a developer-focused audience.
Read More →