Front end development throws a lot of shade over back end processes these days, especially in the land of JavaScript. Originally a language targeting browsers, JS has matured into every nook and cranny of modern development as a de facto tool. The syntax for interacting with various libraries in JavaScript can be confusingly identical between front end and back end environments, so it helps to have a clear picture of what is going on. We’ll discuss the context briefly below, and then I’ll end with my own recipe for you to upload files with node.
The Problem: Information Overload
Searching for “JavaScript File Uploads” will yield an abundance of results, but it can be hard to tell at first glance which practical examples are targeting your specific needs. SDKs often don’t care that much where they’re run, so it is up to the developer to clearly understand the nuances involved.
Uploading Files
What are we talking about when we say “upload”? The notions of “up” and “down” imply server and client storage, respectively. We’re taking a source file and moving it from one storage location to another. When we’re building on the front end, it’s pretty clear that the user’s client is the “down” location, and uploading will move a copy of the user’s file from their client “up” to a server, cloud, or CDN. When we’re building on the server though… Which way is up?
Understanding Filestack’s Architecture
When you utilize Filestack’s Software as a Service (SaaS), you’re unleashing a massive global network with powerful features. You’re skipping the research and development of functionality for effective uploads, transformations, delivery, and intelligence. All of this starts by getting your content (and/or your users’ content) in to that world. You can bring your own storage back end, like Amazon’s S3 buckets, or use our default storage. You can interact with our REST API directly, or take advantage of one of our SDKs. You can bring any language, any architecture, and any content strategy.
If you’re the one configuring your account, you can set different back end storage options and preferences. If not, you can completely ignore what is happening behind the scenes and just write code. In that scenario, “upload” is as simple as handing off the content to Filestack’s system. We can do that by moving a file from the same computer running node, or even use node as a transport to move a file from elsewhere. The end result is that the file enters the Filestack world, and we’re calling that an “upload” in this case (even if what’s happening might look more like a side-load, or a cross-load, or a down-then-up-again load — that’s up to you!).
The Solution: Use Filestack’s JS SDK
Don’t reinvent the wheel! Here’s a lightning-fast solution to uploading your files from a node project to the cloud, using Filestack’s JavaScript SDK. Even more importantly, we’ll make it clear what is happening, and how that would be different if approaching this problem from the front end.
Obtain the SDK
JavaScript used to have two major systems for obtaining packages and libraries. On the front end, we used bower. Packages in bower were suited to front end delivery, so it made sense to run one tool to pull them all in to your project. On the back end, npm was king. Those packages were intended to run inside of node, often within the MEAN stack in the early years of full stack JS development.
Now, projects are increasingly building everything with complex tool chains. Instead of including a .js file in your HTML to get a front end framework or library, we’re using transpilers and other processing tools to generate the code we ship to the browser. No longer are we wiring together different libraries directly in the browser; even the Bower project itself recommends using Webpack as a more modern solution to the older problems. We write in super-languages like TypeScript, and then all of the code and imported libraries are processed and shaken down into a dense, optimized, shippable bundle at the end.
This can be confusing at first glance, especially if you’re new to the world of JavaScript. You can obtain an SDK such as Filestack’s JavaScript SDK so many ways:
- git clone https://github.com/filestack/filestack-js.git, to pull the source
- Downloading the GitHub source as a .zip file and unpacking it on your machine
- npm install filestack-js, to pull the npm package into your project
- npm install -g filestack-js, to pull the npm package into your global system
- yarn install filestack-js, to pull the same npm package (but using yarn instead of npm)
- yarn global add filestack-js, to add the npm package to yarn’s global installation
- Adding the filestack-js package as a dependency inside of package.json in your project’s root folder, then running either `npm install` or `yarn install` inside of that folder…
That’s just the short list! Let’s break it down: ultimately you want the filestack-js package to be available from within your node code. That’s it. The code that goes into that package comes from GitHub, and may be passed around by different tools, but at the end of the day it just needs to land inside your project where you can call its functionality. You don’t need to install it globally, nor do you need to do anything fancy to get it in there. One method is as good as another.
Fun fact: as described earlier, many projects are moving to write in TypeScript and then transpile the exported code as JavaScript. Filestack’s SDK does exactly that! The source code is written in TypeScript, which itself is an npm module that is imported as a requirement. This all happens seamlessly, automatically, behind the scenes, so you can just focus on your code!
Use the SDK
Once you have the filestack-js npm package installed, you’ll be able to see it inside of the project’s directory. For example, if I ran `npm init` inside of a directory called my-test-directory, and then ran `npm install filestack-js` in that same directory, I’d be able to see my-test-directory/node_modules/filestack-js/ to confirm that it is there. You’ll also see a ton of other packages that were installed inside of the node_modules directory; that’s ok! They were brought in for support, as requirements of the package you installed. This directory structure is magic: Node specifically looks inside of the node_modules location for the names of modules you call from within your code.
A Simple Recipe for Node Uploads
Requirements:
- Node, v10 or better should do
- NPM, usually installed when Node is installed
- A Filestack API Key (get a free account if you need one)
Create a file to test inside of the directory where you have `npm install filestack-js`’d the SDK. I’ll call mine `test.js`.
Include the Filestack SDK by adding it at the top of your file:
const client = require('filestack-js').init("APIKEY");If you want to set your API key as a variable, add it above that line:
const apikey = "FOOBAR123"; // Change to your API KEY here
const client = require('filestack-js').init(apikey);
Otherwise, it’s OK to just change the argument you pass to the .init() from `APIKEY` to your actual key. You’re just using a shortcut, running the init() function at the same time as you require it in your code. The init() function expects an API key so it knows which account you’re dealing with. It is possible for you (or your organization) to have multiple API keys, each running on their own service plan. This allows different projects to adapt to different usage levels and features as needed. Each API key corresponds to an “app” in Filestack’s system.
We now have a constant variable inside of our code called “client” that is an instance of the Filestack SDK, and all we have to do is utilize its functions to interact with it. Here, we’re interested in a simple upload:
https://filestack.github.io/filestack-js/globals.html#upload
By calling client.upload() and passing it the required arguments, we should be good to go! This can be as simple as passing in a string which describes the path to a file:
client.upload("./assets/images/palmtree.jpeg");However, this just ships the file off to Filestack without capturing any information about how that turned out. The upload function returns a Promise, meaning that when everything plays out we can get a nice view of the results. Promises, similar to the English word they’re named after, are forward-looking statements that set our expectations. In this case, we expect an object with information about our upload containing things like the status (“Stored”, once it has been stored), mimetype (“image/jpeg” in this example), size (14634 Bytes with the example image I chose), filename (which we actually provided, but good to have on hand), url (the link we can use to access this file via Filestack’s CDN), and of course the handle: a unique identifier assigned to this upload that does exactly what it sounds like, providing us something to grab it by as we do stuff with it down the road.
When a Promise comes back (we say when because our code patiently waits for the result to resolve), it provides us with a special function we can use to capture the result (or an error, if that’s what we receive). This function is called .then(), and we can write a little code to run “inside” of this land-of-the-future:
const myFile = './assets/images/palmtree.jpeg';

client.upload(myFile).then(
  function(result){
    console.log(result);
  },
  function(error){
    console.log(error);
  }
);
When I run this, I get the following result:
{
  handle: 'p1czPBTFTpGZWEWmiiSZ',
  url: 'https://cdn.filestackcontent.com/p1czPBTFTpGZWEWmiiSZ',
  filename: 'palmtree.jpeg',
  size: 14634,
  mimetype: 'image/jpeg',
  status: 'Stored'
}
That’s it! We have successfully “uploaded” a file from our local machine to our Filestack app using node.
But, I’m Lazy!
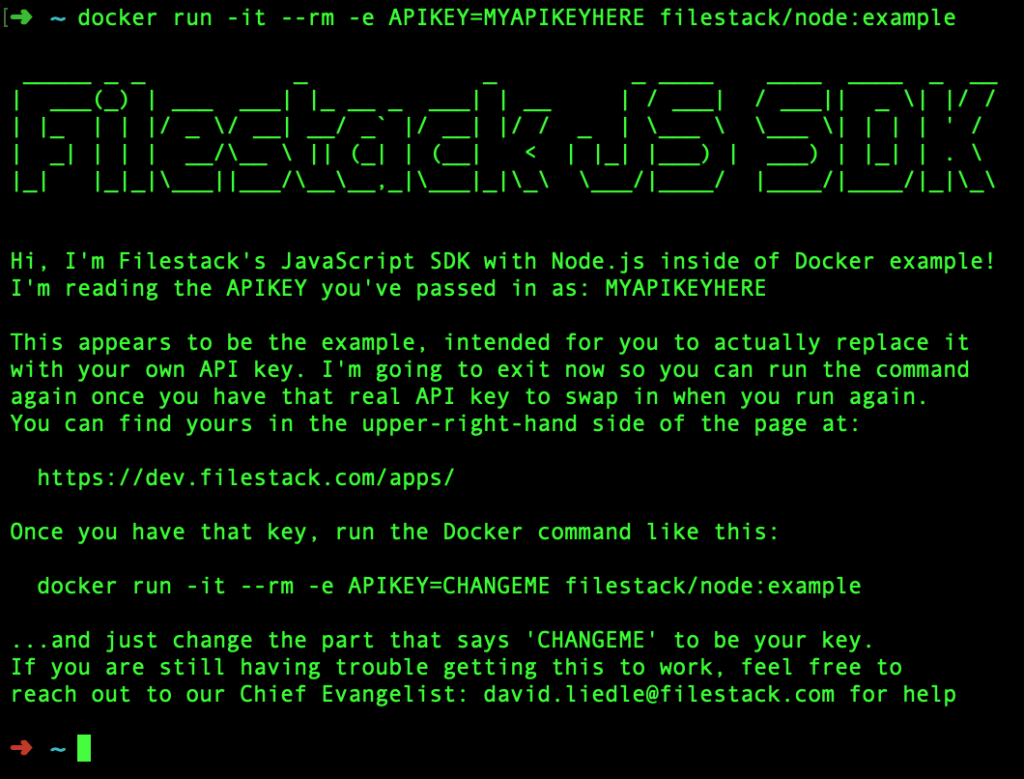
Ok, here’s an even shorter path to try this out on any machine: if you have Docker installed on your system, you can run the test above with the following command:
docker run -it --rm -e APIKEY=MYAPIKEYHERE filestack/node:exampleThis will spin up the example image and put you inside an interactive shell. Just substitute your Filestack API Key in the example command above, and then the example image (a palm tree obtained from Google Image Search with the usage rights filter set to reuse with modification) will be uploaded to your very own app automatically. The command line will give you further information as it runs, so read the output carefully for even more cool stuff you can do with it.
This has just been a tiny peek at what you can do with Filestack’s JavaScript SDK on the server side with node. To learn more, check out https://www.filestack.com/products/file-upload/ and explore our docs for detailed features and implementation instructions.
David Liedle is Filestack’s Chief Evangelist. He works remotely in New York City with his wife and son, and their kitty. See more at https://DavidCanHelp.me/
Read More →