Every print shop has faced this problem. A customer uploads a file. The order is added to the queue. But when it’s time to print, someone notices a mistake.
Maybe the images are low quality.
Maybe the bleed is missing.
Maybe the fonts don’t work.
Now the job is delayed. Files need fixing, and customers get frustrated.
In fact, about 30% of print files have problems. Fixing them can delay printing by up to two days.
If you run a print shop, a print-on-demand service, or manage marketing materials, you need a way to catch these mistakes early, before printing starts.
That’s why automated file checking (called preflight validation) is important. It checks the file automatically and finds problems right away.
In this checklist, you’ll see the 10 most important things to check. You’ll learn:
- What to check
- Why it matters
- How to check it (manually or automatically)
Before we go step by step, here’s a quick summary of what matters most.
Key Takeaways
- Up to 30% of print files fail validation, which causes 48-hour delays. Automated preflight checks catch errors at upload time, instead of print time.
- The most common issues are resolution, color mode, and bleed. Always check that images are 300 DPI or higher, the file uses CMYK color mode, and there is a 0.125″ bleed.
- Fonts and transparency matter a lot. Fonts should be embedded in the file, and transparency should be flattened. These problems usually cannot be fixed after the PDF is created.
- Automation saves time. Using automated validation tools (like webhooks and processing APIs) removes the need for manual checks and gives users instant feedback if something is wrong.
- It’s better to prevent problems than fix them. Catching errors at upload costs very little. Fixing them during production costs much more in time and money.
Now let’s break this down into the exact checks your system should enforce.
1. File Format & Compatibility
The Rule
Only accept print-friendly formats like PDF/X-1a, PDF/X-4, TIFF, or EPS. For PDFs, make sure fonts are embedded, and transparencies are flattened.
Why It Matters
Different file formats handle color, fonts, and transparency differently. A standard PDF might look perfect on screen, but print incorrectly because fonts aren’t embedded or transparencies aren’t flattened. PDF/X formats are made specifically for printing, so they’re more reliable.
How to Validate
Manual:
Open the file in Adobe Acrobat.
- Check the PDF standard in Properties.
- Make sure all fonts show as “Embedded.”
Automated:
Use a file processing API to extract file metadata and validate the PDF version and subtype. Check for font embedding status and flag any files that don’t meet your requirements. For non-PDF formats like TIFF or EPS, verify the file can be opened and parsed without errors.
If you accept different image formats from users and need to convert images to a print-ready format like JPEG, it’s best to standardise everything into one format during upload. This makes validation easier and reduces printing issues later.
Once you confirm the file format is correct, the next step is checking image quality. Even a perfect PDF format won’t help if the images inside are low resolution.
2. Resolution & DPI
The Rule
Set clear minimum quality rules:
- 300 DPI for photos and regular images.
- 1200 DPI for logos and vector graphics.
- 2400 DPI for very fine text or line art.
Anything below this should not be accepted.
Why It Matters
Images that look fine on a screen (usually 72–96 DPI) will look blurry when printed.
Also, there’s an important difference between:
- Embedded resolution: What the file says it is.
- Effective resolution: The real resolution after resizing.
For example, if a 300 DPI image is enlarged to 200%, its effective DPI becomes 150. That means it will print blurry.
Example: Failed vs Passed
| Check | Failed File | Passed File |
| Image Size | 1200px wide at 8″ print size | 3000px wide at 8″ print size |
| Effective DPI | 150 DPI (blurry) | 375 DPI (sharp) |
| Print Result | Pixelated, soft | Crisp and professional |
| Validation Result | Reject | Approve |
How to Validate
Manual:
In Photoshop:
Go to Image → Image Size and check:
- Pixel dimensions
- Resolution (DPI)
In InDesign or Illustrator, use the Preflight panel to check the effective resolution after scaling.
Automated:
Use an API to get:
- Image width in pixels
- Physical print width in inches
Then calculate:
effective_DPI = pixel_width / print_width_inchesIf it’s below 300 DPI, reject or flag the file.
Example logic:
// Conceptual validation logic
const imageWidth = 3000; // pixels
const printWidth = 8; // inches
const effectiveDPI = imageWidth / printWidth; // 375 DPI - PASS

if (effectiveDPI < 300) {
  // Reject or flag for correction
}
This ensures only sharp, print-ready files move forward in your workflow.
Resolution ensures sharpness. Now let’s look at color accuracy, which affects how the final print actually looks.
3. Color Space & Profiles
The Rule
Use the correct color mode for printing:
- CMYK for offset printing.
- RGB only if your digital or DTG printer specifically allows it.
Also, make sure the correct ICC color profile is embedded (such as SWOP or FOGRA, depending on your region).
Why It Matters
Screens use RGB, and printing presses use CMYK.
If you send an RGB file to a CMYK printer, it will automatically convert it. This can change the colors:
- Bright blue can look dull.
- Red can shift toward orange.
- Colors may not match the proof.
If the ICC profile is wrong or missing, colors may look different between proof and final print.
How to Validate
Manual:
In Photoshop:
Go to Image → Mode and confirm it says CMYK.
In Adobe Acrobat:
Open Output Preview to check which color spaces are used in the file.
Automated:
Use an API to extract:
- Color mode (RGB or CMYK)
- Embedded ICC profile
If the file is RGB when CMYK is required:
- Reject it, or
- Trigger an automatic conversion workflow
Also, compare the embedded ICC profile against your approved list.
If you want a deeper technical breakdown, see our guide on how to standardize color profiles automatically before files hit your print pipeline.
After confirming the colors are correct, you need to verify the physical layout of the file, starting with bleed and safe zones.
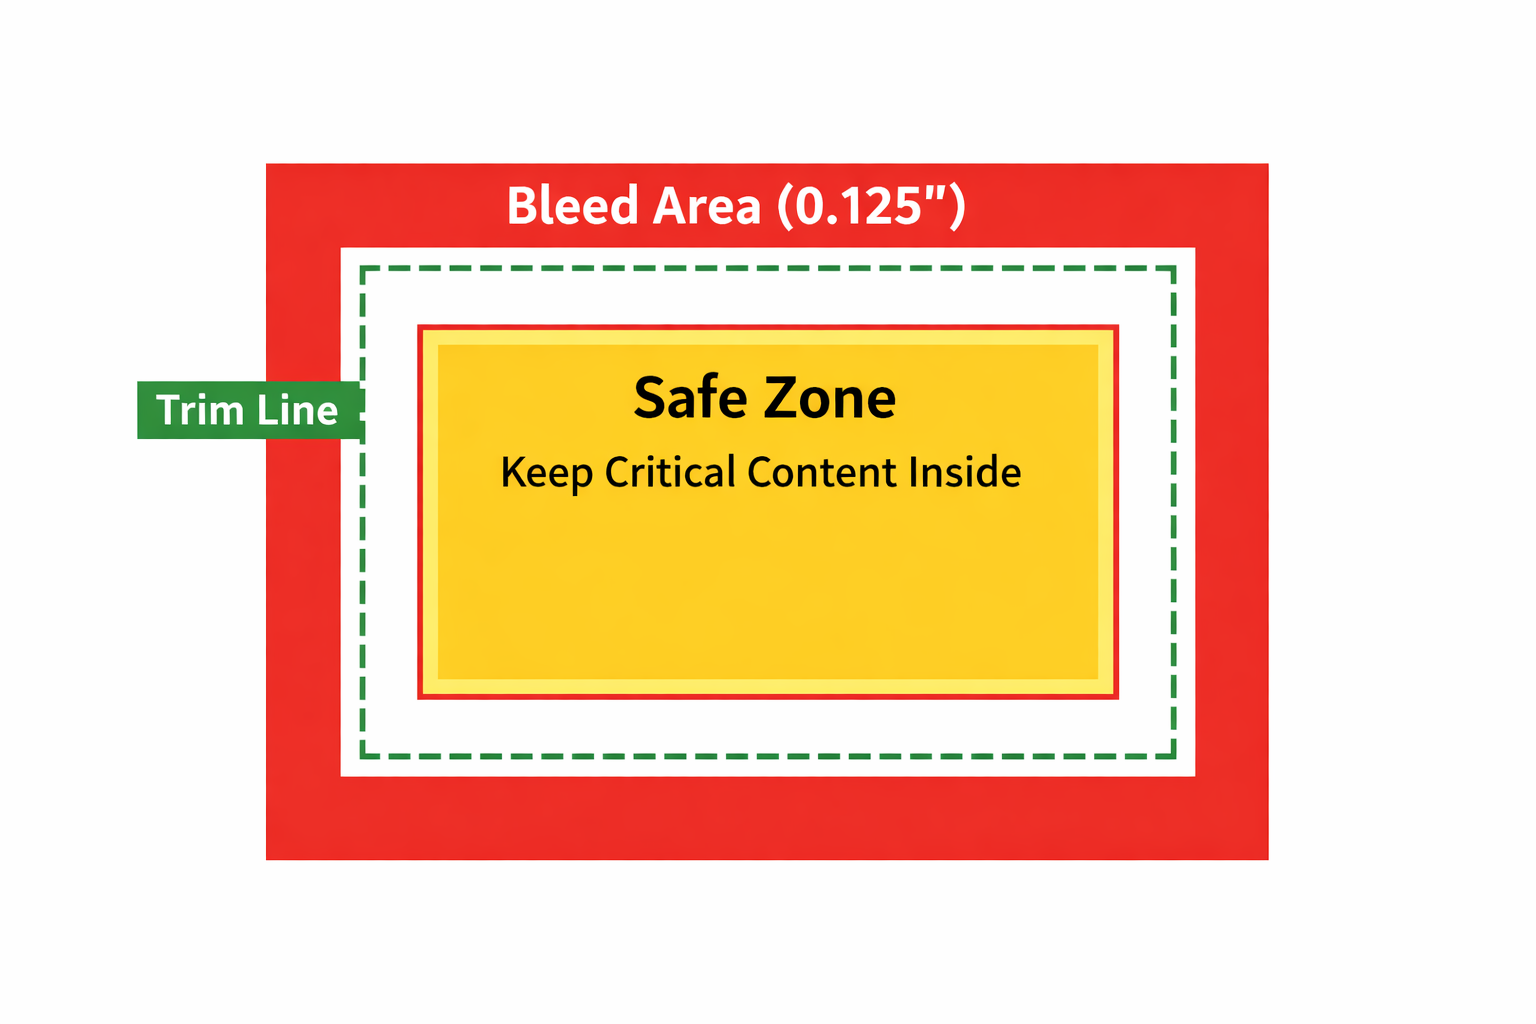
4. Bleed & Safe Zones
The Rule
Make sure:
- The design includes 0.125 inches (3mm) of bleed on all sides.
- Important content (text, logos, faces) stays at least 0.125 inches inside the trim line (safe zone).
This gives the printer enough extra space to trim the paper cleanly.
Example: Failed vs Passed
| Check | Failed File | Passed File |
| Bleed | No bleed area | 0.125″ on all sides |
| Text Placement | Text near trim line | Text inside safe zone |
| Print Result | White edges possible | Clean edge-to-edge print |
| Validation Result | Reject | Approve |
Why It Matters
Paper cutting isn’t perfectly precise. If there is no bleed, you may see thin white edges after trimming. If text or logos are too close to the trim line, they may get cut off. These are among the most common and most visible print failures.
How to Validate
Manual:
In your design tool:
- Turn on rulers and guides.
- Measure the bleed area outside the trim line.
- Check that background elements extend into the bleed.
- Make sure text stays inside the safe zone.
Automated:
Use an API to read PDF page boxes:
- TrimBox → final size
- BleedBox → size including bleed
Calculate the bleed:
bleedAmount = (bleedBoxWidth - trimBoxWidth) /2If it’s less than 0.125″, reject or flag the file.
Example logic:
// Conceptual PDF box validation
const trimBoxWidth = 8.5; // inches
const bleedBoxWidth = 8.75; // inches
const bleedAmount = (bleedBoxWidth - trimBoxWidth) / 2; // 0.125" - PASS

if (bleedAmount < 0.125) {
  // Flag insufficient bleed
}
This ensures every file prints cleanly without white edges or cut-off content.
With layout and trimming handled, the next step is checking the technical properties of embedded images, including color mode and bit depth.
5. Image Mode & Bit Depth
The Rule
Make sure:
- The image is not in Indexed Color mode.
- Bit depth is correct:
- 8-bit per channel for most CMYK images
- 16-bit only if high-end tonal quality is required
- 1-bit only for true black-and-white line art
Why It Matters
Indexed Color limits the image to only 256 colors.
This can cause:
- Color banding
- Rough gradients
- Inaccurate color reproduction
Bit depth also affects quality and file size:
- Using 16-bit when not needed makes files unnecessarily large.
- Using 1-bit for photos destroys image detail.
Choosing the right mode keeps both quality and performance balanced.
How to Validate
Manual:
In Photoshop:
- Go to Image → Mode
- Make sure it does not say Indexed Color
- Check the bit depth in the title bar (for example, “CMYK/8” or “RGB/16”)
Automated:
Use an API to extract:
- Image color mode
- Bit depth
If the file is in Indexed Color, flag it for conversion to RGB or CMYK.
Also check:
- 1-bit images: allow only if they are intentional line art
- 16-bit images: allow only if your workflow supports it
This ensures consistent color quality without unnecessary file size issues.
Images are only one part of a print file. Text must also be handled properly, which brings us to font embedding.
6. Font Embedding & Outline
The Rule
Make sure every font in the PDF is:
- Fully embedded, or
- Converted to outlines (paths)
No font should appear as “Not Embedded.”
Why It Matters
If a font isn’t embedded and the printer doesn’t have that exact font installed, the system will replace it with another font.
This can cause:
- Broken layouts
- Changed line spacing
- Text shifting to a new page
- Unreadable content
Some fonts also cannot legally be embedded due to licensing rules. In those cases, converting text to outlines is the safest option.
How to Validate
Manual:
In Adobe Acrobat:
- Go to File → Properties → Fonts
- Make sure every font says (Embedded) or (Embedded Subset)
In Illustrator or InDesign:
- Select text
- Click Type → Create Outlines before exporting the PDF
Automated:
Use an API to extract font metadata from the PDF.
- Check each font’s embedding status
- If any font is not embedded, reject the file
- Return a clear message listing the problematic fonts
Example logic:
// Conceptual font validation
const fonts = extractFontsFromPDF(fileHandle);
const unembeddedFonts = fonts.filter(font => !font.embedded);

if (unembeddedFonts.length > 0) {
  // Reject file with specific font list
}
Because fonts cannot be outlined after the PDF is created, these files must be fixed and re-uploaded.
Once fonts are secured, the next check is structural: confirming the document’s physical dimensions and file size.
7. File Size & Dimensions
The Rule
- The file’s physical size must match the exact trim size. For example: 8.5″ × 11″ for letter, 4″ × 6″ for postcard.
- The file size must stay within your system’s upload limit. Typically 100MB for web uploads, though print files with high-resolution images can be larger.
Why It Matters
If the dimensions are wrong:
- The file cannot be printed correctly.
- Scaling it will affect quality and bleed.
If the file size is too large:
- Uploads may fail or timeout.
- Processing may crash.
- The printer’s RIP system may struggle to handle it.
Both problems can delay production.
How to Validate
Manual:
In your design software:
- Go to File → Document Setup and confirm the page size.
In Adobe Acrobat:
- Open Page Thumbnails to check dimensions.
For file size:
- Right-click the file and check its size in properties.
Automated:
Use an API to extract:
- Physical width and height from PDF metadata or image headers
- File size during upload
Then:
- Compare dimensions against the required trim size (Allow a small tolerance like ±0.01″)
- Reject or flag files that don’t match
- Set upload limits to block oversized files
- Optionally trigger compression or optimisation workflows
This ensures every file is the correct size before it reaches production.
Now that the document size is correct, it’s time to inspect advanced print behaviours like transparency and overprints.
8. Transparency & Overprints
The Rule
- Make sure all transparencies are flattened before printing.
- Confirm that overprint settings are intentional (usually only for black text over colored backgrounds).
Why It Matters
If transparencies are not flattened:
- Objects may disappear during printing.
- Colors may shift.
- White boxes may appear around graphics.
If overprint settings are wrong:
- Text or elements may look fine in the proof
- But disappear or change in the final print
These issues usually show up only after the file reaches the printer, which makes them expensive to fix.
How to Validate
Manual:
In Adobe Acrobat:
- Open Output Preview
- Enable Simulate Overprinting
- Check how objects will actually print
For transparency:
- Use Print Production tools in Acrobat
- Look for transparency warnings
Best practice:
- Flatten transparency in Illustrator or InDesign before exporting the PDF (Edit → Transparency Flattener Settings)
Automated:
Use an API to:
- Scan PDF objects for transparency blend modes
- Detect if transparency elements exist
- Flag files that contain unflattened transparency
For overprints:
- Check object rendering settings
- Flag unexpected overprint attributes
Since flattening cannot be done after PDF creation, any failed file should be rejected and returned with clear instructions.
This prevents invisible elements and unexpected color problems in production.
With visual elements verified, don’t forget the hidden details inside the file: metadata and printer marks.
9. Metadata & Printer Marks
The Rule
- Include crop marks, registration marks, and color bars if your printer requires them.
- Check that document metadata (title, author, etc.) does not contain sensitive or unnecessary information.
Why It Matters
Printer marks help the press operator:
- Align the pages correctly
- Maintain color accuracy
- Trim the paper precisely
If these marks are missing (when required), the final print may be misaligned or inconsistent.
Metadata is also important. Hidden details like internal project names, client names, or draft labels can accidentally appear in production files or create confidentiality issues.
How to Validate
Manual:
When exporting the PDF:
- Enable crop marks and registration marks in the export settings (if required).
In Adobe Acrobat:
- Go to File → Properties → Description
- Review and clean up metadata fields before final approval.
Automated:
Use an API to:
- Detect printer mark objects in the PDF structure (if your workflow requires them).
- Extract metadata fields such as title and author.
- Remove or flag sensitive information automatically.
Keep in mind: some workflows intentionally exclude printer marks. Your validation rules should match your specific print process.
This ensures files are both production-ready and professionally prepared.
Even after all technical checks pass, one final review is necessary before sending the file to press.
10. Final Visual Spot-Check
The Rule
Always do a final visual review at 100% zoom (or higher). Even if all technical checks pass, visually inspect the file before printing.
Why It Matters
Automation can catch:
- Wrong DPI
- Missing bleed
- Incorrect color mode
But it may not catch:
- Stray pixels
- Thin hairline strokes
- Light transparency halos
- Small color shifts
- Tiny design mistakes
These small issues may not appear in metadata, but they will show up on paper.
How to Validate
Manual:
Open the final PDF:
- Zoom to 100% or 200%
- Scroll through every page carefully
- Check:
- Fine lines
- Edges of images
- White backgrounds
- Areas where objects overlap
- Gradients and color transitions
This step takes time, but it prevents expensive reprints.
Automated:
For high-volume workflows:
- Use image comparison tools to match files against approved templates.
- Implement computer vision checks to detect common defects.
- Generate automated proof PDFs for customer approval before printing.
Even with automation, a final proof review step adds an extra safety layer.
This is your last quality gate before the file reaches the press.
So far, we’ve covered what to check. Now let’s look at how to automate all of it.
Implementing Automated Preflight
Building this validation into your workflow doesn’t mean manually checking every file. The real goal is to let the system check everything automatically the moment a file is uploaded.
Here’s how a simple automated print validation workflow works:
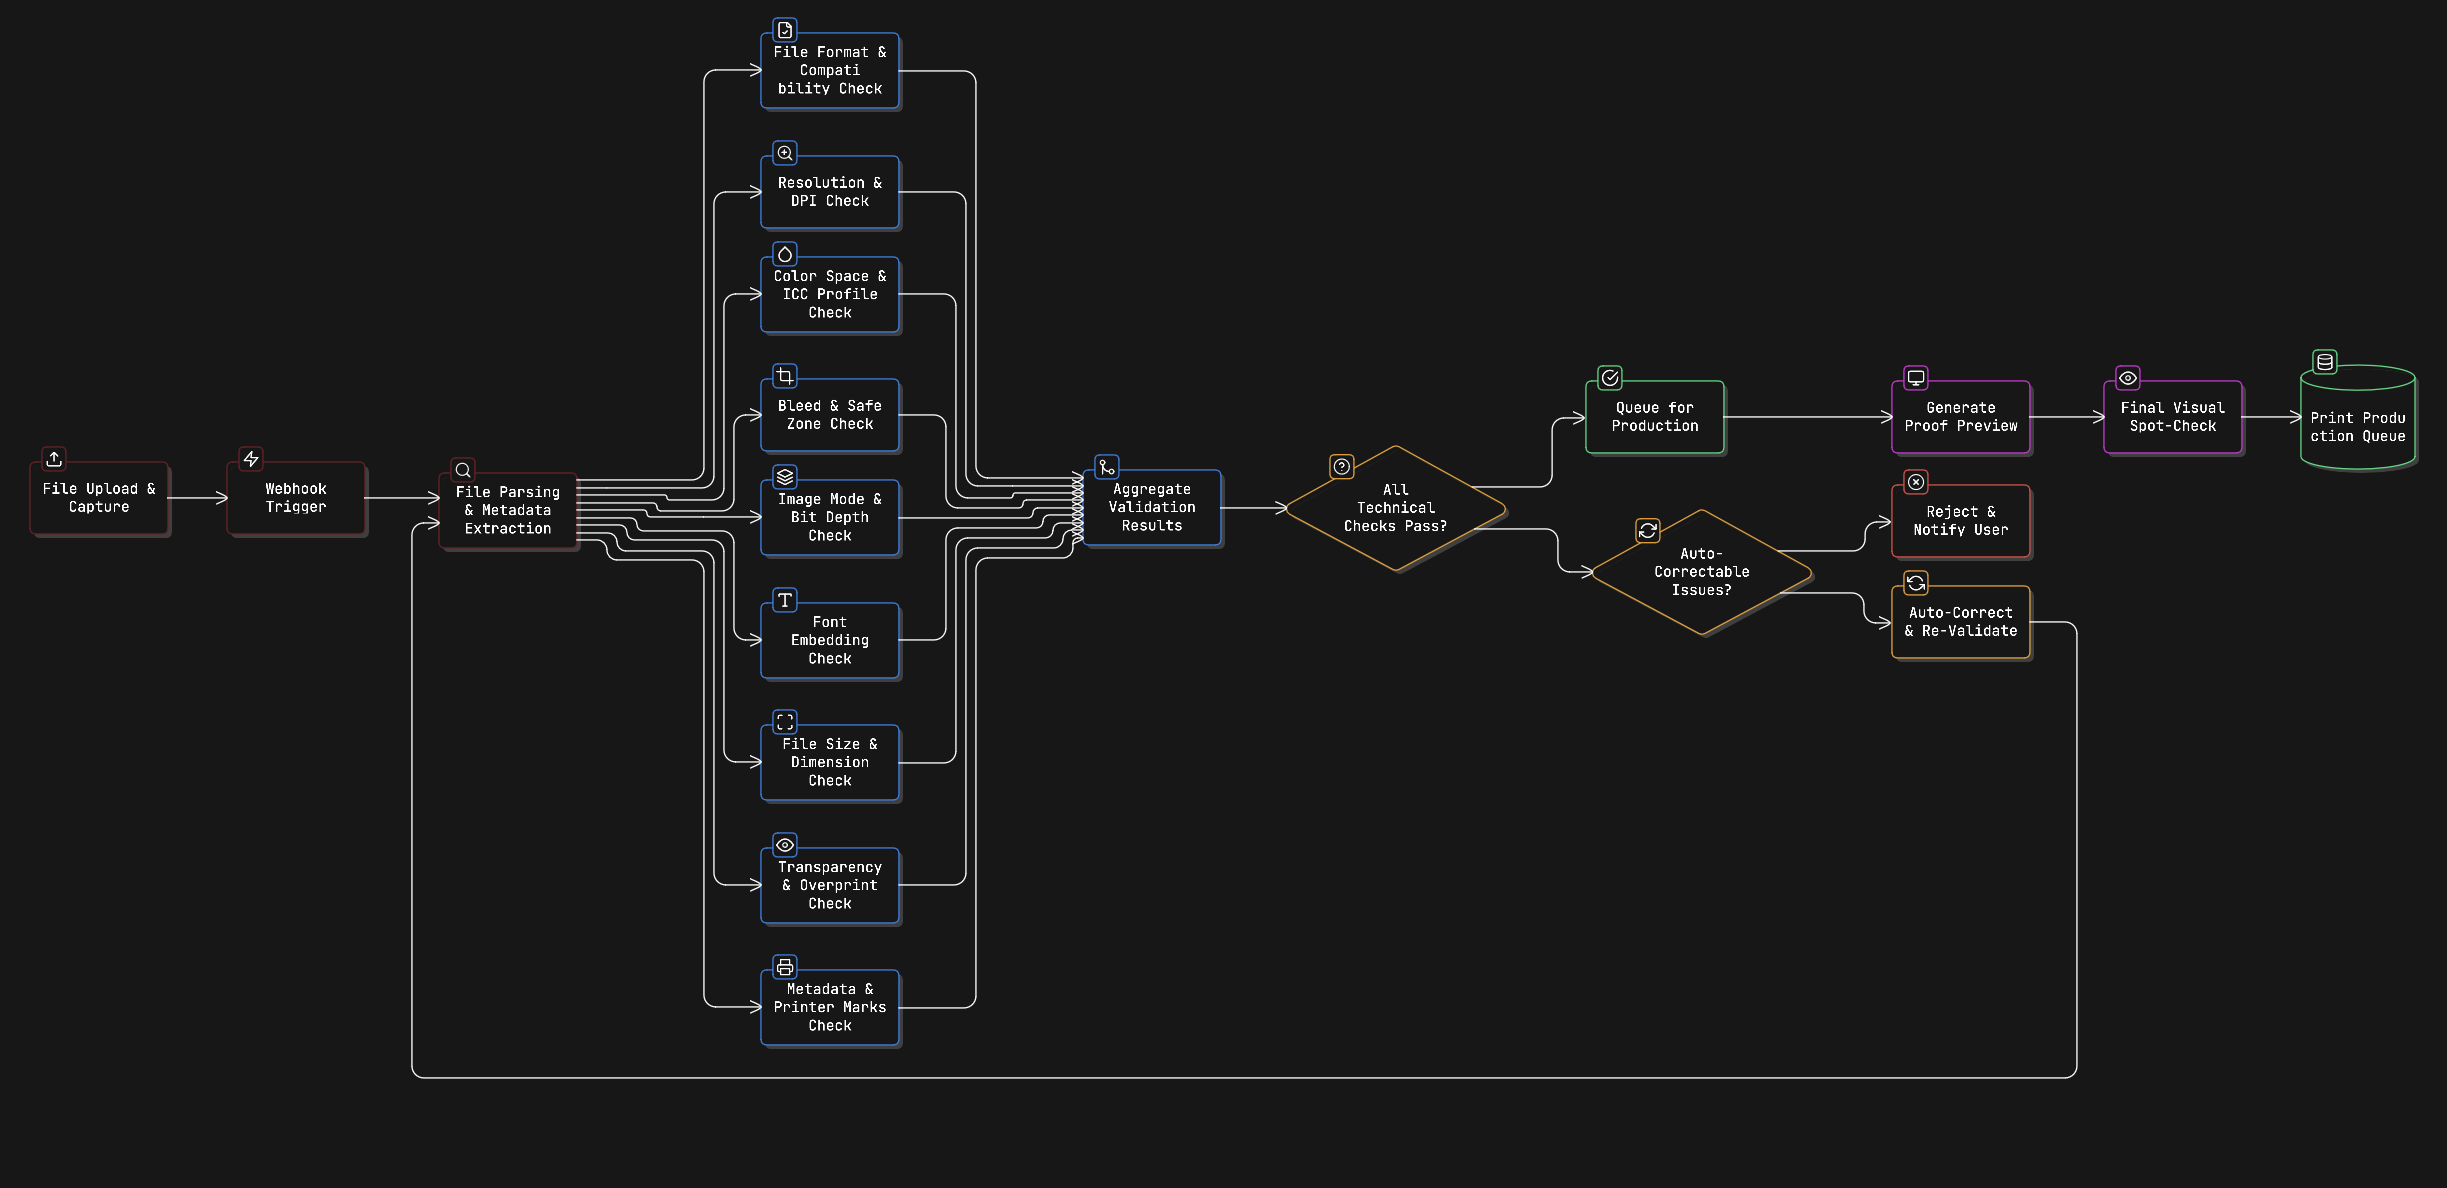
This process shows how all 10 checks work together in one system.
After a file is uploaded, it goes through all validations. Then the system decides:
- Fix it automatically
- Reject it with feedback
- Approve it for printing
Here’s how it works in simple steps:
- Upload & Initial Capture: When a file is uploaded, use webhooks to trigger your validation pipeline. Learn more about how to orchestrate this validation workflow using webhooks.
- Metadata Extraction: Use a file processing API to extract technical metadata: resolution, color space, dimensions, fonts, etc. This gives your system everything it needs to check the file.
- Validation Logic: Compare extracted values against your checklist requirements. Implement this as a series of validation functions that each return pass/fail with specific error messages.
- Automated Correction (Where Possible): For certain failures like color space or resolution, trigger automatic conversions or optimisations. For issues that can’t be automatically fixed (missing bleed, unembedded fonts), reject the file with clear instructions.
- Notification & Feedback: If validation fails, immediately notify the user with specific, actionable feedback, not just “File rejected” but “Image resolution is 180 DPI (required: 300 DPI). Please upload a higher-resolution version.”
- Quality Gate: Only files that pass all validation checks get queued for production.
// Conceptual automated validation workflow
async function validatePrintFile(fileHandle) {
  const metadata = await extractMetadata(fileHandle);
  const results = {
    format: validateFormat(metadata.format),
    resolution: validateResolution(metadata.dpi, metadata.dimensions),
    colorSpace: validateColorSpace(metadata.colorMode),
    bleed: validateBleed(metadata.pageBoxes),
    fonts: validateFonts(metadata.fonts)
  };

  const failures = Object.entries(results)
    .filter(([key, value]) => !value.passed)
    .map(([key, value]) => value.message);

  if (failures.length > 0) {
    return { passed: false, errors: failures };
  }

  return { passed: true };
}
To automate complex file processing workflows like this, you need a platform that can handle file transformation, metadata extraction, and conditional logic at scale.
At this point, you have the full validation framework. The final step is understanding why automation changes everything.
Preventing Problems vs. Fixing Them
The old way of handling print errors is reactive. You discover the problem only when the file reaches production. Then you contact the customer, ask for a new file and start the job again.
This wastes time, delays delivery, and increases costs.
The better way is proactive. Check everything at the moment the file is uploaded.
- If the issue can be fixed automatically → fix it.
- If it can’t → give clear, instant feedback so the user can correct it right away.
When users fix problems immediately, the job stays on schedule.
This shift from fixing problems later to preventing them early is what turns a simple upload form into a professional print intake system.
The checklist above gives you the technical requirements. Implementing it programmatically gives you a competitive advantage.
Let’s wrap up what this means for your workflow.
Conclusion
Print file validation is not optional if you care about quality and speed.
Every item in this checklist prevents a real problem, blurry images, wrong colors, missing bleed, and broken fonts. These issues cause delays and extra costs when they are discovered too late.
By adding these 10 validation checks, especially through automated preflight, you can:
- Catch errors before production
- Reduce reprints
- Speed up turnaround time
- Give customers a smoother experience
The good news? You don’t have to build everything from scratch.
Modern file processing APIs can handle:
- Reading file metadata
- Converting formats
- Transforming images
- Running automated workflows
So you can focus on enforcing your print rules, not building infrastructure.
Start a free trial with Filestack and build a bulletproof print file intake system by automating your print validation checklist.
If you’re ready to implement this technically, explore the Filestack Processing API documentation to see how to extract metadata and process files programmatically. And if you need help optimising images specifically for print, you can automate that too, so your team focuses on printing, not fixing files.
Shefali Jangid is a web developer, technical writer, and content creator with a love for building intuitive tools and resources for developers.
She writes about web development, shares practical coding tips on her blog shefali.dev, and creates projects that make developers’ lives easier.
Read More →