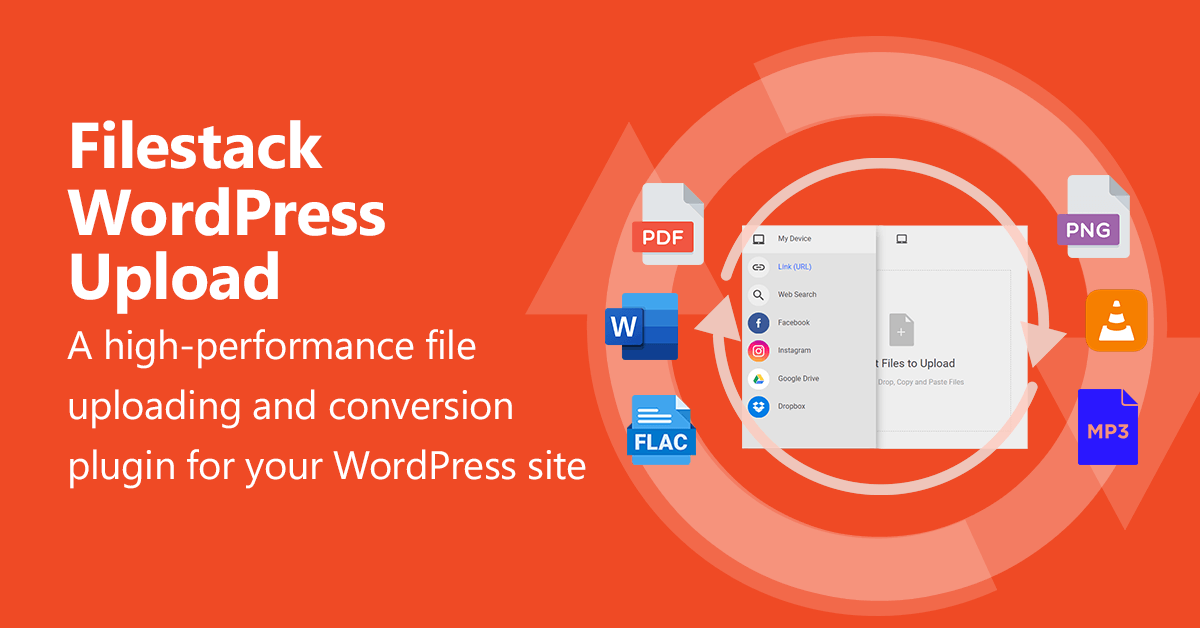
We are back with some exciting news for WordPress users! The long-awaited Filestack WordPress Upload V2.0 is finally released with some impressive improvements and new features.
Filestack WordPress Upload V2.0 features include:
- New file picker improvements
- Additional upload control settings
- New callbacks
- Shortcode improvements
- File Convert Widget
- A Video to Audio Converter widget.
- Various minor bug fixes and performance improvements.
Are you excited to know more? Let’s dig deeper into these amazing updates!
✨ What’s New 🚀
File Convert Widget
This widget brings Filestack file conversion capabilities to WordPress users. The converter converts data from one format to another. It can convert text, images, and other digital formats. The converter takes the original data and translates it into a different format, allowing users to access their data in a different format. This means you can modify user-uploaded files before storing them. For example, you can set the widget to convert images to the modern user-friendly WebP format. When these images are displayed on a page, the page performance will be much better because the WebP format maintains high quality with smaller file sizes.
The widget settings give you full control over the file conversion process. This ensures that your users can easily convert their files to meet their specific requirements. These settings let you
- Customize the widget title.
- Specify the acceptable file formats for conversion.
- Select the format to convert the file to. Wide formats are supported, such as doc, odt, svg, docx, pjpg, txt, html, pdf, webp, jpg, png, xls, odp, ppt, xlsx, ods, pptx.
- Customize the message that appears after conversion succeeds.
- Customize the message that appears after conversion fails.
- Select the file picker mode – ‘overlay’ or ‘dropPane’.
- Set the output file quality, page format, page orientation, and background color.
- Set the number of output file pages.
Filestack document conversion preserves file format, images, fonts, special characters, and page breaks of the converted file.
Video to Audio Converter Widget
One of the most exciting features introduced in Filestack WordPress Upload V2.0 is the Video to Audio Converter Widget. This powerful tool enables users to easily extract audio from their video files. This provides them with a simple and efficient way to create audio-only content from their videos. This can be a game-changer for podcasters, journalists, or any other users who need to work extensively with audio.
Similar to the File Convert Widget, the Video to Audio Convert Widget comes with a variety of options, giving users complete control over the conversion process. The available options include widget title, converted file type, Allowed File Types, Instructions, Success Message, Failure Message, Display Mode, and Audio Bitrate. Using these settings, you can customize the widget’s behavior before displaying it on your WordPress site.
✨ What’s Improved 🚀
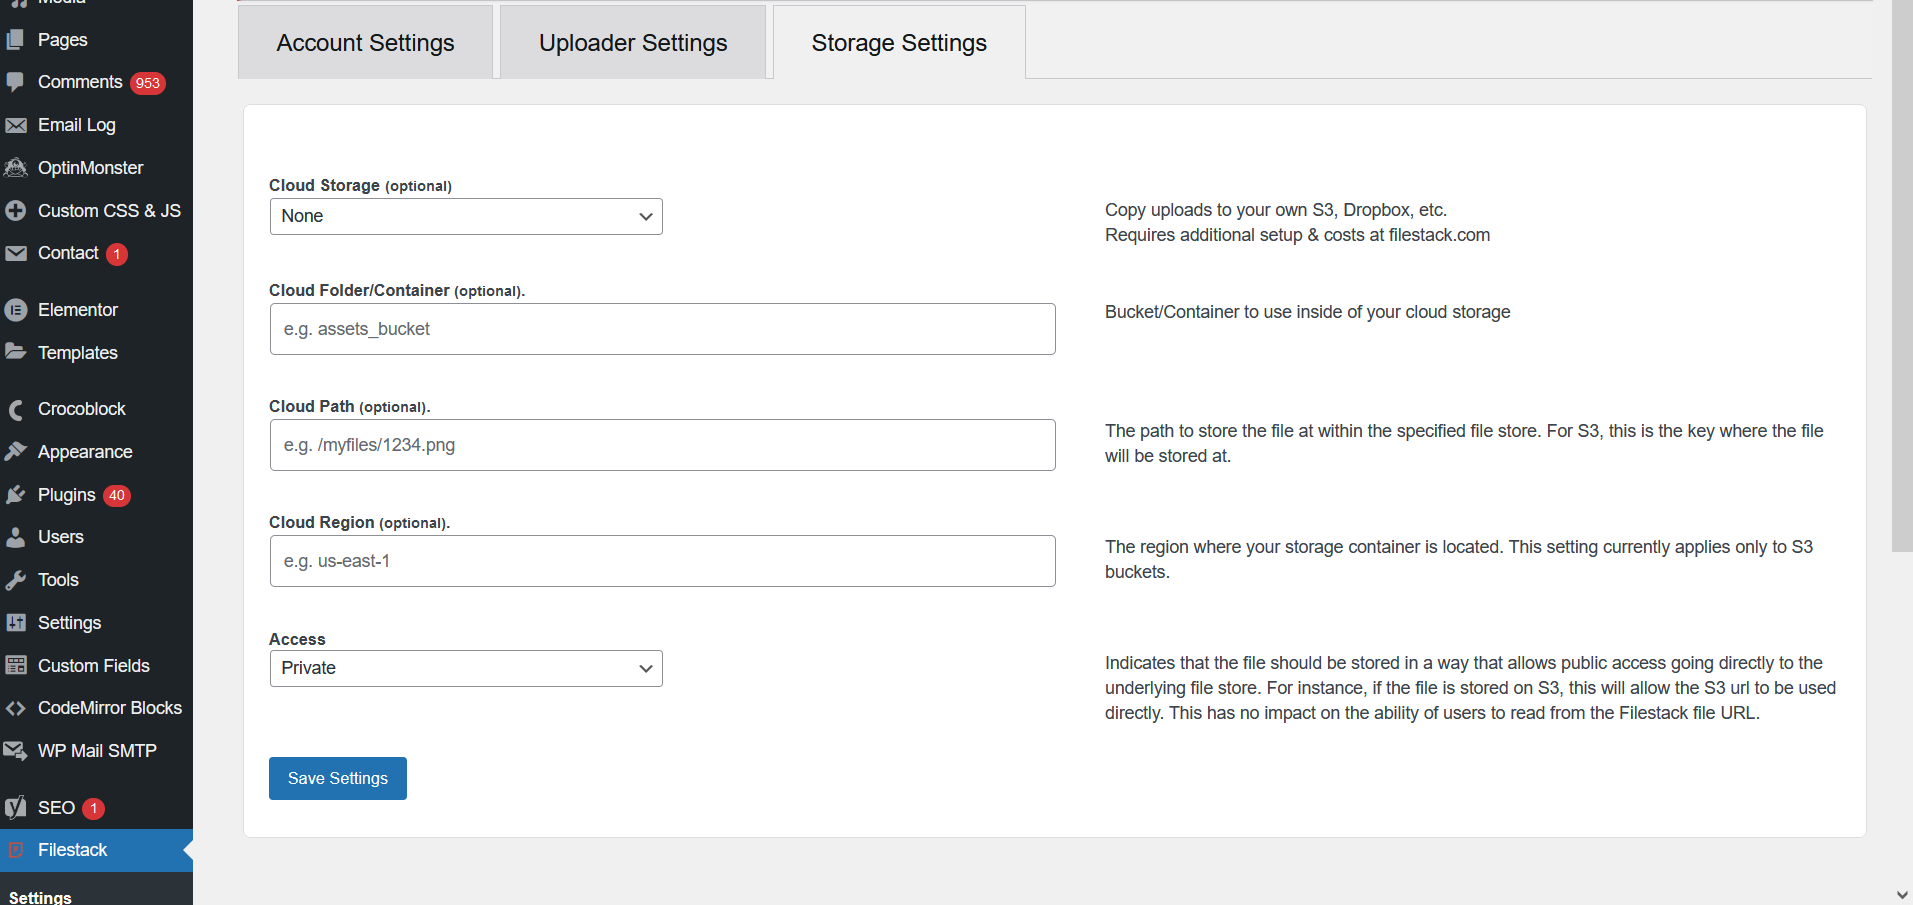
Improved Setting Page UX
The plugin now has its own menu instead of being a submenu of the settings menu. The settings page contains three tabs
- Account Settings
- Uploader settings
- Storage settings
Each has its own dedicated section to configure its corresponding options. The overall design of the settings page is now cleaner and more user-friendly, making it easier to manage and update your plugin preferences.
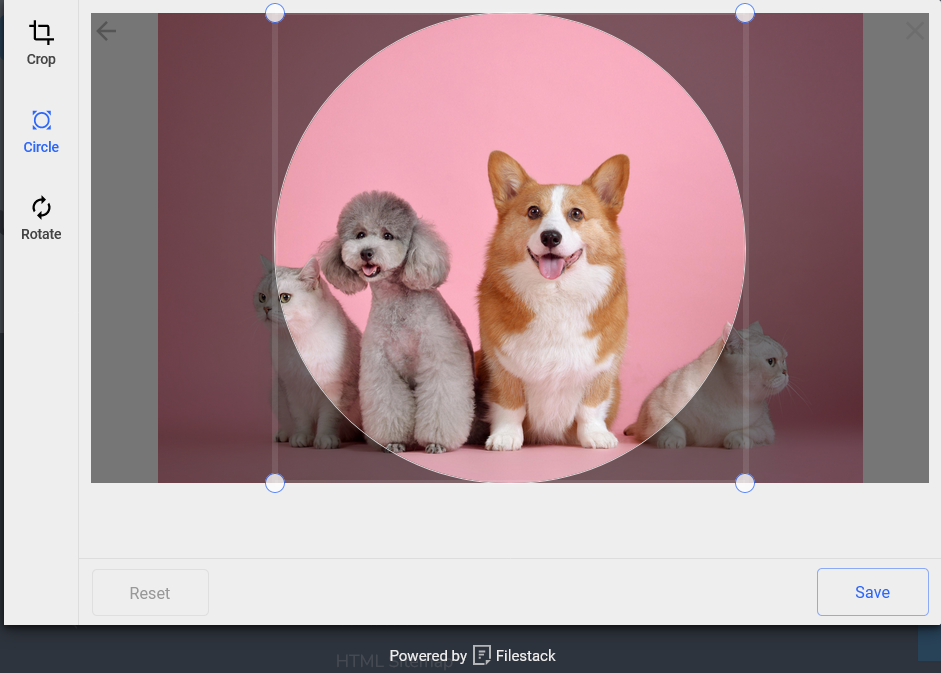
Enhanced File Picker
The File Picker in Filestack WordPress Upload V2.0 has undergone significant improvements to provide a smoother user experience. The File Picker now offers more image transformation features such as Crop, Circle, and Rotate. It also allows users to categorize files with key-value tags.
The ‘Minimum Files’ option has been introduced to ensure users have a certain number of files ready before the upload process begins. Site admins can now choose from different Filestack display modes for a more personalized experience. The ‘Container’ field lets admins define a name for the container where the uploader should render.
Additionally, the plugin now offers more control over file uploading. Visit the plugin documentation for more information.
Shortcode improvements
The shortcode for displaying the file picker inside WordPress pages now supports additional parameters. Besides the button_title, post_id, and media_category parameters, the following parameters have been added:
- lang: Defines the file picker language. Default: en
- image_transform: Defines the image transform to be given when the user uploads an image.
- api_key: API key to be used (In case the user has multiple apps in his Filestack account)
- policy: Used if the app has security enabled
- signature: Used if the app has security enabled
- media_owner: ID of a registered WordPress user
- upload_source: Comma-separated values of allowed sources. Default: local_file_system
- file_types: Allowed file types.
Using these parameters, you will be able to customize the File Picker for each page of the website. It is possible, for example, to display a File Picker with different upload sources for each page by using the “upload_source” parameter in the shortcode. In the absence of this parameter, the settings you have selected on the plugin settings page will take effect.
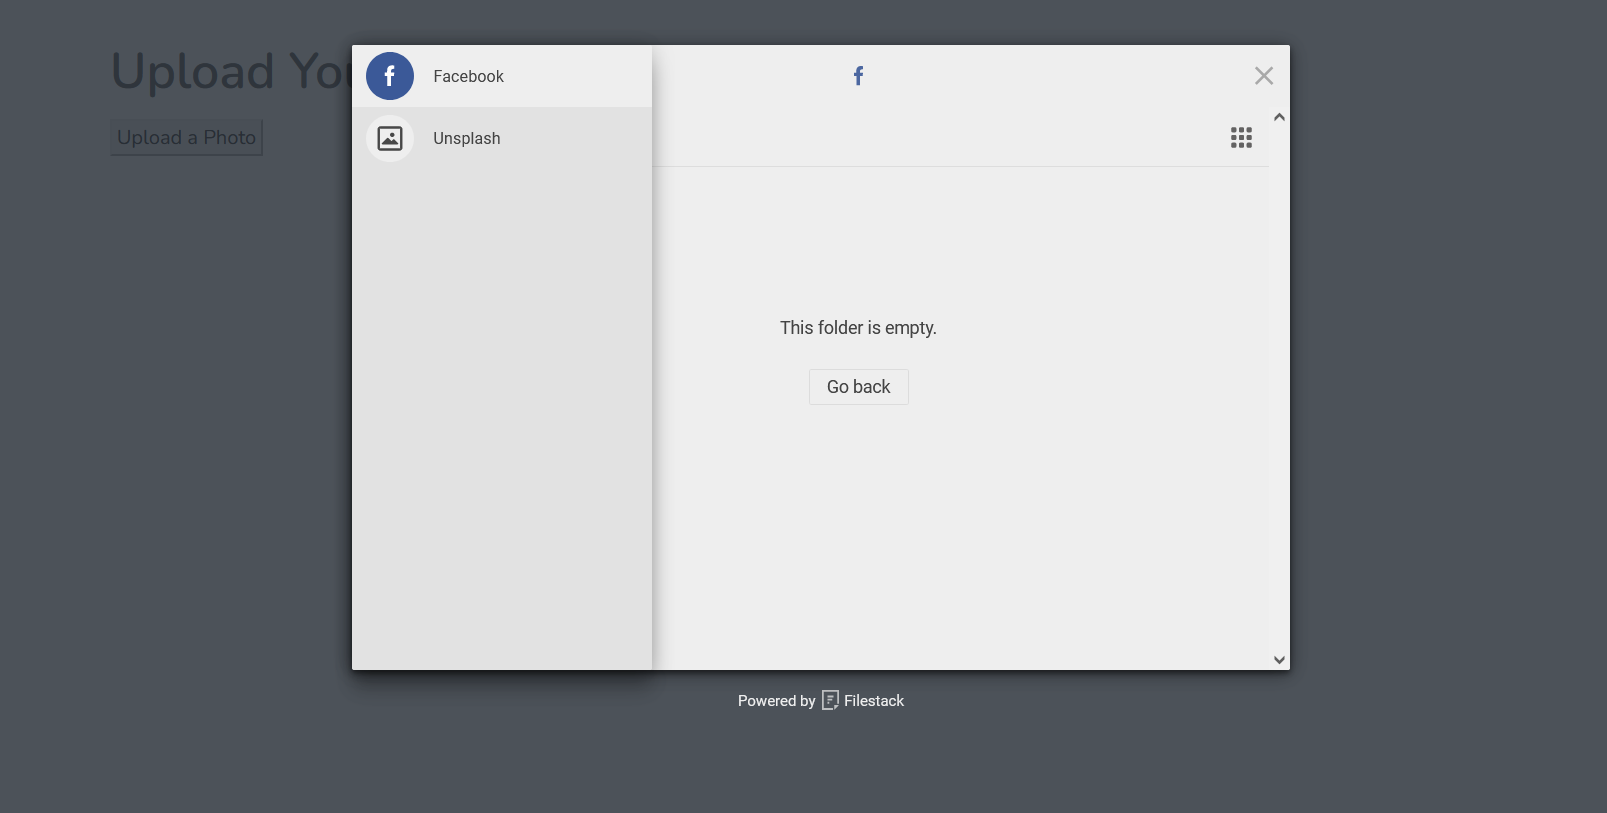
For example, if you add the below shortcode to your page
[filestack button_title='Upload a Photo' upload_source="facebook,unsplash" media_owner=102]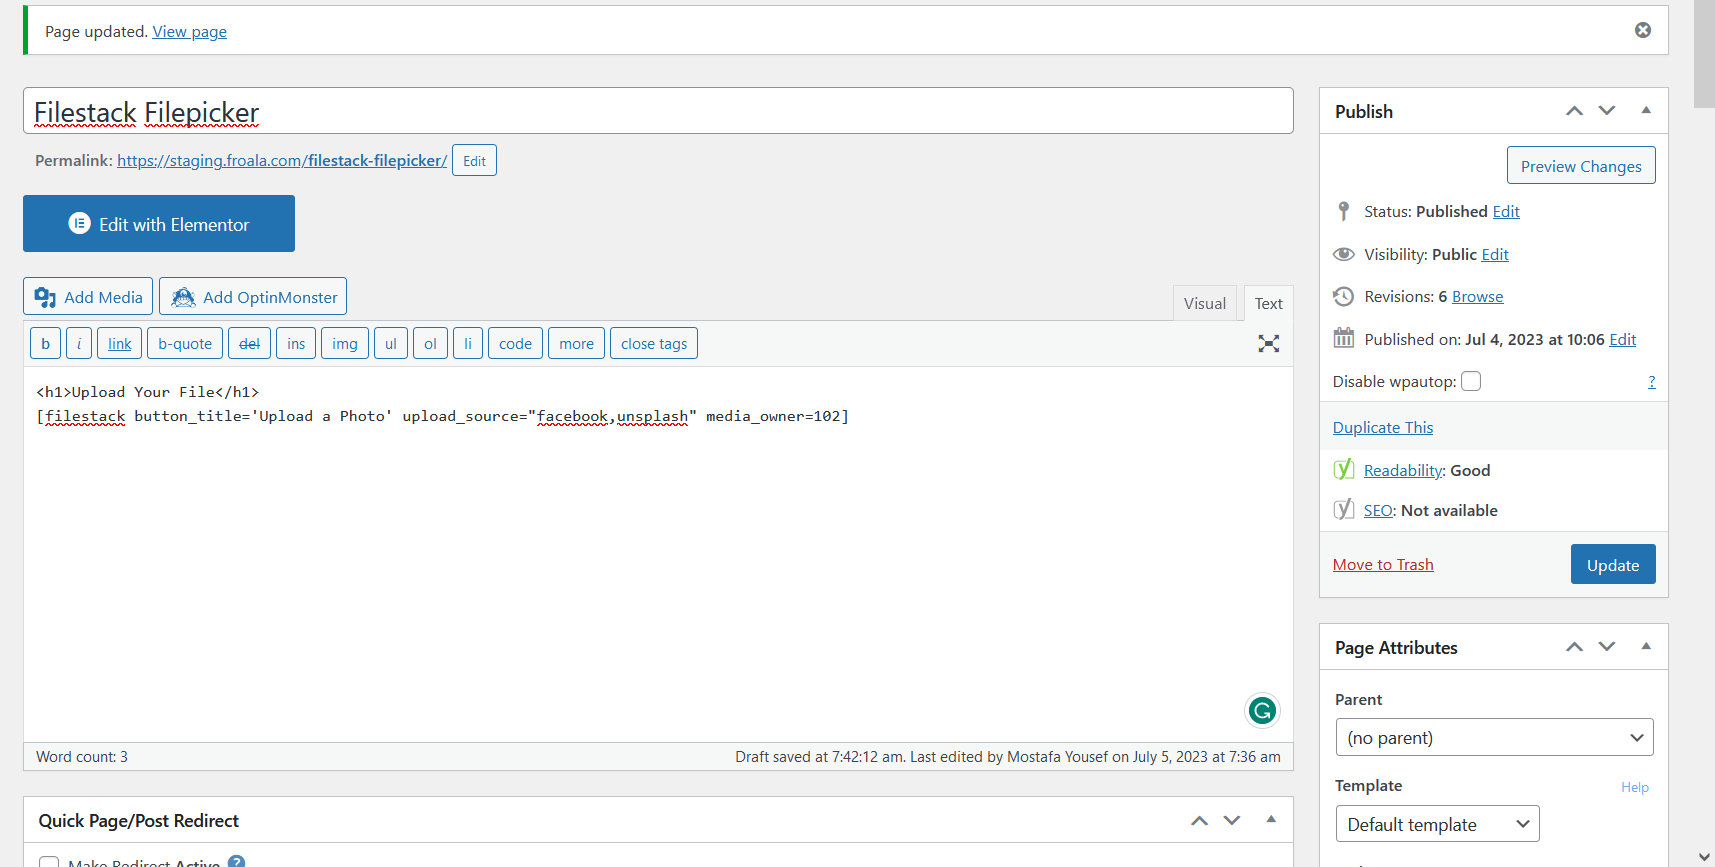
It will display an upload button in the place of the shortcode with the text “Upload a Photo”. If you click that button, the File Picker modal will appear, enabling users to upload images from their Facebook account and Unsplash site only. The uploaded files will appear in your media library and be owned by the user with ID 102.

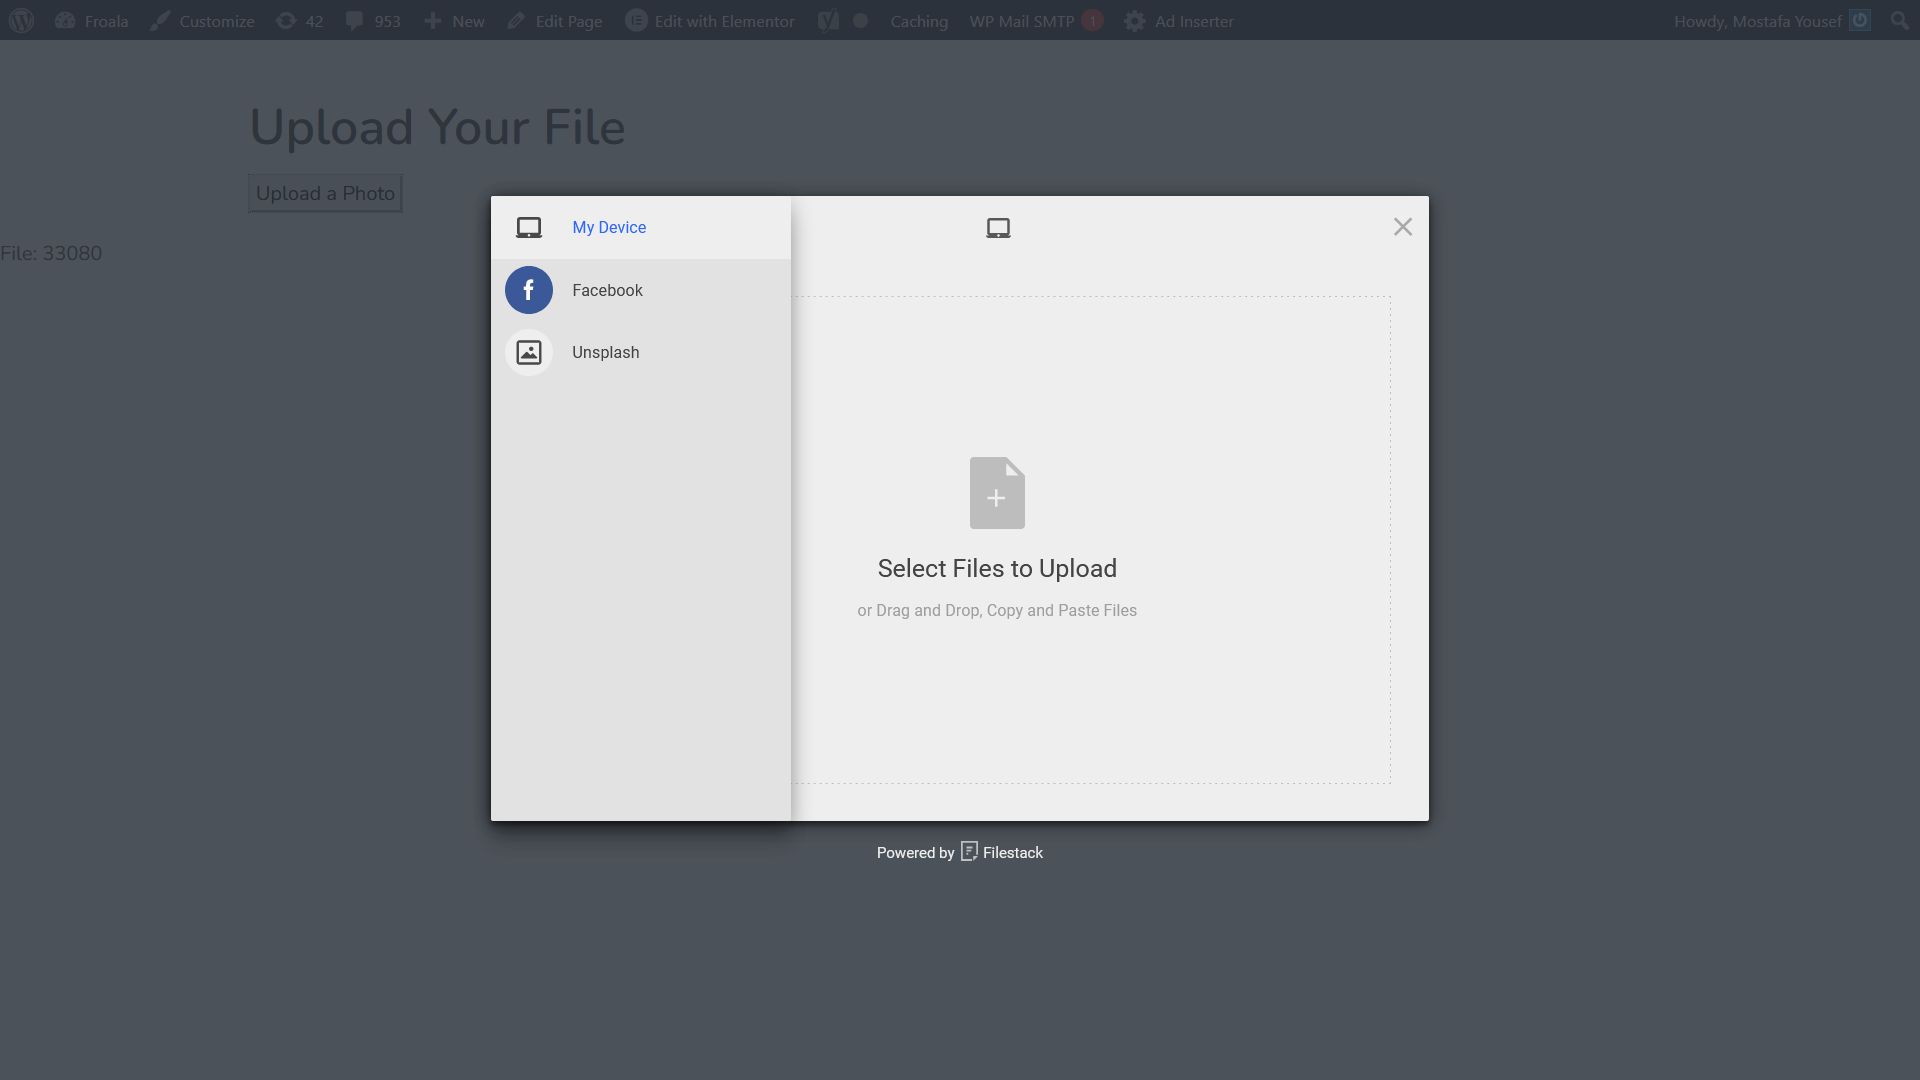
If you place the shortcode on another page as
[filestack button_title='Upload a Photo' upload_source="local_file_system,facebook,unsplash" media_owner=102]It will work as the previous one but the File picker will display the option to upload files from local sources as well.
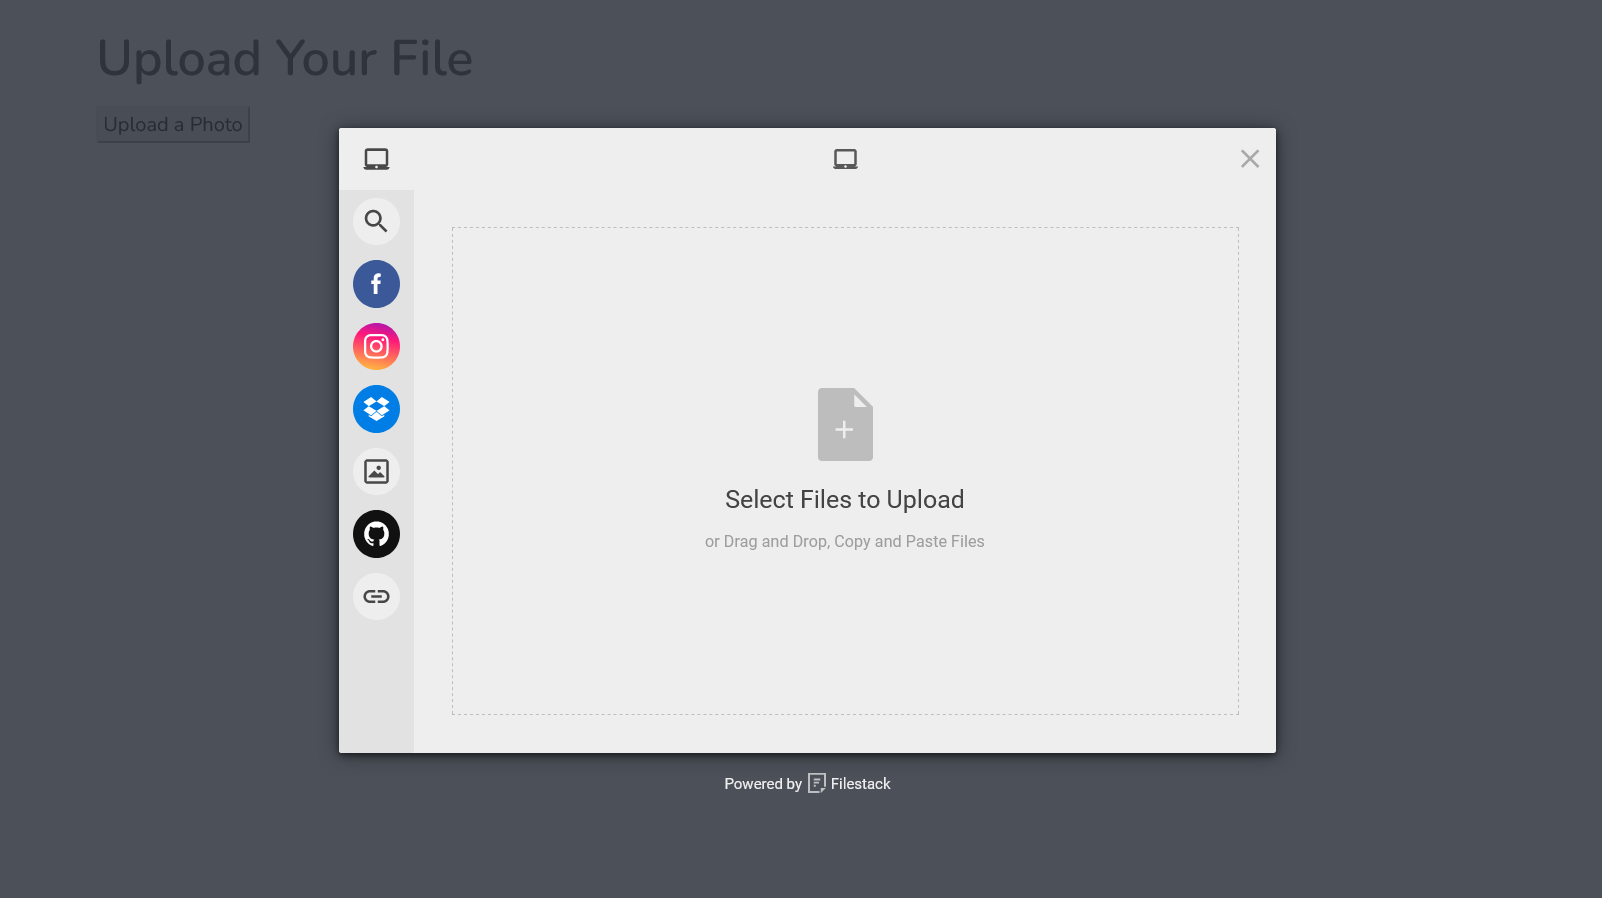
if we removed the upload_source parameter like this
[filestack button_title='Upload a Photo' media_owner=102]The File Picker will be loaded with all the sources you selected on the settings page
Do you feel confused? You don’t need to worry, the releases come with a shortcode generator. Shortcodes can be created more easily by selecting options rather than manually writing them. The shortcode generator can be accessed from the WordPress admin left menu under “Filestack”.
Additional Callback Functions
Filestack WordPress Upload V2.0 introduces additional callback functions to customize uploader behavior and manage file events. These newly added callbacks are
- filestackOnCancel(file): Called when all uploads in the stack are canceled.
- filestackOnUploadDone(file): Called when all files have been uploaded.
- acceptFn(file, options): Provide your own accept function. Note: The presence of this callback overrides any input file validation setting. Manual validation should be present inside this callback in such cases.
Callback functions enable you to customize the file-uploading process by writing a custom function that runs when a specific event is triggered. For instance, `filestackOnUploadDone` can be customized to trigger server-side notifications or to populate specific fields in your UI with the uploaded file data immediately after the upload finishes. This ensures a more reliable and efficient file integration process in your workflow.
You can also use the “filestackOnUploadDone” callback to benefit from Filestack’s artificial intelligence (AI) features. For example, after a user uploads an image, you can let Filestack automatically create an appropriate caption for it and display it under the image.
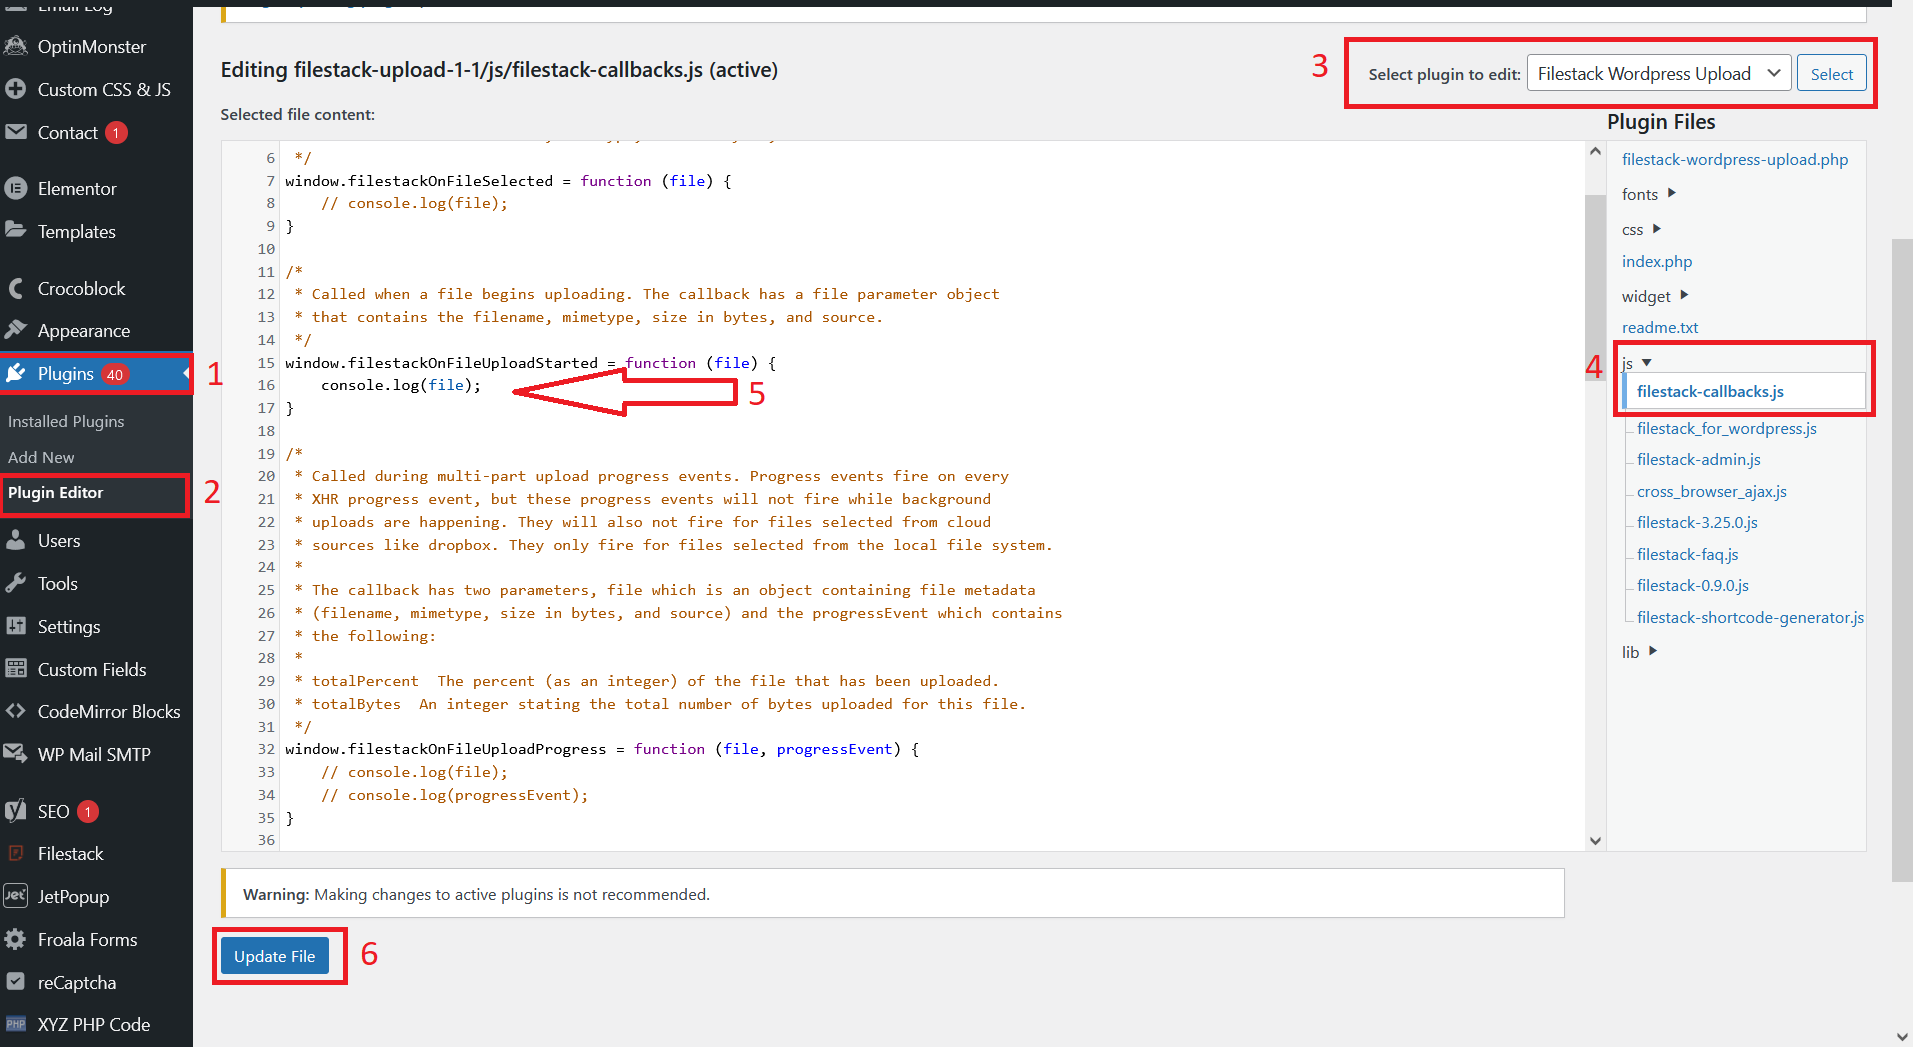
Editing the callback functions is very easy. Follow these steps:
- Go to the “Plugin Editor“ page
- Select “Filestack WordPress Upload“ from the dropdown list
- Now, you can see all the available files for the selected plugin
- Open the “filestack-callbacks.js” file
- Here is where all the scripts including the callback functions are defined
- Congratulations! Now you are all set to customize the callback functions as per your needs.
Also, remember that callback functions provide powerful customization options but require JavaScript knowledge. Any errors could break the plugin. So it’s advisable to deactivate the plugin before editing the file.
… and more!
Several minor bugs were removed with this release in a constant effort to make the user experience even better.
Please find the complete changelog list here.
Get Filestack WordPress Upload V2.0
How Do I Install or Upgrade to V2.0?
Super easy! Navigate to the plugins page on your WordPress site. If the plugin is in your plugin list, click on the ‘Update’ button to upgrade to the latest version. If you haven’t installed it yet, click on ‘Add New’ and search for ‘Filestack WordPress Upload‘ in the search bar. Then select ‘Install Now’ and ‘Activate’ to install and activate the plugin.
After successfully installing and activating the plugin, head over to the Filestack menu in your WordPress dashboard to configure your account, uploader, and storage settings. Once all settings have been configured, you are ready to allow your site users to start uploading and managing their files with Filestack. Have fun!
For more detailed installation instructions, check out our documentation guide.

Senior web developer with a profound knowledge of the Javascript and PHP ecosystem. Familiar with several JS tools, frameworks, and libraries. Experienced in developing interactive websites and applications.
Read More →