Rendering videos seamlessly across browser types is often an arduous process for developers. It is important to consider the format and codec of a video file. Different browser types support different video codecs, which means that you need to provide multiple formats to ensure that your video renders on all browsers.
| Browser | Video Codec | Audio Codec |
| Chrome | H.264, VP8, VP9 | AAC, MP3, Vorbis, Opus |
| Firefox | H.264, VP8, VP9 | AAC, MP3, Vorbis, Opus |
| Internet Explorer | H.264 | MP3 |
| Safari | H.264 | MP3, AAC |
| iPhone | H.264 | MP3, AAC |
| Android | H.264, VP8 | MP3, AAC, Vorbis |
| Opera | H.264, VP8 | Vorbis, Opus |
| Chrome Android | H.264, VP8, VP9 | MP3, AAC, Vorbis |
If you are looking for one codec to rule all web browsers, then your best bet is with H.264, which is supported on 98% of web browsers and is used for both HD and SD video encoding. There are other ways to optimize for speed and quality, but I won’t delve into them here. The main problem people face is when they need to display user generated video content that is recorded in one format on a browser that does not accept that format.
For example, if you are building an app like Instagram, where users submit videos recorded on their phone (likely a .MOV file), and then try to display that video without transcoding, then you’re going to have a bad time on a lot of browsers.
To transcode video, you can use free services like Fone Paw to convert individual files. You can also use advanced video editing software like Final Cut Pro, which is especially valuable if you are going to edit the video in detail.
However, manually encoding videos file by file is tedious and time consuming, to say the least. If you want your application to run in real time, then you need a reliable service to transcode video automatically.
In today’s post, I will show you how to use Filestack’s API to transcode between video codecs. One of the key benefits of using Filestack for video transcoding is that Filestack can also integrate seamlessly with your file uploader and CDN.
Please note that although I am primarily focused on video files, you may apply the same transformations to audio files. All of the following codecs will work:
Video: h264, h264.hi, webm, webm.hi, ogg, ogg.hi, hls.variant
Audio: mp3, oga, m4a, aac, hls.variant.audio
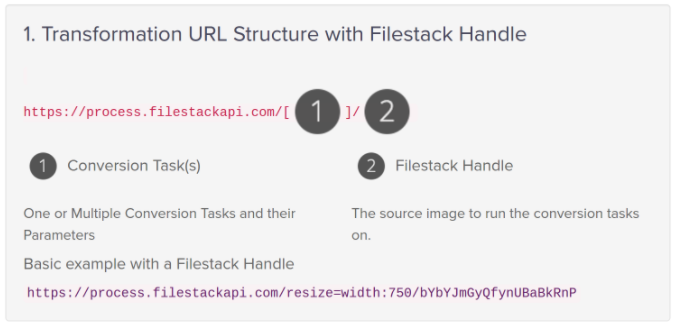
There are two parts to making an API call with Filestack: (1) The conversion task, in this case the video conversion parameters that match what you want the output to be, and (2) The Filestack handle of the file you wish to convert. To generate this handle, you can upload the video file through Filestack’s uploading API, or pull directly from your cloud storage with AWS, Google, Azure, Rackspace, or Dropbox.
As an example, let’s look at how you can transcode a webm video file to H.264 with the Filestack API.
You would make a call specifying the conversion task video_convert=preset: h264 and the Filestack handle of the video to convert. For example:
>>> curl -X GET <span style="font-weight: 400;">"https://process.filestackapi.com/video_convert=height:260,width:300,preset:webm/Q5eBTKldRfCSuEjUYuAz"</span>
In response, you will receive:
{
    "data": {},
    "status": "started",
    "timestamp": "1450730720",
    "uuid": "638311d89d2bc849563a674a45809b7c"
}
Now, for the final final step –
Make a note of the uuid field, which is the unique identifier for that video transcoding job, then head to your Dev Portal to tell us where to send the transcoding job webhooks. The webhook alerts you when the video has finished transcoding. A small video file will transcode very quickly, while a larger file may take a little longer.
Once your video transcoding is complete, you will receive a webhook containing the URL of your new video, as well as thumbnails in varying sizes to use. You can use these URLs in the <src> tag to display your video.
Using Filestack you can generate copies of your video in different formats, so that you can always play the best format for that browser. Encodings for FileLinks with the same parameters are cached, so if you run the same conversion multiple times, you will receive results immediately, without having to wait for the webhook.
That’s all for video transcoding, folks!
You can use Filestack’s API to alter additional aspects of your video files such as:
- Force – True / False – Restarts completed or pending video encoding
- Width in pixels (ex: 1080)
- Height in pixels (ex: 720)
- Title
- File extension
- File name
- Location – The custom storage service to store the converted file to (S3)
- Path – Path to store the file to (ex: “/myfiles/1234.mp4”)
- Access – Public / Private
- Container – The bucket or container for the file.
- Policy – Policy to sign the request with if security is enabled.
- Signature – Signature to sign request with if security is enabled.
- Upscale – True/False to upscale video resolution to match your profile.
- Aspect
- Letterbox (default) – Adds black bars to defined height
- Preserve – Original ratio is preserved
- Constrain – Aspect ratio is maintained
- Pad – Adds black bars to output to match defined frame size
- Crop – Fills frame size and crops the rest
- Two Pass
- Video Bitrate
- FPS
- Keyframe Interval
- Audio Bitrate
- Audio Sample Rate
- Audio Channels
- Clip Length
- Clip Offset
- Watermark URL
- Watermark Top, Bottom, Left, Right, Width, Height
- Frame Count – Evenly spaced number of generated screenshots
Enjoy!
If you have any questions, don’t hesitate to reach out:
Contact SupportFilestack is a dynamic team dedicated to revolutionizing file uploads and management for web and mobile applications. Our user-friendly API seamlessly integrates with major cloud services, offering developers a reliable and efficient file handling experience.
Read More →