You might remember the case of the monkey selfie. In 2011, a nature photographer named David Slater was in Indonesia to photograph some Celebes crested macaques. He set up the camera on a tripod, and left the remote trigger for the camera out so that a macaque that wandered by could take it’s own picture. One of the macaques actually did, taking some amazing pictures that made their way all over the internet and into the Wikimedia Commons. This kicked off a legal battle about who owns the copyright of a work of art created by a non-human.
In December 2014, the United States Copyright Office stated that works created by a non-human are not subject to US copyright. In 2016, a US federal judge ruled that the monkey cannot own the copyright to the images.
Things probably wouldn’t have turned out different if that macaques had added a watermark to her picture, but these days adding a watermark copyright to an image is a common task in the web design world as it’s an easy way to protect the intellectual property rights of content producers.
Just think how easy it is to grab images from another website or Google Image search (we’ve all done it!). When it’s the norm that images from one part of the internet make their way to another, a watermark can help build brand recognition and show the source of an image, without relying on a user to actually state it.
Can’t I just use Photoshop?
Nowadays the majority of graphic editors, Photoshop, Sketch to name few, provide watermark functionality. There are also tools that allow you to upload images, apply a watermark and then re-download the image. While it is easy enough to add one watermark this way, there are major speed advantages of using an API which can add a watermark to thousands of images as easily as for 1.
In today’s post I am going to demonstrate how to use the Filestack API to add a watermark to an image. You can use this example to add a watermark to any image including png and jpgs.
Let’s see how to do it!
The Filestack Process API
To add a watermark using the Filestack API, you basically send a request to our transformation endpoint along with your API key and task. You can programmatically interact with our API, but in these examples, I’ll just show you how to convert the file by adding conversion tasks to the URL.
You can see there are three parts: your API key, the conversion task (in our case add watermark), and the url of the image we want to convert.
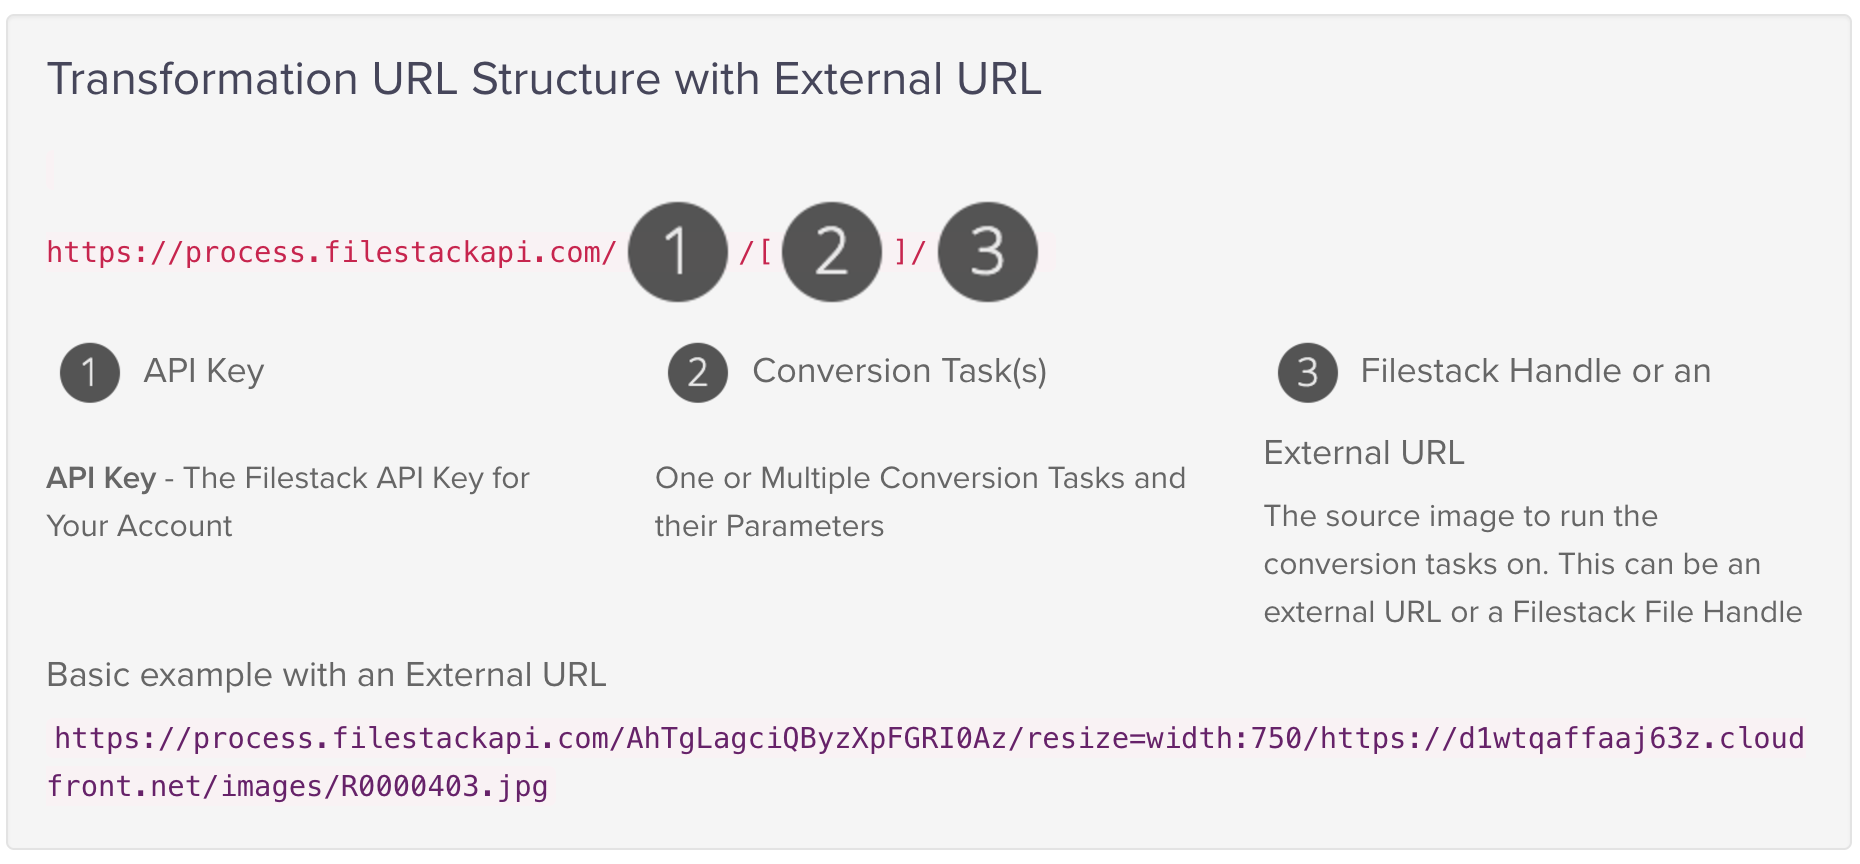
The Conversion Task(s) is basically the transformation or set of transformations to apply on a picture. Let’s see the syntax for watermark:
https://process.filestackapi.com/[API Key]/watermark=[options]/[URL]
There are 3 options
file: This is required. It is the file that will be used as the watermark. Here we will use the Filestack handle which is a UID that the Filestack API returns to you after you’ve programmatically uploaded your watermark image.size: The size of the watermark defined as a percentage of its original size, the value is an integer between1and500.position: The position of the watermark, where the possible values are top, middle, bottom, left, center, and right. They can paired likeposition:[top,left]
Enough talking, let’s see an example.
Adding a copyright watermark to the Monkey Selfie
Here is the original picture without a watermark:
https://upload.wikimedia.org/wikipedia/commons/thumb/4/4e/Macaca_nigra_self-portrait_large.jpg/347px-Macaca_nigra_self-portrait_large.jpg

And here is the watermark, the watermark we want to add:
https://cdn.filestackcontent.com/KTd4nAafRgahraWhDwvS
Now let’s create the new URL following the syntax above:
https://process.filestackapi.com/AhTgLagciQByzXpFGRI0Az/watermark=file:AEOyoBkrRVGKb8YRXzx5/https://upload.wikimedia.org/wikipedia/commons/thumb/4/4e/Macaca_nigra_self-portrait_large.jpg/347px-Macaca_nigra_self-portrait_large.jpg
Great, now, we’ve added our copyright watermark but it’s too big. Let’s reduce the size by adding size:50.
This is much better, but it’s covering those pearly whites. Let’s move the watermark to the bottom left by adding [bottom,left] .
Here is the new URL:
https://process.filestackapi.com/AhTgLagciQByzXpFGRI0Az/watermark=file:AEOyoBkrRVGKb8YRXzx5,size:50,position:[bottom,left]/https://upload.wikimedia.org/wikipedia/commons/thumb/4/4e/Macaca_nigra_self-portrait_large.jpg/347px-Macaca_nigra_self-portrait_large.jpg

Perfect.
That’s pretty much all you need to know to add watermarks to your favorite pictures!
Adding a watermark using React
If you want to play with adding a watermark programmatically, I wrote a simple app with React which includes adding a watermark and a few other transformations so you can see how the Filestack API work. All you need to do is insert your API key and start uploading pictures.
Specially, in the section below, I will show you how to
- Accept an image upload using the
pickfunction. - Apply transformations to the image.
- Dynamically generate the url describing the file transformation.

To follow along, you can clone or fork the sample application from my github.
Once you open the project, take a look at the /add view where you can upload pictures and manipulate them.
At the bottom of the form, there is a checkbox to add a watermark to the picture.
For simplicity’s sake in this demo, I use the Filestack logo as the watermark but you can customize the code and add your own watermark like our monkey friend above.

Working with the Filestack API
In the project, the React container in charge of the /add view is in/src/containers/AddContainer.jsx. This is where the form and all the functions to manipulate the URL string reside. Remember, to apply a watermark transformation, we need to pass options in a URL, so this is where we will programmatically do it.
To add a watermark, users must first upload a picture, so I started with the pick function which provides an image upload modal to the user with multiple image source options.
 filepicker.pick (
        {
          mimetype: 'image/*',
          container: 'modal',
          services: ['COMPUTER', 'FACEBOOK', 'INSTAGRAM', 'URL', 'IMGUR', 'PICASA'],
          openTo: 'COMPUTER',
        },
With this code,
- We limit the upload type to a picture by setting the
mimetypeto image/*. - The uploader interface is shown in a modal window thanks to the
containerproperty. servicesproperty lists the allowed sources to upload photos from.openTois the default image source, the physical device.
In the form, you can see the upload button that triggers the handleClickevent:

Take a look at the code:
handleClick = () => {
  this.filestack().then(handle => this.setState({
    handle,
    transformation: this.setTransformation(),
  }));
}
We are calling filestack which returns a promise. If the promise resolves, the Filestack handle is set in the state along with the transformation.
The transformation, which we’ll look at in more detail below, is just the piece of URL before the Filestack handle where the process API domain or CDN are included as well as the specific image transformations chosen in the form, in this case “apply watermark”.
To continue with the upload, the pick function is included in the filestack function:
filestack () {
  return new Promise((resolve, reject) => {
    filepicker.pick (
      {
        mimetype: 'image/*',
        container: 'modal',
        services: ['COMPUTER', 'FACEBOOK', 'INSTAGRAM', 'URL', 'IMGUR', 'PICASA'],
        openTo: 'COMPUTER',
      },
      Blob => {
        console.log(JSON.stringify(Blob));
        const handle = Blob.url.substring(Blob.url.lastIndexOf('/') + 1);
        resolve(handle);
      },
      FPError => {
        console.log(FPError.toString());
        reject(FPError.toString());
      },
    );
  });
}
filestack effectively returns a promise which either resolves or rejects according to the onSuccess and onError function parameters in pick.
Also, notice that the handle is passed in the resolve so that we can easily extract it from .then() and set it in the state.
In the animation below you can see the code in action:

A picture is uploaded using Filestack and by clicking on the watermark checkbox our logo appears on the top-right of the picture.
Now that we’ve seen how to pick and upload an image, let’s dig into the transformation concepts.
Touching any of the form inputs or checkboxes triggers the handleChange function:
handleChange = () => {
  this.setState({ transformation: this.setTransformation() });
}
We set the transformation to apply to the URL in the state by calling setTransformation. While this tutorial is focused on the watermark transformation, the app offers more than watermark transformations, so setTransformation returns the transformation URL as a summation of the transformations the user chooses:
setTransformation = () => {
  const { getPolaroid, getTornEdges, getShadow, getWatermark } = this;
  return filestackCDN + getPolaroid() + getTornEdges() + getShadow() + getWatermark();
}
Here is the code for the getWatermark function:
getWatermark = () => {
  return `${this.watermark.checked
    ? '/watermark=file:5dHB6cKbSx2w3NaU6R61,position:[top,right],s:15'
    : ''
  }`;
}
This snippet aligns the watermark to the top-right of the image and reduces its size to 15% of the original. Also, I mentioned above that this sample app uses the Filestack logo as the watermark. If you wanted to change that, you would replace 5dHB6cKbSx2w3NaU6R61 with the handle of whatever image you wanted to use.
With all this in place, we can now programmatically build our transformation url.
To gather the final URL structure we’ll use:
filestackCDN + [transformations_URL] + file_handle
Where filestackCDN is a constant in the AddContainer.jsx file,
const filestackCDN = 'https://cdn.filestackcontent.com';
the transformations_URL is the summation of the applied transformations from all the various transformation options and the file_handle is returned from the pick function once the file is uploaded to Filestack and eventually stored in the state.
So there you have it. We’ve seen how to use the Filestack API to apply a watermark to any image using React.
Want to learn more?
Here is a complete list of image transformations supported by Filestack.
See you next time!
Filestack is a dynamic team dedicated to revolutionizing file uploads and management for web and mobile applications. Our user-friendly API seamlessly integrates with major cloud services, offering developers a reliable and efficient file handling experience.
Read More →