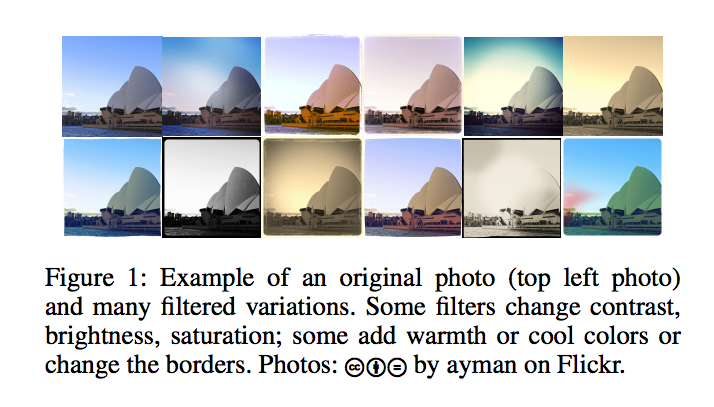
Photo filters are everywhere on the internet. But do they really affect engagement? Yes. A lot.
At least according to an interesting 2015 study from the team at Yahoo Labs and Georgia Tech called Why We Filter Our Photos and How It Impacts Engagement (PDF) which looked at the use of photo filters in the Flickr community.
Based on a study of 7.6 million Flickr photos, the study found that
filtered photos are 21% more likely to be viewed and 45% more likely to be commented on by consumers of photographs
Given how popular Instagram, Facebook and Snapchat filters are, this is not surprising, but it is interesting to be able to put a quantitative value on these filters.
Top 5 reasons to apply filters to photos
The paper also summarizes why people are so eager to filter photos. The research team breaks things down into the following 5 categories:
- Improving aesthetics: Smartphones have limited options to correct brightness, saturation, contrast and focus so filtering may improve the overall aesthetic.
- Adding vintage effects: Black and white and aged look are very popular to give photos a look and feel that is relevant but not immediately obvious in the full color version. A black and white filter, for instance, can be used to bring attention to a certain texture without being distracted by colors.
- Highlighting objects: filters can help bring focus to a certain object in the photo. This is popular when the focus should be on a person in a photo instead of the surroundings
- Manipulating colors: Filters can help to either emphasize a certain color or reduce color diversity.
- Making the photos appear more fun and unique: Sometimes filters help users give a fun and unique look that the camera alone simply cannot achieve.
The study summarizes these categories with the following examples:
| Motive | Example |
| Improving Aesthetics | Make the clouds look distinct from the sky |
| Adding Vintage Effects | Give an old look to an old theater |
| Highlighting Objects | Focus the attention on the face |
| Manipulation of Colors | Change the saturation of food |
| Making Photos Appear More Fun and Unique | Emulate film by removing colors from a portrait of an old man |
It seems clear that in the social media era filtering photos has a huge impact not just on the success of a private Facebook page but also on businesses taking advantage of social networks like Instagram, Snapchat and Twitter.
If you’re inspired by these findings, read on about how to use the Filestack API to programmatically add filters and borders to your photos.
Add Borders, Filters and Effects to your photos via API
In today’s article I will show you 3 effects you can add to your images via API:
- Instagram-like filters
- Polaroid effect
- Torn edges
- Shadow effect
Add Instagram-like filters via API
Filestack provides a bunch of filters that let you create Instagram-like photos programmatically.
Let’s look at the Sepia option.
Sepia Filter URL FORMAT:
https://process.filestackapi.com/sepia=[options]/Filestack_FileLink_Handle
or
https://process.filestackapi.com/sepia=[options]/File_URL
Here, the only option you need to apply is
tone: The value to set the sepia tone to. The value for this parameter can be any integer in a range from 0 to 100. The default value for this parameter is 80.
Let’s start with this beautiful vineyard.
https://d1wtqaffaaj63z.cloudfront.net/images/E-1701.jpg
Then add the sepia filter
https://process.filestackapi.com/AhTgLagciQByzXpFGRI0Az/sepia/https://d1wtqaffaaj63z.cloudfront.net/images/E-1701.jpg
Ahh, like being back in Italy in the 30s.
This just one of many transformations Filestack can do you for. You can do many other things such as blur, sharpen, or even add borders. A complete list of image transformations is available in our documentation.
Polaroid Effect
Shows your pictures as they come from an instant camera:
Polaroid URL Format:
https://process.filestackapi.com/polaroid=[options]/Filestack_FileLink_Handle
or
https://process.filestackapi.com/polaroid=[options]/File_URL
This effect comes with 3 options to change the background, frame color and rotation:
color: The frame color, you can use the word for a color or the hexadecimal representation. The default is snow.rotate: The rotation assumes a value between [0, 359], if not specified the rotation is random.background: The background color behind the polaroid instant picture. As the option color, you can use the word or the hex representation. The default is white.
Example
Given the following picture:
Let’s create a polaroid instant effect with frame color white and background black:
https://cdn.filestackcontent.com/polaroid=color:white,background:black/e4WkIdGRYim2PPnwssae
NB: Notice that I did not set the rotation so the value is a random value between 0 and 359.
Torn Edges
This another great effect that gives a retro feeling to your pictures:
Torn Edges URL Format:
https://process.filestackapi.com/torn_edges=[options]/Filestack_FileLink_Handle
or
https://process.filestackapi.com/torn_edges=[options]/File_URL
Torn edges allows 2 options:
spread: Set the spread of the tearing effect, the values can be between 1 to 10000. The default is [1, 10].background: The color to display behind the torn edge, it can be either the word of a color or the hexadecimal representation. The default is white.
Example
Let’s add torn edges to the following picture:
We set the spread vector to [15,10] and the background to Khaki:
https://cdn.filestackcontent.com/torn_edges=spread:[15,10],background:999999/sCnzTrKTzC9FLzoHAvWF
Shadow Effect
The shadow effect adds a shadow around the edge of the processed picture:
Shadow URL Format:
https://process.filestackapi.com/shadow=[options]/Filestack_FileLink_Handle
or
https://process.filestackapi.com//shadow=[options]/File_URL
The shadow effect is fully customizable with a few options:
blur: The blur for the shadow effect takes a value from 0 to 20, the default is 4.opacity: The opacity level for the shadow effect. The value is between 0 and 100, the default is 60.vector: the X/Y coordinates that determines the shadow position, the values are from -1000 to +1000, the default is [4,4].color: The shadow color, as usual it can be either the word of a color or the hexadecimal representation. The default is Black.background:: The color to display behind the image, it can be either the word of a color or the hexadecimal representation. The default is white.
Example
Let’s take the following picture as example:
https://cdn.filestackcontent.com/xeMDdcw5RRO74fsSevyV
We want to add a shadow with blur of 20 and vector [25,25]:
https://cdn.filestackcontent.com/shadow=blur:20,vector:[25,25]/xeMDdcw5RRO74fsSevyV
And that’s pretty much all you need to know start editing your pictures with Filestack.
Adding border and effects using React
Let’s now take a look at how to use javascript & React to add these effects to photos programmatically. You can find the sample app on my github:

In this part of the post, I am going to show you how to use React to:
- Accept an image upload using the
pickfunction. - Apply the 3 transformations to the image.
- Dynamically generate the url describing the file transformation.
Let’s kick off with the picture upload. This is where the Filestack API pick function comes in handy. With pick we have total control of the uploading process, including the type of files, file sizes, and sources.
Take a look at this code controlling the upload process:
filepicker.pick (
        {
          mimetype: 'image/*',
          container: 'modal',
          services: ['COMPUTER', 'FACEBOOK', 'INSTAGRAM', 'URL', 'IMGUR', 'PICASA'],
          openTo: 'COMPUTER',
        },
With this code,
- We limit the upload type to a picture by setting the
mimetypeto image/*. - The uploader interface is shown in a modal window thanks to the
containerproperty. servicesproperty lists the allowed sources to upload photos from.openTois the default image source, the physical device.
In the form, you can see the upload button that triggers the handleClickevent:

Take a look at the code:
handleClick = () => {
  this.filestack().then(handle => this.setState({
    handle,
    transformation: this.setTransformation(),
  }));
}
We are calling filestack which returns a promise. If the promise resolves, the Filestack handle is set in the state along with the transformation.
The transformation, which we’ll look at in more detail below, is just the piece of URL before the Filestack handle where the process API domain or CDN are included as well as the specific image transformations chosen in the form.
To continue with the upload, the pick function is included in the filestack function:
filestack () {
  return new Promise((resolve, reject) => {
    filepicker.pick (
      {
        mimetype: 'image/*',
        container: 'modal',
        services: ['COMPUTER', 'FACEBOOK', 'INSTAGRAM', 'URL', 'IMGUR', 'PICASA'],
        openTo: 'COMPUTER',
      },
      Blob => {
        console.log(JSON.stringify(Blob));
        const handle = Blob.url.substring(Blob.url.lastIndexOf('/') + 1);
        resolve(handle);
      },
      FPError => {
        console.log(FPError.toString());
        reject(FPError.toString());
      },
    );
  });
}
filestack effectively returns a promise which either resolves or rejects according to the onSuccess and onError function parameters in pick.
Now let’s run the project and browse the /add view where you can upload pictures and manipulate them.
In the form users have the chance to choose one of the effects or combined them all together:
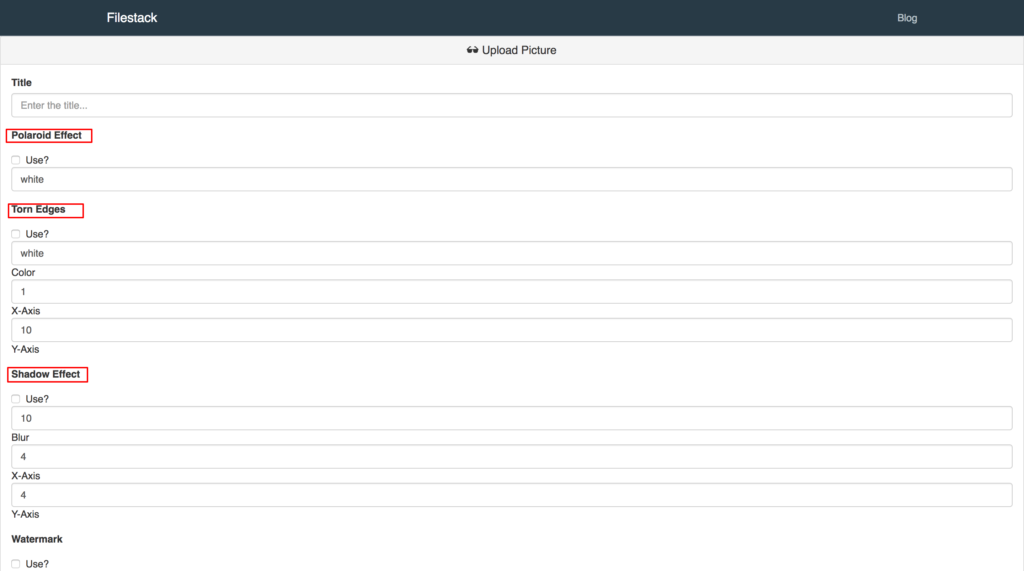
The 3 effects are fully customizable as I provided users with the ability to set the options in the form:
For instance, the shadow effects allows for blur and vector (defined by x-axis and y-axis).
In the animation below you can see the code in action to add the polaroid effect:
Now, do you remember setTranformation? Let’s dig into it:
setTransformation = () => {
  const { getPolaroid, getTornEdges, getShadow, getWatermark } = this;
  return filestackCDN + getPolaroid() + getTornEdges() + getShadow() + getWatermark();
}
The function returns the piece of URL containing the transformations applied to the picture by following the Process API syntax we have seen throughout the article. It’s important to notie that
- The effects and other transformations can be combined together, hence the string concatenation in the return line.
- I separated each transformation in a specific function for better clarity.
By the way, if you noticed the getWatermark function, this app provides more transformations than the ones covered in the article. If you are interested in learning how to add watermarks with Filestack I wrote a tutorial about it on the blog.
Here is the code for polaroid, torn edges and shadow effects:
getPolaroid = () => {
    const { polaroid, polaroidColor } = this;
    return `${polaroid.checked
      ? `/polaroid=color:${polaroidColor.value}`
      : ''
    }`;
  }

getTornEdges = () => {
  const {
    tornEdges,
    tornEdgesColor,
    tornEdgesSpreadX,
    tornEdgesSpreadY,
  } = this;
  return `${tornEdges.checked
    ? `/torn_edges=background:${tornEdgesColor.value},spread:[${tornEdgesSpreadX.value},${tornEdgesSpreadY.value}]`
    : ''
  }`;
}

getShadow = () => {
  const { shadow, shadowBlur, shadowVectorX, shadowVectorY } = this;
  return `${shadow.checked
    ? `/shadow=blur:${shadowBlur.value},vector:[${shadowVectorX.value},${shadowVectorY.value}]`
    : ''
  }`;
}
The 3 functions return the formatted piece of URL for the specific transformation by concatenating the values from the form inputs.
To gather the final URL structure we’ll use:
filestackCDN + [transformations_URL] + file_handle
Where filestackCDN is a constant in the AddContainer.jsx file,
const filestackCDN = 'https://cdn.filestackcontent.com';
the transformations_URL is the summation of the applied transformations from all the various transformation options and the file_handle is returned from the pick function once the file is uploaded to Filestack and eventually stored in the state.
That’s all, you are now able to use Filestack border and effects along with React to beautify your photos.
Do you want more?
If you are looking for more transformations, here is a list of them with the link to the documentation:
- Compress
- Facial Detection
- Crop
- Rotate
- Border and Effects
- Filters
- Collage
- Image Enhancements
- URL Screenshot
- Image to ASCII
- File type conversions
- Security
See you on the next article!
Filestack is a dynamic team dedicated to revolutionizing file uploads and management for web and mobile applications. Our user-friendly API seamlessly integrates with major cloud services, offering developers a reliable and efficient file handling experience.
Read More →