
What do you think of how QR codes are revolutionizing technology? Approximately 11 million US households regularly scan QR codes. Such codes have become indispensable in numerous industries. These include retail, marketing, healthcare, and education. By simply scanning, one retrieves information with little difficulty.
Developers can use QR code leads to keep users engaged with their applications. However, this task becomes challenging without the necessary software tools. Filestack simplifies the generation of QR codes and integrates the process into a React App.
This blog addresses QR code implementation in web applications. We will guide you through these tasks. First, we explain what QR codes are and their relevance. Then, we introduce the procedure for creating and integrating them using Filestack’s API. Let’s get started.
What is a QR Code?
A QR (Quick Response) code is a type of barcode that holds more information than a regular one. It stores things like website links, product details, or event tickets. You can access this by scanning the code with your phone or a scanner. For example, scanning a code in a menu might take you to an order page, or in stores, it shows more product details.
QR codes are used in many areas. In stores, they provide product information. In ads, they link to promotions or loyalty programs. Hospitals use them for managing patient records. They also make payments through apps like Venmo and PayPal easier. QR codes help with event check-ins, transport tickets, and even sharing school materials.
What are the real-life applications that help us create QR codes?
Here are some popular apps that help create QR codes:
Filestack
Filestack enables QR code generation within web applications through an API.
QR Code Generator
QR code generator allows users to create codes for several file types. It is available for free online or in mobile apps.
Google Chrome
Google Chrome lets smartphone users create QR codes from the share menu without leaving the site.
Canva
Canva offers a QR code generator among its tools. Users can generate QR codes in stylized formats.
QR Code Monkey
QR Code Monkey provides advanced features like high-quality codes with logos and colors.
Beaconstac
Beaconstac offers a QR Code generator for businesses. It includes dynamic codes, analytics, and customization options.
What is the best method to generate QR codes within your web application?
Filestack’s QR code generator simplifies the process. It encodes URLs quickly for web applications. You provide either a Filestack handle or an external URL. The application checks the resource before encoding it. It does not alter the file data.
Several customization options are available:
- Version: This controls the number of black-and-white modules. The versions range from 1 to 40. Version 1 has 21×21 modules. Each higher version adds four more modules per side.
- Error Correction: This feature helps recover data if the QR code is damaged. You can choose L (7% recovery), M (15%), Q (25%), or H (30%).
- Format: You can output the QR code as PNG or SVG, depending on your needs.
For example, to create a QR code using a Filestack handle:
https://cdn.filestackcontent.com/qr/HANDLE
You can add parameters:
https://cdn.filestackcontent.com/qr=version:4,error_correction:L,format:svg/HANDLE
How do you integrate Filestack’s QR codes feature?
Here are the steps to integrate Filestack’s QR codes feature:
Prerequisites
The first step towards integration is to get an API key. Create a new account at Filestack and navigate to the dashboard. The API key will be in the top right corner. The next step is to ensure that the API key is working correctly.
Testing the API requests
Create an account at Postman and navigate to the main interface. Here, you will see an option to create a new request. You should make a new GET request. In that new request bar, you should add the below-given URL along with your API key as under:
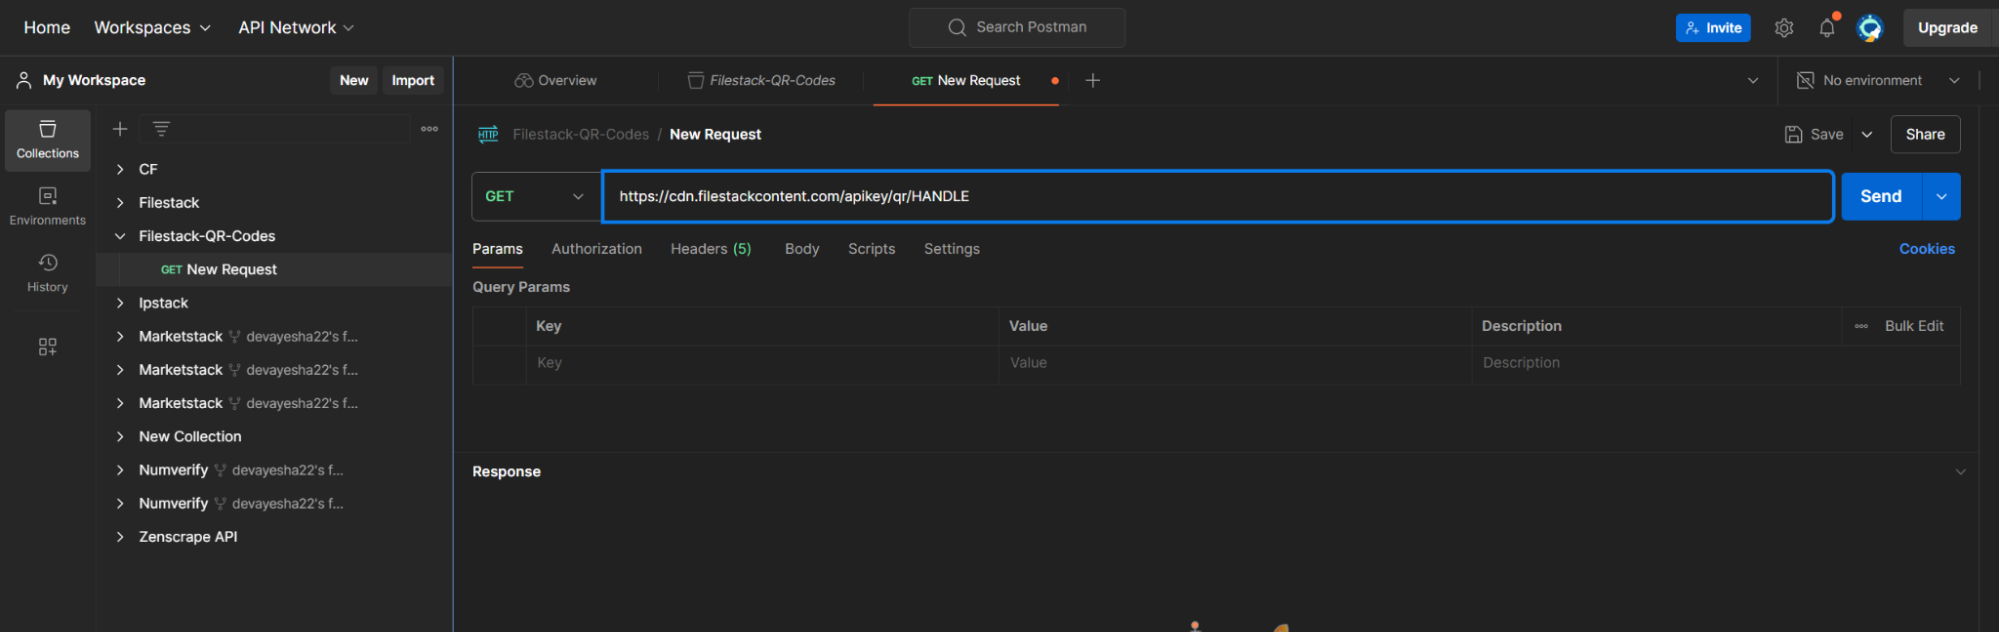
Add your API key and the link to the image you want to convert to a QR code. Then, click on the Send button. You will see the response as shown below:
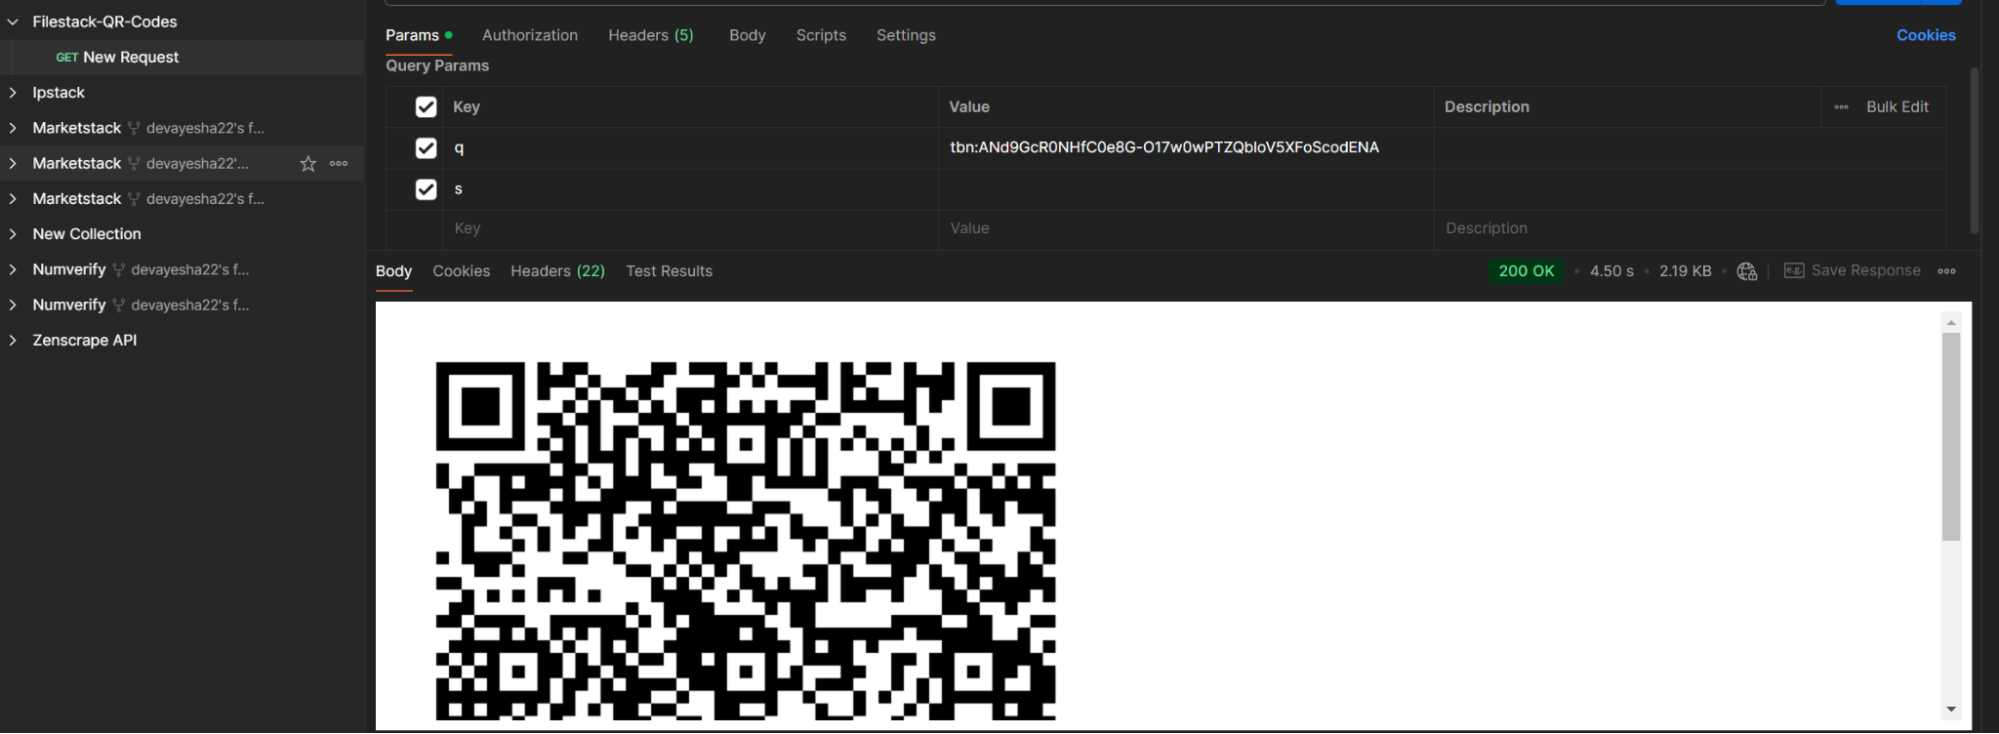
It means that our API key is working fine. Let’s build our sample application now.
Building a sample application
Before building an application, we must ensure React JS is installed on our system. You can download it directly from React’s official website. After installing React, follow the steps given below to build your application.
1. Set up Your React Environment
Step 1: Install Node.js and npm
Before we start, ensure you have Node.js installed on your machine, as it includes npm, which we’ll use to create the React app.
You can check if Node.js is installed by running:
node -vCheck if npm is installed:
npm -vStep 2: Create a New React App
Now, let’s create a new React application using the command npx (comes with npm):
npx create-react-app filestack-qr-generatorNavigate to the project directory:
cd filestack-qr-generator2. Install the Filestack SDK
We’ll need the filestack-js library to handle file uploads. You can install it using npm:
npm install filestack-js3. Modify the Project Structure
Let’s modify the project by creating the necessary components and styles.
Step 1: Update App.js
Replace the contents of the default App.js with the code for the QR code generator functionality:
4. Step-by-Step Breakdown of App.js
1. Importing Required Libraries
At the top of the App.js file, we import the necessary libraries:
import React, { useState } from "react";

import { init } from "filestack-js";

import "./App.css";- React and useState are imported from the react library to allow us to use React components and hooks.
- The init function is imported from the filestack-js library, which initializes the Filestack client.
- The ./App.css file is imported to apply custom styles to the app.
2. Initializing the Filestack Client
Next, we initialize the Filestack client with an API key:
const client = init("Add-Your-API-Key-Here");- The init() method creates a Filestack client. The argument passed to it (“Add-Your-API-Key-Here”) is the Filestack API key, which you can get from the Filestack dashboard after signing up.
- This client object interacts with Filestack services, including file uploads.
3. Creating the Functional Component
The main component of the app is the App functional component. Inside it, we use the useState hook to manage the state of the QR code URL:
function App() {

const [qrCodeUrl, setQrCodeUrl] = useState(null);- qrCodeUrl is a state variable that will store the URL of the generated QR code.
- setQrCodeUrl is the function used to update the qrCodeUrl value.
4. Handling File Uploads
The handleUpload function is responsible for opening the Filestack file picker and processing the uploaded file:
const handleUpload = () => {

  client

    .picker({

      accept: "image/*",

      onUploadDone: (res) => {

        const handle = res.filesUploaded[0].handle;

        generateQRCode(handle);

      },

    })

    .open();

};- When the user clicks the upload button, the Filestack client’s picker method is called.
- The picker accepts only image files (accept: “image/*”), ensuring that only image files can be uploaded.
- Once the user uploads an image, the onUploadDone callback is triggered. This callback receives a response (res) that contains information about the uploaded files.
- We extract the handle (a unique identifier for the uploaded file) and pass it to the generateQRCode function to generate the QR code.
5. Generating the QR Code
The generateQRCode function takes the file handle and generates the QR code URL:
const generateQRCode = (handle) => {

  const qrUrl = `https://cdn.filestackcontent.com/apikey/qr/${handle}`;

  setQrCodeUrl(qrUrl);

};- Filestack provides a CDN (Content Delivery Network) to serve the files you upload. By using the handle, you can generate a link to access the QR code for the file.
- We dynamically construct the URL where the QR code is available by using the format: https://cdn.filestackcontent.com/apikey/qr/${handle}.
- The setQrCodeUrl function is then used to update the state with the newly generated QR code URL.
6. Rendering the UI
In the return block of the component, we define the UI structure:
return (

  <div className="container">

    <img

      src="https://img.freepik.com/premium-vector/qr-code-cartoon-character-searching-with-magnifying-glass-cute-design_152558-13614.jpg"

      alt="Cartoon Banner"

      className="banner-img"

    />

    <h1>Filestack QR Code Generator</h1>

    <button id="uploadBtn" onClick={handleUpload}>

      Upload File

    </button>


    <div id="qrCode">

      {qrCodeUrl && (

        <img src={qrCodeUrl} alt="QR Code" style={{ maxWidth: "100%", height: "auto" }} />

      )}

    </div>


    {qrCodeUrl && (

      <a id="downloadLink" href={qrCodeUrl} download="qrcode.png">

        <button id="downloadBtn">Download QR Code</button>

      </a>

    )}

  </div>

);
Here’s how each part works:
- <div className=”container”>: The entire content is wrapped inside a container div that applies CSS styles for layout and formatting.
- Banner Image: The <img> tag renders a cartoon banner image at the top of the UI for some visual appeal.
- Title: The <h1> tag displays the title “Filestack QR Code Generator.”
- Upload Button: The <button> with the onClick event triggers the handleUpload function, which opens the Filestack picker for file uploads.
- QR Code Display: If a QR code URL is available (i.e., qrCodeUrl is not null), it renders an image (<img>) displaying the QR code. The style ensures that the image is responsive.
- Download Button: If the qrCodeUrl is available, a download link is created with an <a> tag. This allows the user to download the QR code as an image by clicking the “Download QR Code” button.
7. Exporting the Component
Finally, the App component is exported to be used in other parts of the application:
export default App;Complete App Flow
- File Upload
The user clicks the “Upload File” button, which triggers the Filestack file picker.
- File Handling
Once a file is uploaded, the file’s handle is retrieved from Filestack.
- QR Code Generation
A QR code is generated based on the file handle, and the QR code image is displayed in the browser.
- Download Option
The user can download the generated QR code by clicking the “Download QR Code” button.
What’s Happening Under the Hood:
- React Hooks (useState) manages the state of the QR code URL, so the UI can update dynamically when the state changes.
- Filestack API manages the file uploads and QR code generation using Filestack’s powerful file handling services.
- UI Design is styled to be visually appealing and responsive, adapting to different screen sizes.
Next Steps:
- You can enhance this application by allowing different types of file uploads.
- Add more customization options for the QR code (e.g., color, size). The CSS styles are also customizable and can be accessed at the code’s GitHub repository.
- Integrate this app into a larger system or deploy it for real-world use.
App.css
You should add the CSS styles from the GitHub repository into your project’s App.css file. Here is the explanation for CSS styles:
- font-family is used for the entire app.It sets ‘Poppins’ as the font, which is a clean and modern sans-serif.If ‘Poppins’ is unavailable, it defaults to any sans-serif font.
- background is a linear gradient applied to the background. It transitions from blue (#667eea) to purple (#764ba2) at a 135-degree angle.
- margin: 0; padding: 0 resets the default margins and padding.This removes any extra spacing around the edges of the body.
- display: flex; justify-content: center; align-items: center treats the body as a flex container. It centers the content both horizontally and vertically.
- max-width: 500px limits the container’s width to 500px.This prevents it from stretching too wide.
- margin: 20px adds space around the container. It separates the container from other elements.
- border-radius: 15px gives the container rounded corners. It provides a modern and softer look.
- box-shadow adds a subtle shadow to the container. It gives the container a lifted, 3D effect.
- text-align: center centers all the text inside the container. This makes it easier to read and more visually balanced.
- transition: transform 0.3s ease-in-out ensures smooth scaling.It applies the effect over 0.3 seconds when the container is hovered.
- transform: scale(1.02) slightly increases the size of the container (by 2%). This happens when the user hovers over it, adding interactivity.
- margin-bottom: 20px adds space below the heading. It separates the heading from the other content.
- font-weight: bold makes the button text bold.This emphasizes the importance of the text.
- border-radius: 30px fully rounds the button corners.This gives them a modern, pill-shaped look.
- cursor: pointer changes the cursor to a pointer when hovering.This indicates the buttons are clickable.
- transition: background-color 0.3s ease ensures the button background color changes smoothly when hovered.
- background-color: #ff5a3c darkens the button’s background color on hover.This adds an interactive visual effect.
- margin-top: 30px adds space above the QR code section.It separates it from the upload button.
- text-decoration: none removes the underline from the download link.This makes it look more like a button than a hyperlink.
- background-color: #42b883 sets the download button background to teal green.This makes it distinct from the upload button.
- background-color: #36a374 darkens the download button background on hover. This gives it an interactive effect.
- margin-bottom: 20px adds space below the banner image.This separates it from the heading.
- @keyframes fadeIn defines the fade-in animation.It gradually increases an element’s opacity from 0 to 1.
- animation: fadeIn 1s ease applies the fade-in effect to images.They gradually appear over 1 second.
Output
Run the command:
npm startYou should see that the application is started at localhost 3000, as shown below:

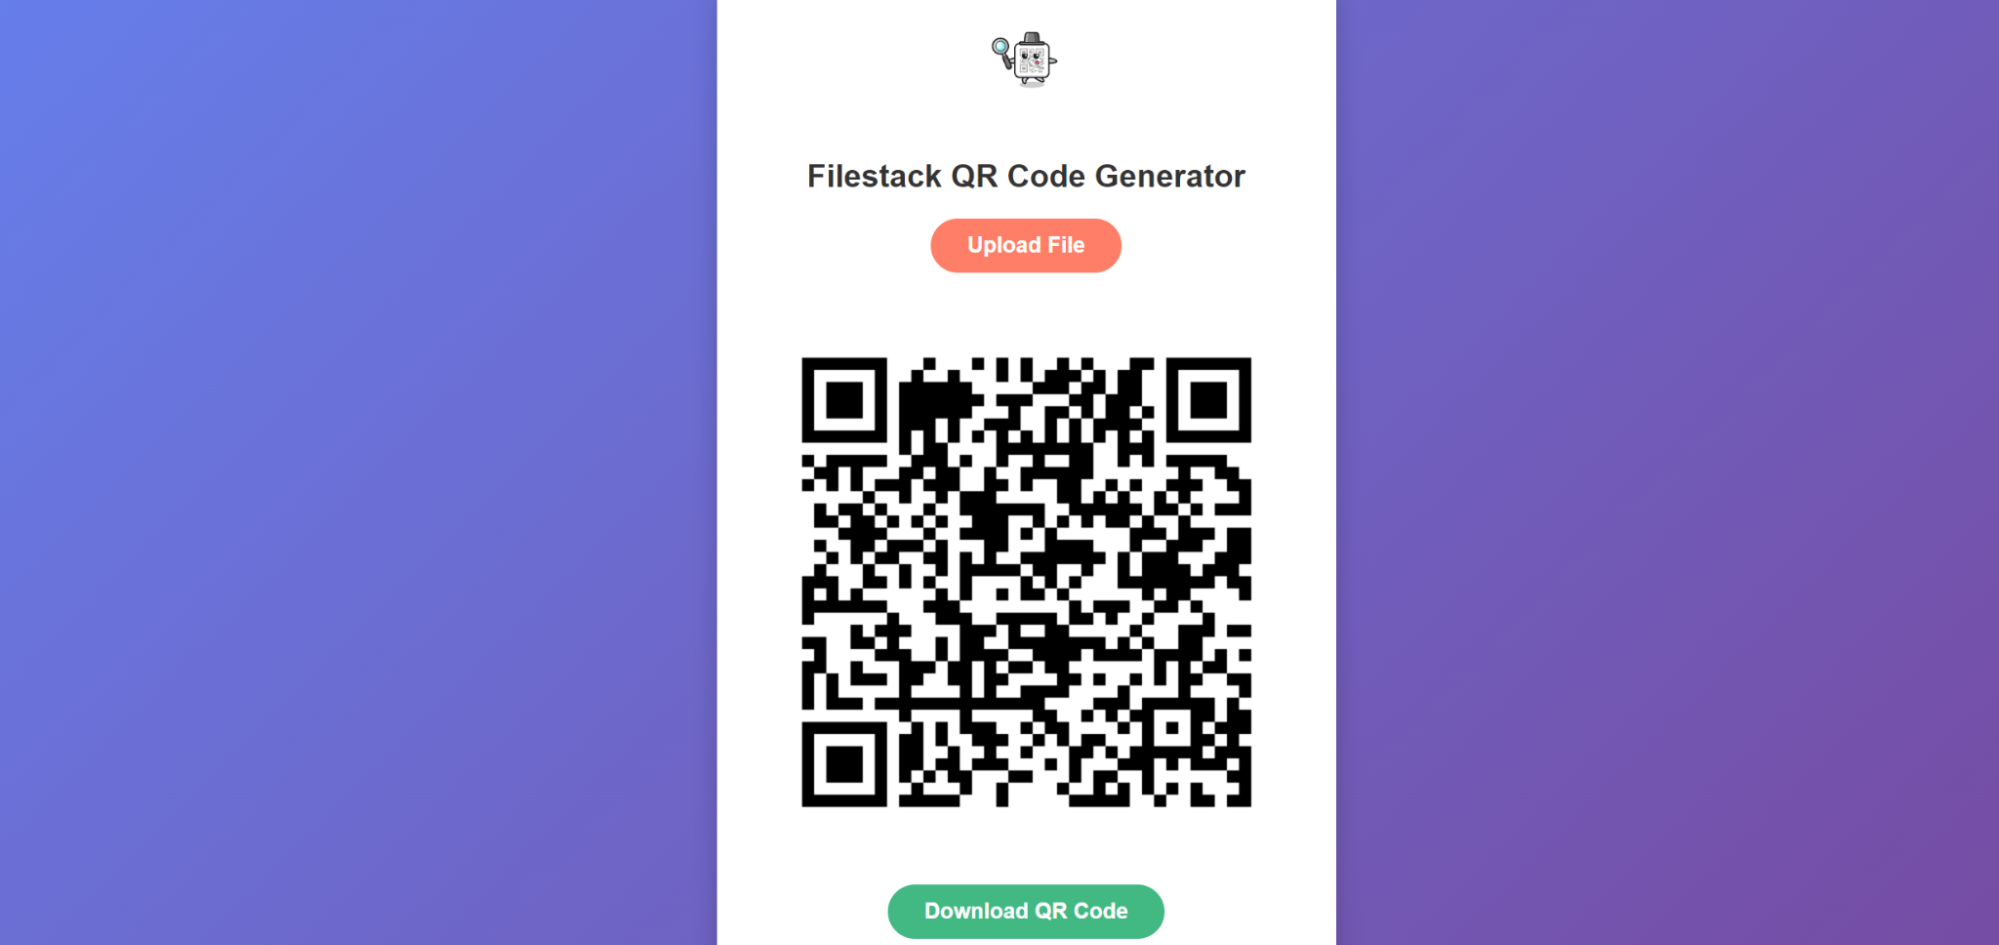
Here is our main web page:

Click on the upload file, and you will get the Filestack file picker under:

Upload the file from your desired location and click on the upload button. You will get the QR code generated for that specific file:

Conclusion
It is easy and fast to add QR codes with Filestack into your React web application. Dynamic QR codes can be generated easily. They can be used for sharing product details, payment processing, or event ticketing. React integration with Filestack’s API is quick and efficient.
Filestack ensures security and submission are not overlooked. The QR code feature can be customized within the application. This guarantees both security and dependability.
Filestack simplifies development, whether for small or large applications. It allows you to focus on user needs without worrying about code complexity.
FAQs
What is QR code integration?
This enables users to scan codes for information or payments. Applications like Filestack and PayPal use this feature.
How do you integrate the QR code feature into a website?
Use a QR code generator API. Manage the API within your website’s code. Automate it to create and display codes based on user interaction.
Does Filestack provide secure QR code generation?
Filestack offers secure QR code generation. It uses encryption and access procedures to protect data. It checks the file’s availability before creating the QR code.
How much do the Filestack QR codes feature cost?
Filestack-paid plans start at $69 per month. You can always upgrade to higher plans.
Sign Up for free at Filestack to create an app that generates accurate QR codes.

Ayesha Zahra is a Geo Informatics Engineer with hands-on experience in web development (both frontend & backend). Also, she is a technical writer, a passionate programmer, and a video editor. She is always looking for opportunities to excel in her skills & build a strong career.
Read More →