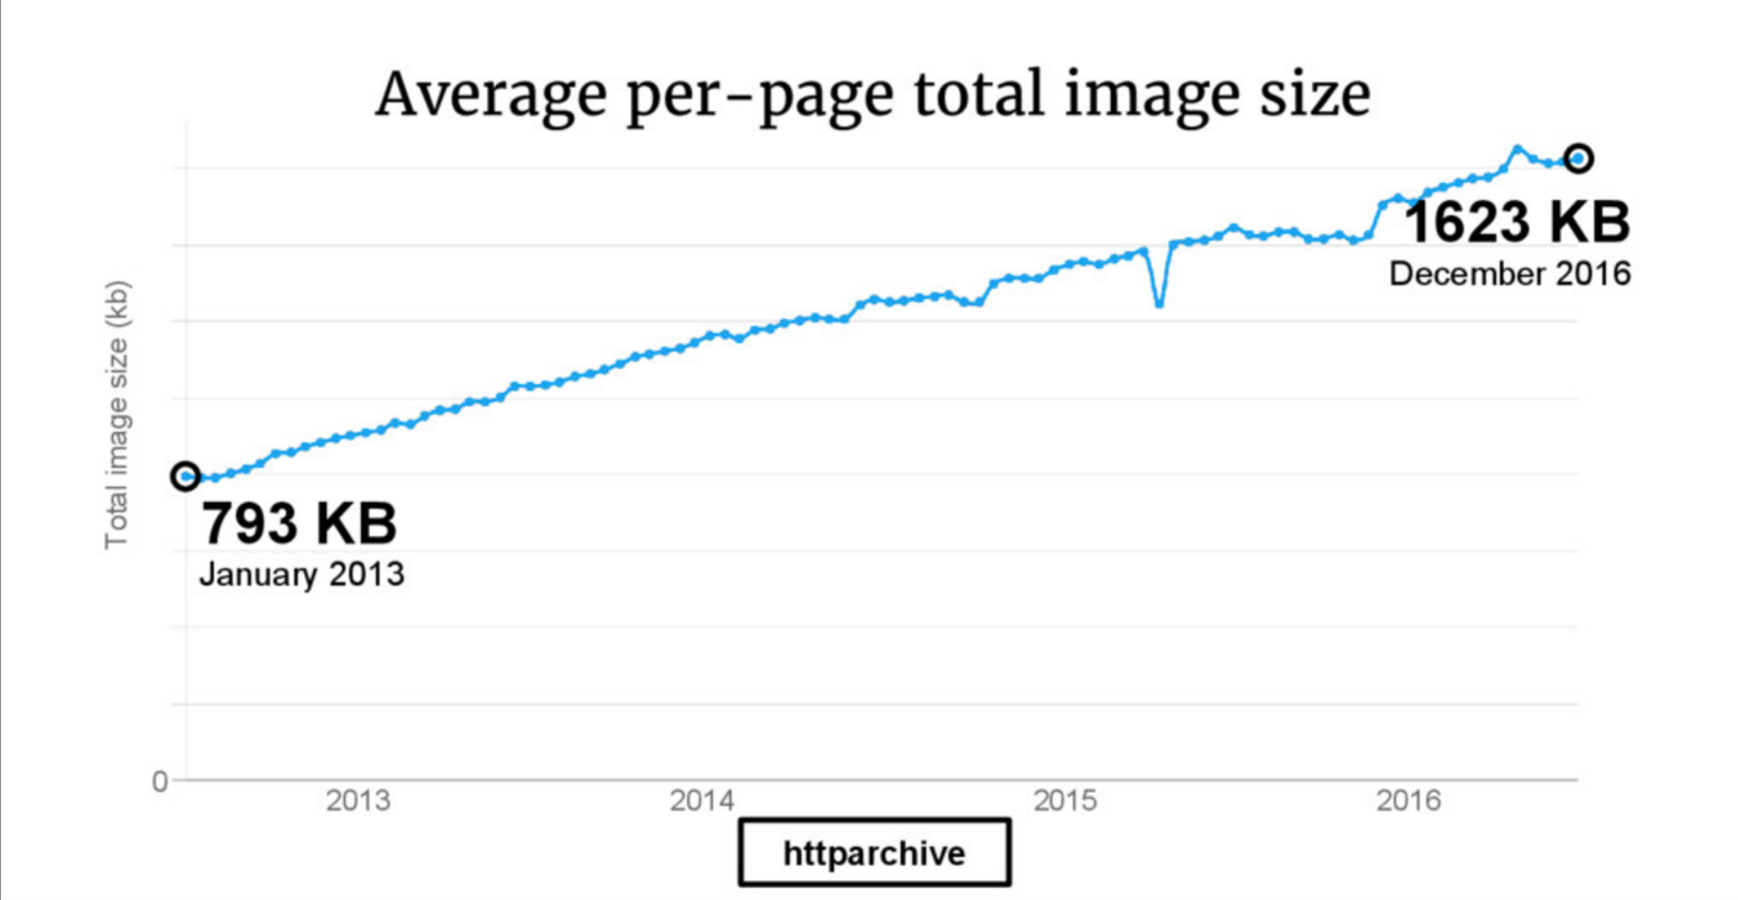
In recent years, we have seen an exponential increase in the number of images displayed online. Each of the 2 billion people with a smartphone is an amateur photographer, taking and sharing images regularly. Additionally, as the the capabilities of smartphone cameras continue to advance, file sizes are also trending larger. As a result, we are seeing scores of large images circulate the web.
To a software developer, large images pose both opportunities and challenges. A high quality image is advantageous when being viewed on a large device. Furthermore, high quality images supplies you with more visits by increasing users’ engagement. However, a drawback is that images can also slow down a webpage or interfere with formatting on smaller screens. Truly, optimization must take into account not just css and javascript but images as well:
Images compose the bulk of the network traffic so reducing their sizes has immediate payoffs. For instance, user experience generally benefits from a reduced load time and many surveys claim that about half of the users tend to abandon a website that isn’t loaded within 3 seconds. For an e-commerce website a slow load time means losing potential sales!
There are several techniques to help achieve this result, such as browser caching, lazy-loading and compression.
Consider a website setup for repeated visitors, browser caching is particularly effective as it helps to temporarily store files in the user’s browser. Static files are downloaded once and any subsequent visit has already some of the files needed. Thus, the amount of data to be dowloaded is less and the server requests decrease resulting in faster page load time.
Lazy-loading on the other hand is a technique that defers content loading until the point the specific content is needed. Webpages are created with placeholder content which is only replaced with actual content when the user needs it. By doing so users connect to content faster as lazy-loading avoid the initial bulk loading!
Finally, file compression minimizes the size in bytes of a file without degrading it (lossless compression). A smaller resize allows more files to be stored in a storage device and faster transmission on the web.
In this tutorial, we will walk through how to use Filestack’s Processing API to implement a compression algorithm to bring our web optimization to the next level:
By compressing users’ uploaded pictures we certainly improve content loading time.
Compress Images in your React App
I wrote a very simple React app to let you play with compression.
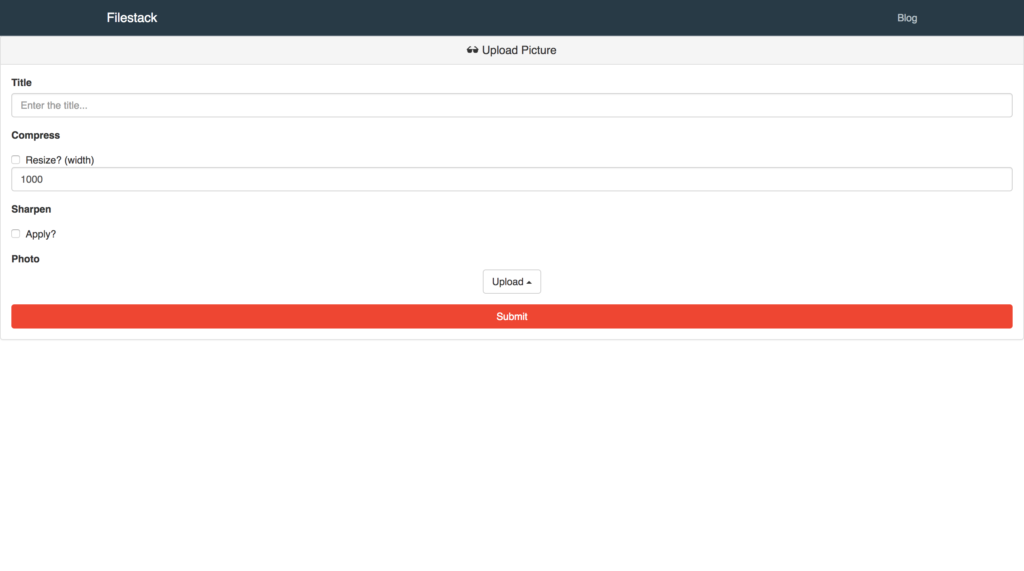
The app allows users to upload their favorite photos and share them in the homepage. Once uploaded one can choose to compress, resize or sharpen a photo before sharing it.
Homepage
Upload Form
The sample code is available on my github.
Upload a Picture
The first step is to upload the picture through the new picker V3.
pick now returns a promise the way modern Javascript works so my implementation takes advantage of ES2017 async/await. Take a look at the code:
filestack = () => {
  return client.pick(
    {
      accept: 'image/*',
      maxSize: 1024 * 1024 * 2,
      transformOptions: {
        transformations: {
          rotate: true,
          circle: true,
          monochrome: true,
          sepia: true,
          crop: {
            aspectRatio: 16 / 9,
          },
        },
      },
    }
  );
};
The new pick function allows user to apply several image transformations within its UI when uploading the photo. You have total customization in which transformations you enable in your app, and in my case I chose them all.
Finally, please note the image size limit: 2MBs.
Now we got the promise from filestack, we need another function to handle the response when the promise either resolves or rejects right?
That’s handleClick job, this async function is the core function for the view:
- First, it gets the promise from
filestack. - When the promise resolves it stores the handle from the response in the state and run
setTransformationto update the state with the latest transformation chosen by the users. - In case of promise rejection the catch branch log the error in the browser console.
Here is the code:
async handleClick () {
  try {
    const { filesUploaded } = await this.filestack();
    const handle = filesUploaded[0].handle;
    this.setState({ handle, transformation: this.setTransformation() });
  } catch (e) {
    console.log(e);
  }
}
Filestack Compression API
Filestack’s compression transformation is one of the simplest ways to reduce file size. To compress files, Filestack’s API…
- Utilizes mozjpeg to offer improved compression for jpgs over the algorithm used for output=compress:true.
- Doesn’t re-compress a previously compressed image.
- Only compresses png and jpg files.
If you are not familiar with Filestack transformations take a look at the transformation architecture. In particular, there are two ways to format the transformation URL:
TRANSFORMATION URL STRUCTURE WITH FILESTACK HANDLE
https://process.filestackapi.com/[conversion_task]/filestack_handle
TRANSFORMATION URL STRUCTURE WITH EXTERNAL URL
https://process.filestackapi.com/api_key/[conversion_task]/[filestack_handle or URL]
The compress transformation is the so-called conversion_task so an example of URL could be
https://cdn.filestackcontent.com/compress/6fWKQk3Tq2numL2dACWw
The original photo is 105kb and when compressed it becomes 99kb. There is no pre-defined value when compressing a picture so the reduction can be far greater.
A more meaningful example is to first resize the picture and finally compress it.
The original size of the photo is 1280×843, let’s resize the width to 800 and compress it:
https://cdn.filestackcontent.com/resize=w:1000/compress/6fWKQk3Tq2numL2dACWw
And the final size is 63kb!
Apply the Transformations
To compress or sharpen a photo we trigger setTransformation whenever a user selects a transformation in the form. We have just seen the function call in handleClick but the same is done in handleChange:
handleChange = () => {
  this.setState({ transformation: this.setTransformation() });
}
So here is the code for setTranformation:
setTransformation = () => {
  const { getCompress, getSharpen } = this;
  return filestackCDN + getSharpen() + getCompress();
}
For clarity I separated the 2 available transformations in specific functions getSharpen and getCompress.
getSharpen = () => {
  return `${this.sharpen.checked ? '/sharpen' : ''}`;
}
getCompress = () => {
  const { resize, resizeWidth } = this;
  return `${resize.checked
    ? `/resize=w:${resizeWidth.value}/compress`
    : '/compress'
  }`;
}
Both functions retrieves the form values and create the transformation URL.
Want to learn more?
Here is a complete list of image transformations supported by Filestack.
- Compress
- Facial Detection
- Crop
- Rotate
- Border and Effects
- Filters
- Collage
- Image Enhancements
- URL Screenshot
- Image to ASCII
- File type conversions
- Security
See you next time!
Filestack is a dynamic team dedicated to revolutionizing file uploads and management for web and mobile applications. Our user-friendly API seamlessly integrates with major cloud services, offering developers a reliable and efficient file handling experience.
Read More →


