
Ever wonder how facial detection can boost your system’s security? Keeping your apps and data safe in our digital world has become important. Facial detection is a smart technology that spots and checks human faces. It also adds a strong security layer to many applications.
In this blog, we’ll explain facial detection and how it works. You’ll also see real-life examples of how it’s used for security. Furthermore, showing its practical benefits. We’ll then discuss how facial detection can make your apps more secure. Picking the right tool is key, and we’ll show why Filestack is the best choice.
Filestack offers easy-to-use features to help you add facial detection to your systems. We’ll also guide you through building a simple app using Filestack’s facial detection. This includes prerequisites, step-by-step code examples, and the final results.
Finally, we’ll summarize why Filestack is great for facial detection. Let’s get started and see how Filestack can help make your system safer with facial detection!
What is facial detection?
Facial detection finds and identifies human faces in photos and videos. To spot a face, it looks for key features like eyes, nose, and mouth.
This technology is the first step in facial recognition systems, which can also identify or verify people. Facial detection is used in security systems, unlocking smartphones, and tagging people in social media photos.
It uses smart computer programs to work accurately, even in poor lighting or with different facial expressions. This technology helps improve security, makes devices easier to use, and allows new ways for people to interact with computers.
Real-life examples of applications using the facial detection feature for security
Here are some real-life mobile and web apps that use facial detection technology:
👉Apple’s Face ID feature on iPhones and iPads uses facial detection to unlock the device, authenticate purchases, and log into apps.
👉Facebook uses facial detection for photo tagging suggestions. When you upload a photo, it can recognize faces and suggest tagging friends.
👉Google Photos uses facial detection to organize and search your photos by recognizing faces.
👉Snapchat uses facial detection for its popular lenses and filters. It can apply fun and interactive effects to users’ faces in real time.
👉Samsung Pass uses facial detection for secure access to apps and websites. Therefore, users can log in using their faces instead of passwords.
👉TikTok employs facial detection for various effects and filters. Furthermore, adding creative elements to videos based on facial features can enhance the user experience.
👉Windows Hello on Microsoft devices uses facial detection for secure and quick sign-in to Windows devices and compatible apps.
👉 The Upwork freelancing platform also uses facial detection when you are uploading a profile picture. If it can’t detect the face in the photo, it will not let you upload it.
Regarding real-time face detection, Upwork keeps a database of your ID cards with pictures. When you verify your identity at Upwork, the camera picture matches the picture on the ID card. If it finds a resemblance, your identity gets verified.
How does facial detection help us secure our applications?
Facial detection helps secure applications by recognizing people’s faces to confirm their identity.
✔️This technology uses advanced software to match faces with stored images. Hence, only authorized users can access the application.
✔️One major benefit is that users don’t need to remember passwords or carry physical keys. They just use their face to log in. Therefore making the process simple and quick. This convenience encourages more people to use secure methods.
✔️Facial detection also improves security by monitoring in real time. It can spot and alert you about unauthorized access attempts or unusual activities. Hence allowing quick responses to potential threats. This is useful in sensitive areas like banks, hospitals, and businesses.
✔️Additionally, facial detection can work with other security methods, like fingerprint or iris scans, for stronger protection. Combining these methods makes it much harder for unauthorized people to gain access.
What is the best tool to integrate facial detection into your applications?
Choosing the best facial detection tool depends on several factors. We will first explain those factors. Then, we will show you the most reliable face detection tool for your applications. Let’s begin.
Choosing the right facial detection tool
Choosing the right facial detection tool is important for keeping your app secure and easy to use. Here are some things to consider:
- The tool should recognize faces correctly and quickly. This ensures a good user experience.
- Look for tools that protect facial data. They should also prevent fake faces from fooling the system and follow privacy laws.
- Ensure the tool works well with your current systems. It should be compatible with mobile, web, and desktop apps.
- Choose a tool that can handle more users and data as your app grows. It should not slow down with increased use.
- The tool should allow you to adjust settings to fit your needs. This includes tweaking detection settings and adding extra security measures.
- Good customer support and clear instructions are important for solving problems and getting the most out of the tool.
- Check the pricing. Some tools require a one-time payment, while others need a subscription. Pick one that fits your budget and meets your needs.
Filestack
The `detect_faces` function is designed to identify faces in images. It includes parameters such as `minsize` and `maxsize` to exclude objects unlikely to be faces.
👉`maxsize` specifies the largest object size to be considered a face. Similar to `minsize`, it helps filter out objects that are too large to be faces.
👉`minsize` specifies the smallest object size to be considered a face. For example, if set to 400, the function will only detect faces that are at least 400×400 pixels.
👉Enabling `export:true` will export all detected face data to a JSON format, including the coordinates (`x` and `y`), dimensions (`width` and `height`), and an `id` for each detected face.
Here’s an example output:
[

    {

        "x": 642,

        "y": 298,

        "width": 137,

        "height": 137,

        "id": 1

    },

    {

        "x": 446,

        "y": 731,

        "width": 138,

        "height": 138,

        "id": 2

    }

]
Building a sample app
Follow the below steps to build a sample app for facial detection.
Prerequisites
There are a few prerequisites that you must know before building the app:
- HTML
- CSS
- JavaScript
- Filestack API key
👉Follow the below steps:
- To get the Filestack API Key, you should visit the Filestack website at: https://www.filestack.com/
- Next, click the Sign-Up button and create an account.
- Filestack asks for verification through your email every time you log in to your account. This helps us ensure the security of our accounts.
- After logging in, you will find the API key in the top right corner. Keep it secure. You should not share this API key with anyone.
- Next, open the command prompt and create a directory to place your code.
- Then, open that directory in your Visual Studio Code.
- Create an index.html file under your root folder.
Our environment is all set up now. However, before integrating Filestack into our app, we should conduct API testing via Postman to ensure our API works fine. Let’s do it now!
API Testing in Postman
Open the Postman and enter the API URL into the request bar:
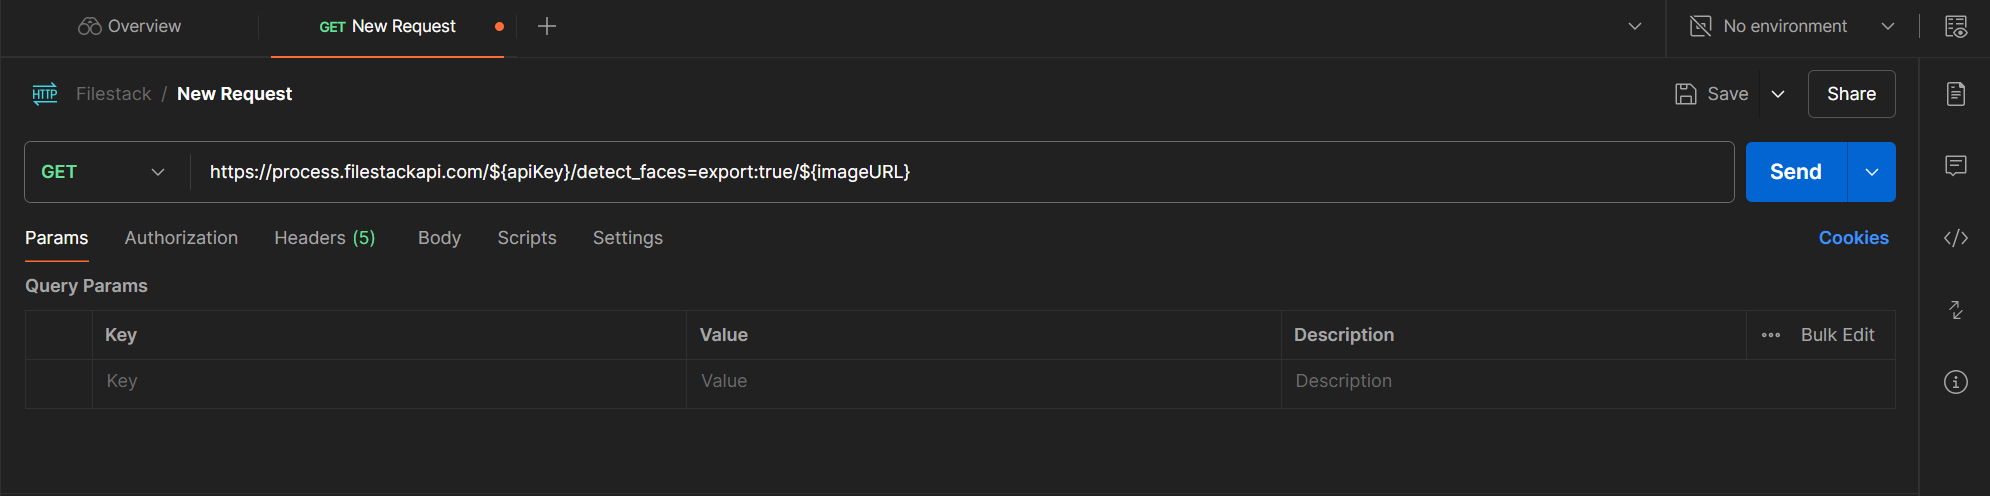
Click on the Send button, and you will get the response as under:
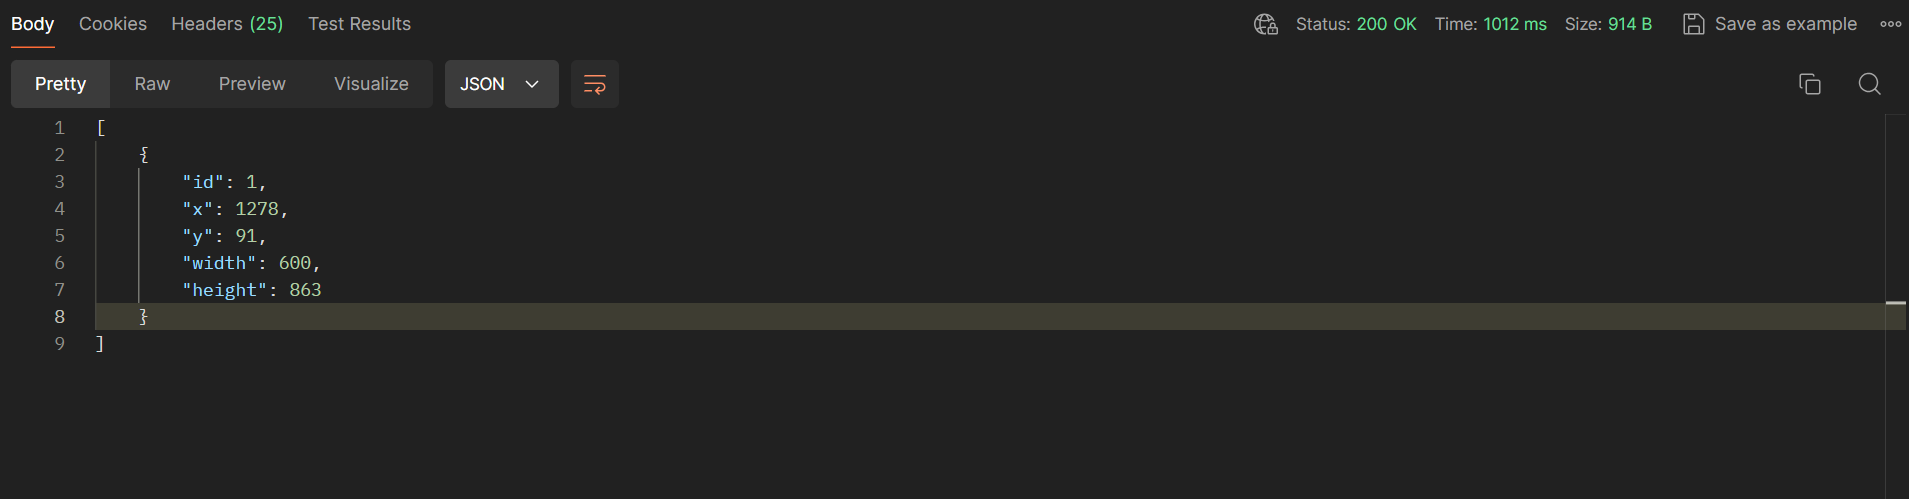
You will get the above response only if your API is working fine. Otherwise, you may encounter issues. Let’s start writing code inside our index.html file.
Step 1: Setting Up the HTML Structure
First, we must set up the basic HTML structure for our face verification app.
<!DOCTYPE html>

<html>

<head>

    <title>Face Verification App</title>

    <style>

        /* Add CSS styles here */

    </style>

    <script src="https://code.jquery.com/jquery-3.6.0.min.js"></script>

    <script src="https://static.filestackapi.com/filestack-js/3.x.x/filestack.min.js"></script>

</head>

<body>

    <div id="container">

        <div id="content">

            <h1>Face Verification for App Security</h1>

            <button id="verifyButton">Verify Face</button>

        </div>

        <div id="output"></div>

        <div id="message"></div>

    </div>

    <script>

        // Add JavaScript code here

    </script>

</body>

</html>- <!DOCTYPE html> declares the document type and version of HTML.
- <html> is the root element of the HTML document.
- <head> contains meta-information about the document, including the title and links to CSS and JavaScript resources.
- <style> is where we will add our CSS styles.
- <script> tags include jQuery and Filestack’s JavaScript library.
- <body> contains the main content of the page. We have a `div` with `id=”container”` that will hold our main interface, including a heading, a button, an output area for the face verification result, and a message area for status updates.
Step 2: Adding CSS Styles
Next, we’ll add some CSS to style the page and make it look visually appealing.
<style>

    body {

        font-family: 'Segoe UI', Tahoma, Geneva, Verdana, sans-serif;

        background-color: #1e1e1e;

        margin: 0;

        padding: 0;

        display: flex;

        justify-content: center;

        align-items: center;

        height: 100vh;

        background-image: url('https://www.nec.com/en/global/solutions/biometrics/img/face/face_header_sd.jpg');

        background-size: cover;

    }


    #container {

        text-align: center;

        background-color: #333;

        padding: 30px;

        border-radius: 10px;

        box-shadow: 0 0 20px rgba(0, 0, 0, 0.5);

        color: #fff;

    }


    h1 {

        color: #00bfff;

    }


    #verifyButton {

        padding: 12px 24px;

        background-color: #00bfff;

        color: #1e1e1e;

        border: none;

        border-radius: 25px;

        cursor: pointer;

        font-size: 16px;

        margin-top: 20px;

        transition: background-color 0.3s ease;

    }


    #verifyButton:hover {

        background-color: #009acd;

    }


    #output canvas {

        display: block;

        margin: 20px auto;

        border: 3px solid #00bfff;

        box-shadow: 0 0 20px rgba(0, 0, 0, 0.5);

    }


    #message {

        margin-top: 20px;

        font-size: 18px;

        color: #00bfff;

    }

</style>- The `body` selector styles the entire page with a font, background color, and a background image that covers the entire viewport. It also centers the content both vertically and horizontally.
- #container` styles the main content area with a dark background, padding, rounded corners, and a shadow for a card-like appearance.
- H1 sets the color of the heading.
- #verifyButton styles the button, including padding, background color, text color, border radius, cursor style, font size, margin, and a transition effect for hover state.
- #verifyButton:hover changes the button’s background color when hovered.
- #output canvas styles the canvas element where the face detection results will be displayed.
- #message styles the message area for status updates.
Step 3: Adding JavaScript for Face Verification
Let’s add the JavaScript code to handle the face verification logic.
<script>
const apiKey = 'AddYourAPIKey';
const client = filestack.init(apiKey);
$('#verifyButton').click(function() {
const options = {
onUploadDone: function(res) {
const fileUrl = res.filesUploaded[0].url;
verifyFace(fileUrl);
},
};
const picker = client.picker(options);
picker.open();
});
function verifyFace(imageURL) {
const detectURL = `https://process.filestackapi.com/${apiKey}/detect_faces=export:true/${imageURL}`;
$.getJSON(detectURL, function(data) {
const outputCanvas = document.createElement("canvas");
const ctx = outputCanvas.getContext("2d");
const img = new Image();
img.onload = function() {
outputCanvas.width = img.width;
outputCanvas.height = img.height;
ctx.drawImage(img, 0, 0, img.width, img.height);
if (data.length > 0) {
data.forEach(function(face) {
ctx.strokeStyle = "#4CAF50"; // Border color
ctx.lineWidth = 2;
ctx.strokeRect(face.x, face.y, face.width, face.height);
});
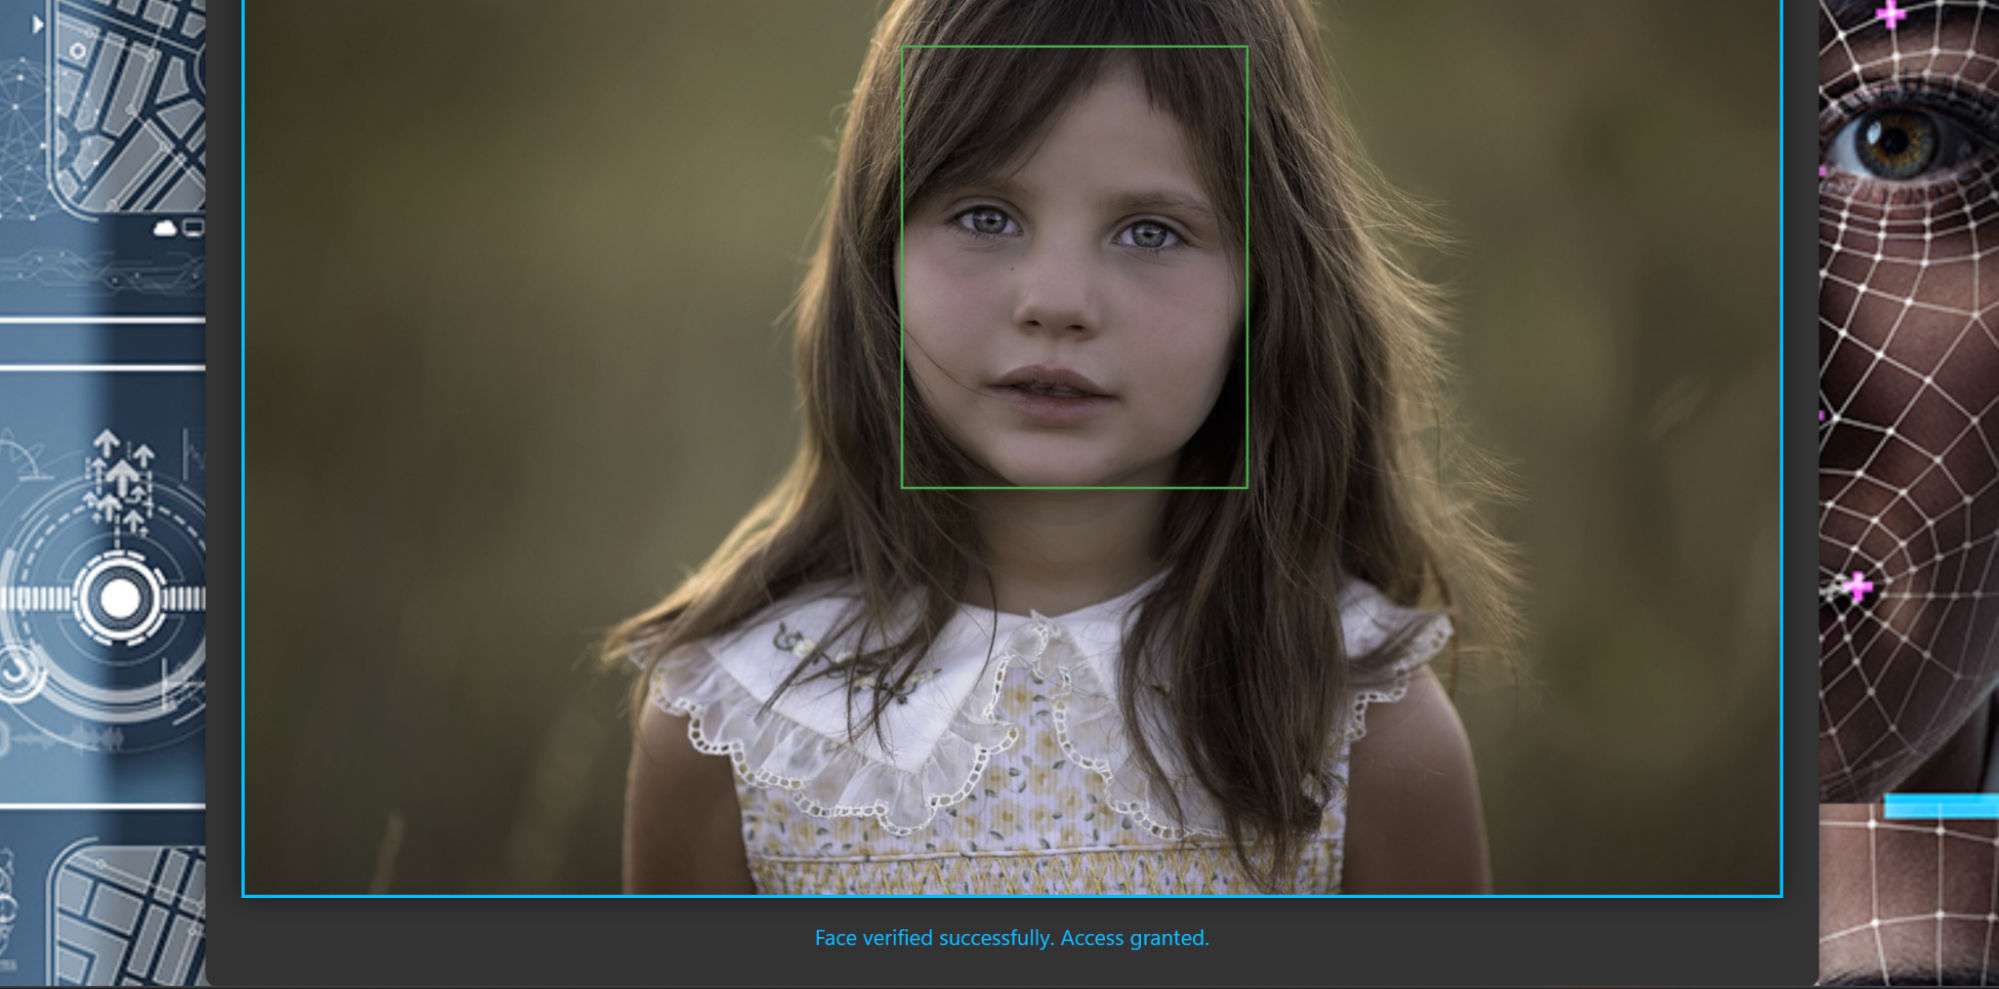
$('#message').text('Face verified successfully. Access granted.');
} else {
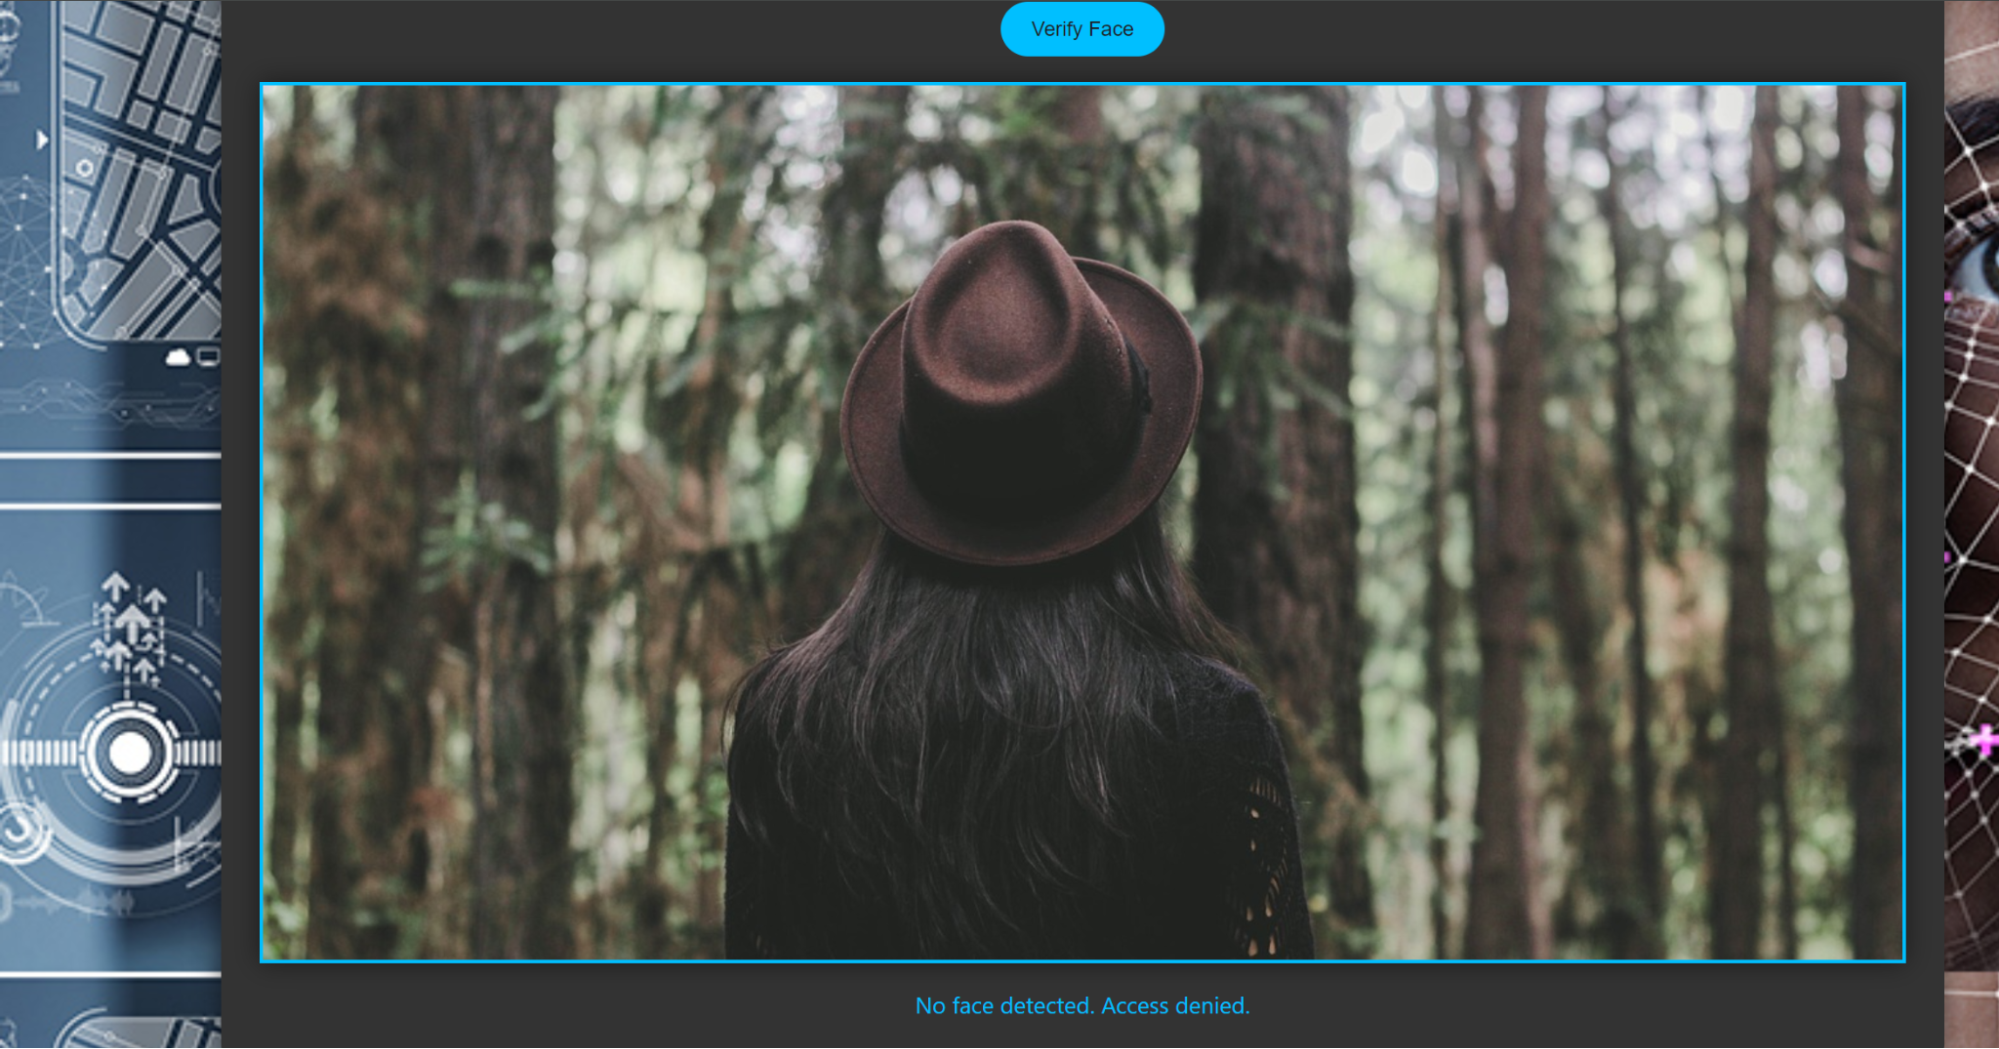
$('#message').text('No face detected. Access denied.');
}
document.getElementById("output").innerHTML = "";
document.getElementById("output").appendChild(outputCanvas);
};
img.src = imageURL;
});
}
</script>- We initialize Filestack with an API key.
- We set up a click event listener on the `#verifyButton` that opens a Filestack file picker. When an image is uploaded, it triggers the `onUploadDone` callback, which retrieves the uploaded image URL and calls the `verifyFace` function.
- The `verifyFace` function constructs a URL for the Filestack face detection API and makes a GET request to fetch the face detection data.
- When the image loads, we create a canvas and draw the image on it. If faces are detected, we draw rectangles around them on the canvas.
- Finally, we update the message area to indicate whether faces were detected and display the canvas with the face detection results.
Check out complete code here: https://github.com/devayesha23/Face_Detection_System
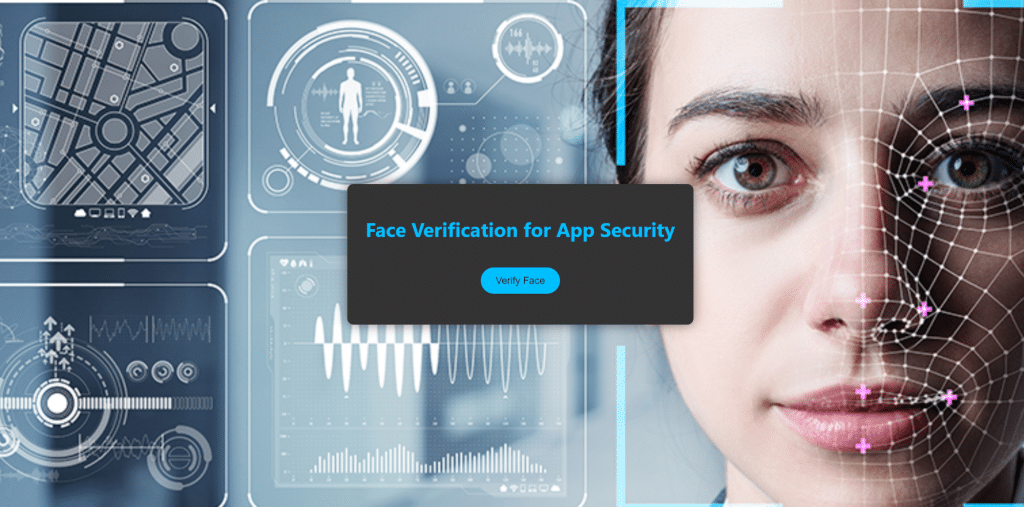
Output
When you run the app, it will show you the below web page:
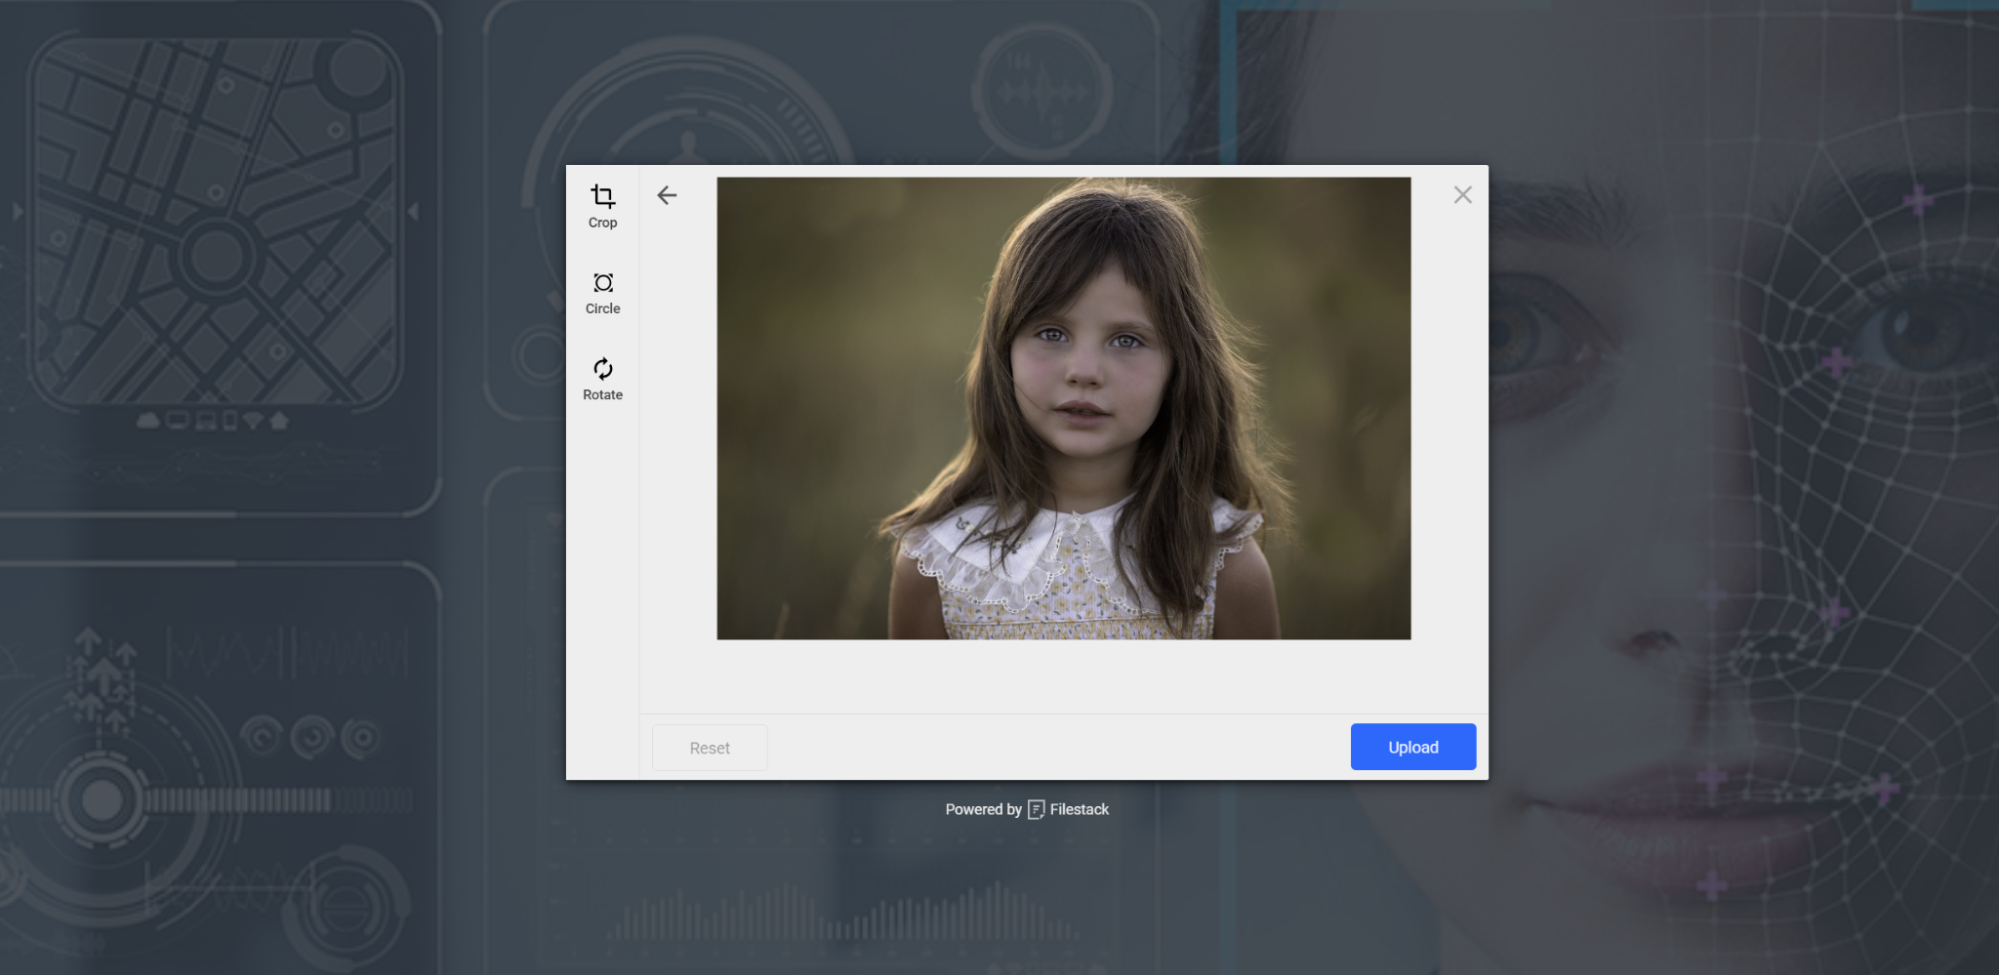
Click on the Verify Face button. You will get the below interface for uploading the picture:
Choose the desired file and click on upload. If it finds the face in the picture, you will get a message that the account is verified and access is granted. Otherwise, it will show you that access has not been granted. Here are the examples:
Conclusion
Adding facial detection to your system is a smart way to boost security. Facial detection technology, like Filestack’s, helps verify users’ identities quickly and easily. This reduces the need for passwords and physical keys. Hence making login processes more convenient and secure.
Filestack’s facial detection is reliable and works well even in poor conditions. It’s easy to set up and integrates smoothly with different platforms. Using Filestack, you can build a simple app to demonstrate its facial detection capabilities.
Facial detection makes your apps safer and more user-friendly. Filestack’s features ensure accurate and fast face recognition. Therefore making it a great choice for enhancing security.
FAQs
How does facial detection work for security systems?
Facial detection works by quickly identifying and verifying users’ faces. It allows access only to authorized people. This technology recognizes key facial features, making systems and data secure and safe.
How do we integrate facial detection using Filestack?
To integrate facial detection with Filestack, follow these steps:
- Get an API key from Filestack.
- Set up the basic HTML and CSS for your app.
- Add Filestack’s API code.
This makes face recognition easy and secure.
What is the cost of the facial detection feature in Filestack?
Filestack offers different pricing plans. However, it starts at $69 per month.
How does Filestack ensure security when using its features?
Filestack keeps your data safe by encrypting it and following privacy rules. It regularly updates its systems to fix any security issues. Filestack also offers clear guides and support to help you use its features securely.
Boost your system security with Filestack’s facial detection today.

Ayesha Zahra is a Geo Informatics Engineer with hands-on experience in web development (both frontend & backend). Also, she is a technical writer, a passionate programmer, and a video editor. She is always looking for opportunities to excel in her skills & build a strong career.
Read More →