


You’ve built the form. The button says Upload. Now what?
This is where many developers get surprised. File uploading looks simple: a user picks a file and clicks submit. But behind the scenes, it’s much more complicated.
You have to think about things like:
- What if someone uploads a 4GB video on slow internet?
- How do you stop someone from uploading a harmful file pretending to be an image?
- What happens to your costs if lots of users start uploading files at once?
This guide helps you simply understand all of that. It covers different upload methods, security basics, choosing the right tools, and how to use them with popular frameworks.
Whether you’re building something small like a profile picture uploader or a secure system for sensitive documents, you’ll learn how to do it properly.
What you’ll learn:
- The 4 main ways to upload files and when to use each.
- A security checklist that goes 3× deeper than anything else you’ll find.
- How to use file uploads with React, Next.js, Node.js, Python, and mobile apps.
- A side-by-side comparison of the top managed file upload providers in 2026.
- The real cost of building vs using a service (including time and effort).
Key Takeaways
- File uploads look simple, but they involve security, storage, and performance challenges.
- There are 4 main upload methods, choose based on file size and use case.
- Always secure uploads with validation, scanning, and proper access control.
- For most apps, managed APIs save time, cost, and effort.
- Good UX (progress, retry, clear errors) is just as important as backend logic.
Before we go deeper, let’s first understand what a file upload API actually is.
What Is a File Upload API?
A file upload API is a system that lets your app receive files from users, process them, and store them safely. After uploading, it usually gives back a link (URL) or ID so you can access that file later.
In simple terms, it connects the user’s device to cloud storage.
Behind the scenes, it does a lot of important work:
- Accepts the file data sent over the internet.
- Checks if the file is valid and safe.
- Applies rules (like file size or type limits).
- Runs extra steps if needed (like scanning or converting files).
- Stores the file in a secure and reliable place.
So even though uploading a file looks simple to the user, the API is handling all the heavy lifting in the background.
Now that you know what it is, let’s quickly see how it works behind the scenes.
How File Upload APIs Work
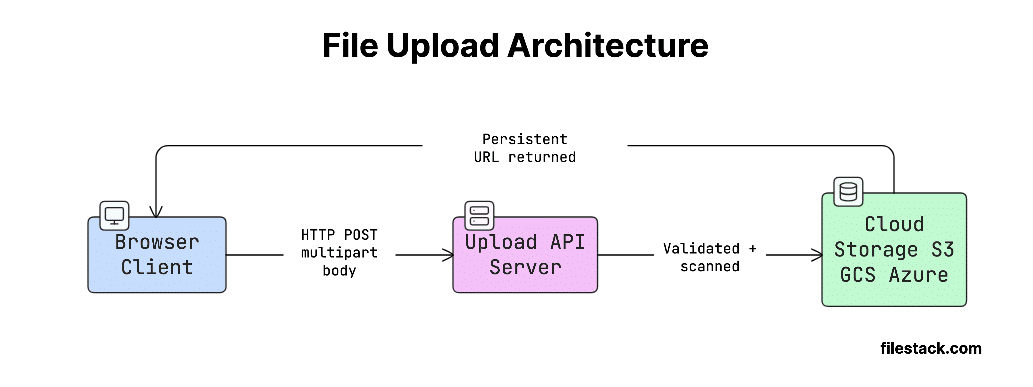
At a basic level, file upload is just an HTTP request that sends file data (binary data) from the client to the server.
The client also tells the server what kind of data it’s sending using a Content-Type header. For example:
- multipart/form-data → used in browser forms
- application/octet-stream → used for raw file uploads
The server then reads this request, extracts the file data, and stores it somewhere (like cloud storage).
Key terms to know:
- multipart/form-data: A format used by forms where the request is split into multiple parts (like fields + file). This is what browsers use for file uploads.
- MIME type: A label that tells what kind of file it is (like image/jpeg or application/pdf). Declared by the client, but must always be verified server-side.
- Magic bytes: The first few bytes of a file that reveal its actual type. This is the most reliable way to check if a file is really what it claims to be.
- File handle / URL: The link or ID you get after uploading. You use this later to access, edit, or delete the file.
Here’s a simple way to visualise this flow:

Now, a common confusion is between upload APIs and storage APIs; let’s clear that up.
File Upload APIs vs. File Storage APIs
These terms sound similar, but they do different jobs:
| Capability | Upload API | Storage API | Full-Service Platform |
| Primary job | Ingest files from clients | Persist and retrieve objects | Ingest + store + deliver |
| Handles HTTP multipart | Yes | No | Yes |
| Transformation/CDN | No | No | Yes |
| Example | Custom Express route | AWS S3 | Filestack, Uploadcare |
Most real-world apps need all three.
A storage service like S3 is great for saving files at low cost. But it doesn’t:
- Check if the file type is actually safe.
- Scan files for viruses.
- Provide ready-made UI like drag-and-drop uploads.
That’s where managed file upload APIs come in; they handle all these extra things and make your job much easier.
So where are these APIs actually used? Let’s look at some real examples.
Common Use Cases
- Profile picture/avatar upload: Small image uploads where you often need to crop or resize the image.
- Document management: Uploading PDFs, contracts, or invoices. Usually needs virus scanning and tracking (logs).
- Media platforms: Uploading videos or audio. Requires handling large files, resumable uploads, and video processing.
- E-commerce product imagery: Uploading many images at once, with fast loading (CDN) and automatic resizing.
- Healthcare: Uploading sensitive data. Needs strong security, encryption, and compliance (like HIPAA).
- Fintech: Uploading receipts or bank statements. Must follow strict security standards (like PCI-DSS).
- EdTech: Students uploading assignments or videos. Often involves large files and mobile users.
Now comes the most important part: how uploads are actually implemented.
The 4 Core File Upload API Patterns
This decision flow will help you pick the right approach quickly:
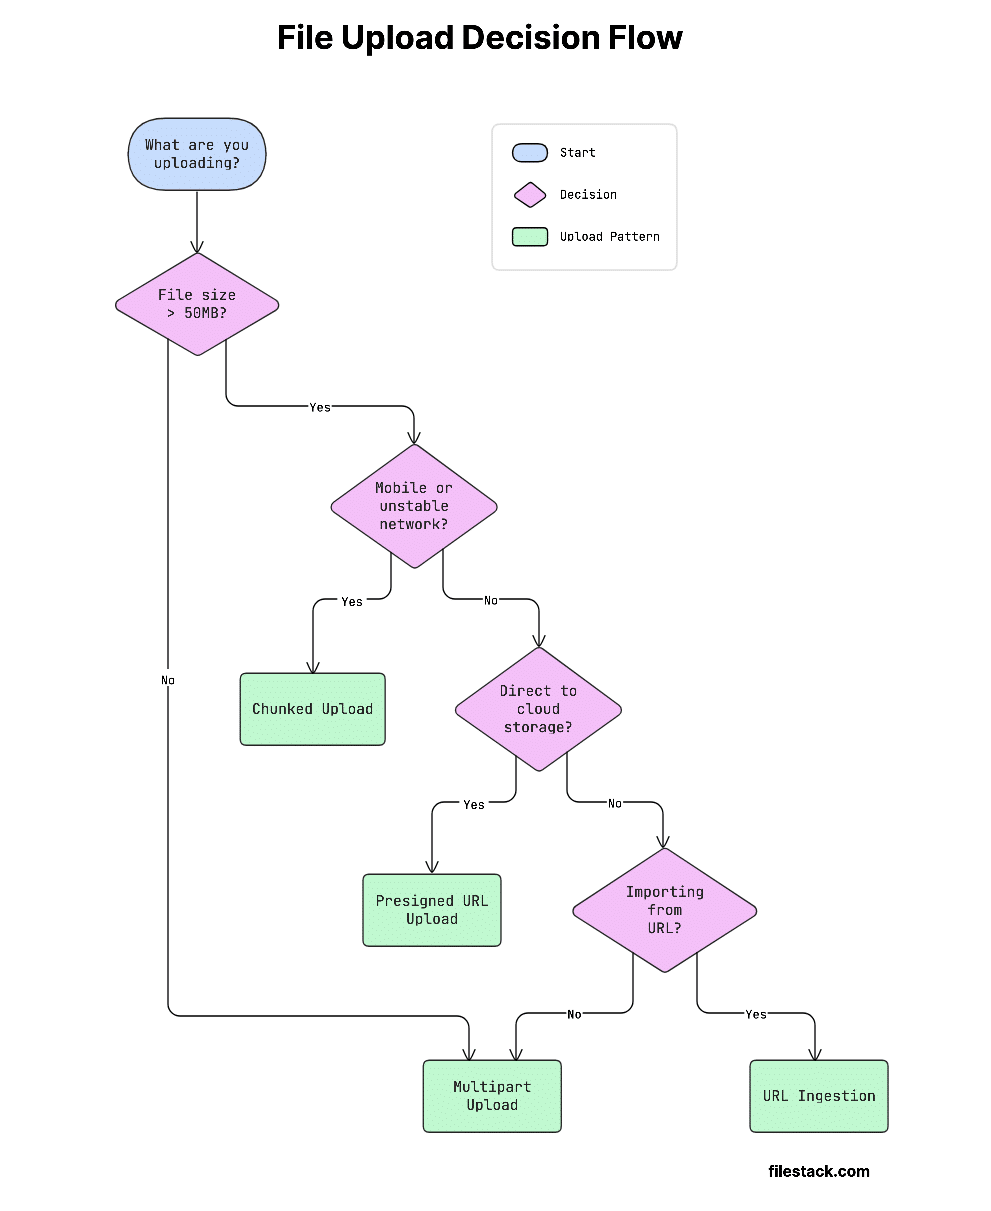

Let’s start with the simplest approach.
Pattern 1 — Multipart Form Data
When to use:
Files under 50MB, simple uploads, and regular browser forms.
Multipart form data is the standard way browsers upload files. It’s defined in RFC 7578.
How it works:
The request is split into multiple parts using a special boundary (a random separator). This helps the server understand where each part starts and ends.
Each part includes:
- Content-Disposition → tells the field name and file name.
- Content-Type → tells what kind of file it is.
Common pitfalls:
- Browsers set Content-Type: multipart/form-data; boundary=… automatically when you use a <form> with enctype. If you build the request manually with fetch, you must let the browser set this header or set it yourself, including the boundary string.
- Servers often have small default size limits. Express has a 100KB JSON body limit by default; nginx has a 1MB client_max_body_size. You need to increase these limits, or large uploads will fail.
cURL example:
curl -X POST <https://api.yourapp.com/upload> \\
-F "file=@/path/to/document.pdf" \\
-F "userId=abc123" \\
-H "Authorization: Bearer YOUR_TOKEN"
Node.js with fetch (browser):
async function uploadFile(file) {
const formData = new FormData();
formData.append('file', file);
formData.append('userId', 'abc123');

const response = await fetch('/api/upload', {
method: 'POST',
headers: { Authorization: `Bearer ${localStorage.getItem('token')}` },
body: formData,
// Do NOT set Content-Type manually -- let the browser set the boundary
});

if (!response.ok) throw new Error(`Upload failed: ${response.status}`);
return response.json(); // { url: 'https://...' }
}
Python with requests:
import requests

with open('/path/to/document.pdf', 'rb') as f:
response = requests.post(
'<https://api.yourapp.com/upload>',
files={'file': ('document.pdf', f, 'application/pdf')},
data={'userId': 'abc123'},
headers={'Authorization': 'Bearer YOUR_TOKEN'},
)
response.raise_for_status()
print(response.json())  # { 'url': 'https://...' }
Handling Multipart on the Server Side
Node.js + multer:
const express = require('express');
const multer = require('multer');
const path = require('path');

const upload = multer({
limits: { fileSize: 50 * 1024 * 1024 }, // 50MB
fileFilter: (req, file, cb) => {
const allowed = ['image/jpeg', 'image/png', 'application/pdf'];
if (!allowed.includes(file.mimetype)) {
return cb(new Error('File type not permitted'), false);
}
cb(null, true);
},
});

const router = express.Router();

router.post('/upload', upload.single('file'), async (req, res) => {
// req.file is the uploaded file buffer
// Always validate magic bytes here before proceeding
const result = await storeToCloud(req.file.buffer, req.file.originalname);
res.json({ url: result.url });
});
Python + FastAPI:
from fastapi import FastAPI, UploadFile, File, HTTPException

app = FastAPI()

ALLOWED_CONTENT_TYPES = {"image/jpeg", "image/png", "application/pdf"}
MAX_FILE_SIZE = 50 * 1024 * 1024  # 50MB

@app.post("/upload")
async def upload_file(file: UploadFile = File(...)):
if file.content_type not in ALLOWED_CONTENT_TYPES:
raise HTTPException(status_code=415, detail="Unsupported media type")

contents = await file.read()
if len(contents) > MAX_FILE_SIZE:
raise HTTPException(status_code=413, detail="File too large")

# Always validate magic bytes before storage
url = await store_to_cloud(contents, file.filename)
return {"url": url}
But what happens when files get large?
Pattern 2 — Chunked / Resumable Uploads
When to use:
Files over 50MB, mobile users, unstable internet, and large media like videos.
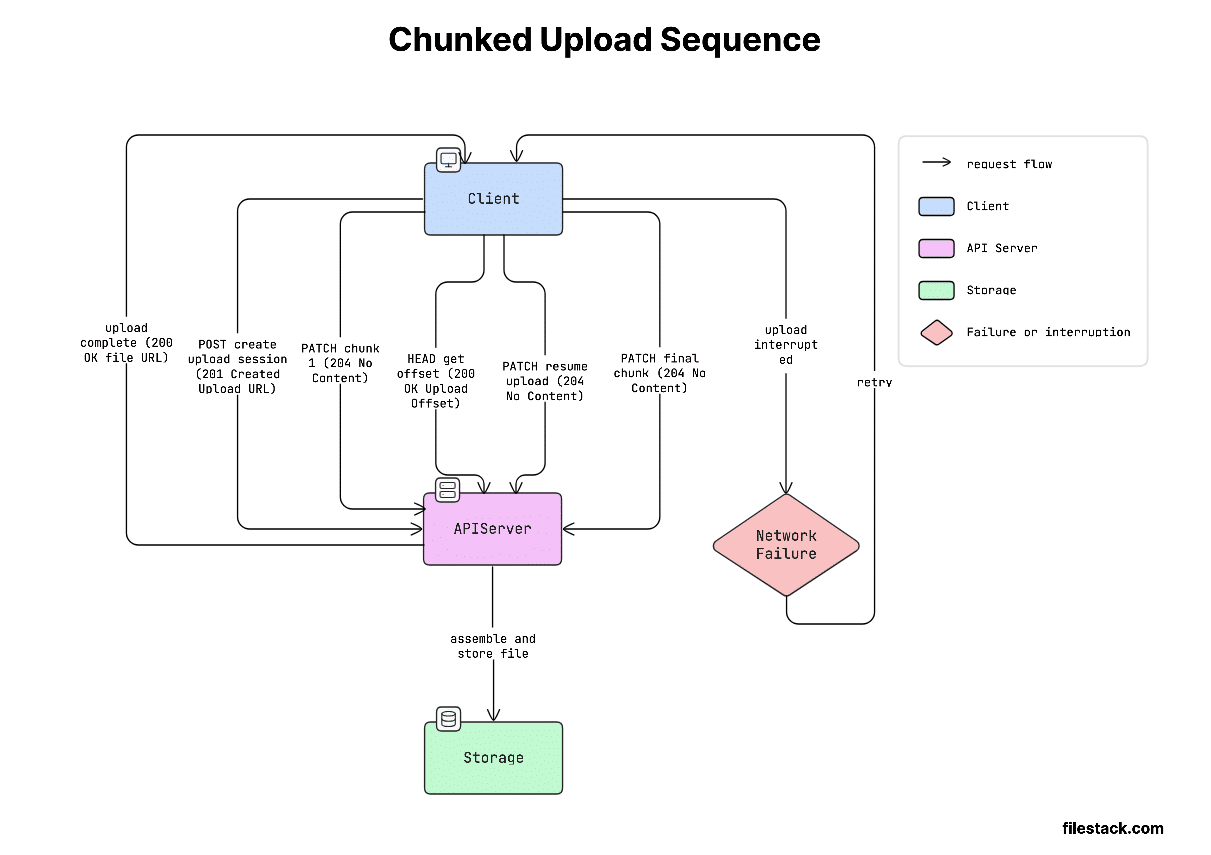
How it works:
Chunked uploading helps solve a big problem: large uploads often fail on weak networks. If the upload fails, starting again from zero wastes time and data.
Instead, the file is split into smaller parts (usually 5–10MB each). Each part is uploaded separately using a Content-Range header. Once all parts are uploaded, the server combines them back into the full file.
A popular standard for this is the Tus protocol.
Tus makes resumable uploads much easier. Instead of building everything yourself, you get:
- Ready-to-use libraries for JavaScript, iOS, Android, and Python.
- Automatic retry if something fails.
- Tracking of how much is already uploaded.
- Detection of when the upload is complete.
So, you don’t have to reinvent complex upload logic.
Here’s how this looks in practice:

Client-side chunking in JavaScript:
const CHUNK_SIZE = 5 * 1024 * 1024; // 5MB chunks

async function uploadInChunks(file, uploadUrl) {
const totalChunks = Math.ceil(file.size / CHUNK_SIZE);
let uploadedBytes = 0;

for (let i = 0; i < totalChunks; i++) {
const start = i * CHUNK_SIZE;
const end = Math.min(start + CHUNK_SIZE, file.size);
const chunk = file.slice(start, end);

const success = await uploadChunkWithRetry(chunk, uploadUrl, start, file.size);
if (!success) throw new Error(`Failed to upload chunk ${i + 1}/${totalChunks}`);

uploadedBytes = end;
const progress = Math.round((uploadedBytes / file.size) * 100);
console.log(`Progress: ${progress}%`);
}
}

async function uploadChunkWithRetry(chunk, url, start, totalSize, retries = 3) {
for (let attempt = 0; attempt < retries; attempt++) {
try {
const response = await fetch(url, {
method: 'PATCH',
headers: {
'Content-Type': 'application/offset+octet-stream',
'Content-Range': `bytes ${start}-${start + chunk.size - 1}/${totalSize}`,
'Upload-Offset': String(start),
},
body: chunk,
});
if (response.ok || response.status === 204) return true;
} catch (err) {
if (attempt === retries - 1) return false;
await new Promise(r => setTimeout(r, 1000 * (attempt + 1))); // exponential backoff
}
}
return false;
}
Using Filestack’s Intelligent Ingestion for Resumable Uploads
Filestack’s Content Ingestion Network (CIN) handles all of the above automatically. You get resumability, retry logic, parallel chunk uploads, and progress callbacks without writing a single line of chunking code.
import * as filestack from 'filestack-js';

const client = filestack.init('YOUR_API_KEY');

async function uploadWithFilestack(file) {
const result = await client.upload(file, {
onProgress: ({ totalPercent }) => {
console.log(`Upload progress: ${totalPercent}%`);
updateProgressBar(totalPercent);
},
});

console.log('File URL:', result.url);
return result.url;
}
Filestack automatically chooses the best upload method based on file size and network conditions.
For large files or slow internet, it switches to resumable (chunked) uploads, without you needing to configure anything.
So instead of building complex upload logic yourself, you can focus on your app while Filestack handles the heavy lifting.
See Filestack’s Intelligent Upload technology for the full technical breakdown.
Now let’s look at a more scalable approach.
Pattern 3 — Presigned URL (Direct-to-Cloud)
When to use:
Large files, when you want to reduce server load, or upload directly to cloud storage like S3 or GCS.
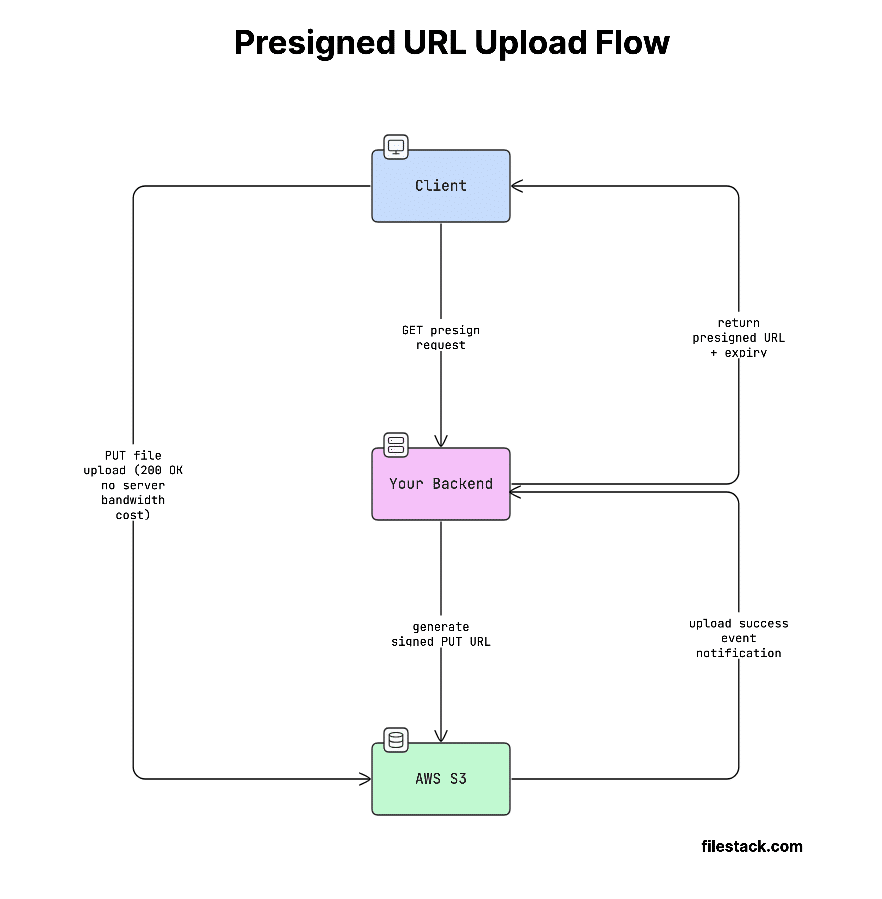
In a normal upload, every file goes through your server. This can become slow and expensive, especially with large files or lots of users.
The presigned URL approach avoids this.
How it works:
- Your backend creates a temporary, secure upload link (called a presigned URL).
- This link gives permission to upload to a specific location in cloud storage.
- The client (browser/app) uploads the file directly to storage.
- Your server never handles the file data.
This saves server resources, bandwidth, and cost.
So instead of acting as a middleman, your server just gives permission, and the upload happens directly.
This flow looks like this:

Generating a presigned URL (Node.js, AWS SDK v3):
import { S3Client, PutObjectCommand } from '@aws-sdk/client-s3';
import { getSignedUrl } from '@aws-sdk/s3-request-presigner';
import { v4 as uuidv4 } from 'uuid';

const s3 = new S3Client({ region: 'us-east-1' });

export async function generatePresignedUrl(filename, contentType) {
const key = `uploads/${uuidv4()}-${filename.replace(/[^a-zA-Z0-9._-]/g, '_')}`;

const command = new PutObjectCommand({
Bucket: process.env.S3_BUCKET,
Key: key,
ContentType: contentType, // Enforced -- client must match this header
});

const url = await getSignedUrl(s3, command, { expiresIn: 300 }); // 5-minute expiry
return { url, key };
}
Client-side upload with presigned URL:
async function uploadToS3(file) {
// Step 1: Get presigned URL from your backend
const { url, key } = await fetch('/api/presign', {
method: 'POST',
headers: { 'Content-Type': 'application/json' },
body: JSON.stringify({ filename: file.name, contentType: file.type }),
}).then(r => r.json());

// Step 2: Upload directly to S3 -- your server never sees the bytes
await fetch(url, {
method: 'PUT',
headers: { 'Content-Type': file.type },
body: file,
});

return key; // Store this key in your database
}
Important gotcha:
AWS API Gateway has a strict 10MB upload limit.
If your file uploads go through API Gateway, anything larger than 10MB will fail with a 413 Payload Too Large error.
The presigned URL approach avoids this completely.
Since the file is uploaded directly from the client to S3, it never passes through API Gateway.
That’s one of the main reasons this pattern is used for large file uploads.
There’s also a less obvious but very useful pattern.
Pattern 4 — URL Ingestion (Import from URL)
When to use:
Moving data, importing files from services like Dropbox or Google Drive, or running background jobs.
How it works:
Instead of uploading a file directly, the user just sends a URL. Your server (or a service) then downloads the file from that URL and stores it.
So the flow is:
- Client sends a link
- Server fetches the file
- Server saves it
Security consideration:
Be careful with user-provided URLs.
A malicious user could send a URL that targets your internal systems (like AWS metadata endpoints) and try to access sensitive data.
To stay safe:
- Only allow trusted domains (use an allowlist)
- Set strict timeouts
- Validate and sanitise URLs before fetching
Never blindly fetch any URL you receive.
Filestack URL ingestion example:
import * as filestack from 'filestack-js';

const client = filestack.init('YOUR_API_KEY');

async function importFromUrl(sourceUrl) {
// Filestack fetches the remote URL and stores it; your server is not involved
const result = await client.storeURL(sourceUrl, {
location: 's3',
path: '/uploads/',
});

console.log('Ingested file handle:', result.handle);
console.log('CDN URL:', result.url);
return result;
}
Filestack makes this even easier by supporting imports from 20+ sources like Google Drive, Dropbox, Instagram, Facebook, and direct URLs.
This means you don’t have to build complex integrations or handle OAuth yourself. You can let users pick files from different platforms, and Filestack takes care of the rest.
So if your app needs uploads from social or cloud sources, this saves a lot of development time.
Now that you know how uploads work, let’s talk about the most important part: security.
File Upload API Security — The Complete Checklist
File uploads are one of the most common security risks (as noted by OWASP). If not handled properly, they can open the door to serious attacks like:
- Stored XSS (malicious scripts saved and executed later)
- Path traversal (accessing restricted files on your server)
- Malware uploads (hosting harmful files)
- Remote code execution (running attacker-controlled code)
That’s why securing file uploads is critical; a small mistake can lead to major vulnerabilities. This section will help you understand how to handle uploads safely.
Server-Side Validation (Non-Negotiable)
Never trust the client.
Checks done in the browser (like file size limits or <input accept=”…”>) are only for user experience, not security. You must enforce everything again on the server.
For proper security, you need all three layers of validation (not just one or two):
- Extension check: Block dangerous file types like .exe, .php, .sh. Always use an allowlist (only allow known safe types), not a blocklist.
- MIME type check: Check the Content-Type sent with the file and make sure it matches allowed types (like image/jpeg, application/pdf).
- Magic bytes check: Read the first few bytes of the file to detect its real type. This is the most reliable check, for example, a file named .jpg might actually be a ZIP file. This is the only check that cannot be faked by the client, so it’s very important.
Node.js validation middleware:
import { fileTypeFromBuffer } from 'file-type'; // Reads magic bytes
import path from 'path';

const ALLOWED_EXTENSIONS = new Set(['.jpg', '.jpeg', '.png', '.pdf']);
const ALLOWED_MIME_TYPES = new Set(['image/jpeg', 'image/png', 'application/pdf']);

// Magic bytes map: MIME type → expected hex signature
const MAGIC_BYTES = {
'image/jpeg': [0xFF, 0xD8, 0xFF],
'image/png': [0x89, 0x50, 0x4E, 0x47],
'application/pdf': [0x25, 0x50, 0x44, 0x46],
};

export async function validateUpload(buffer, originalName, declaredMimeType) {
// 1. Extension check
const ext = path.extname(originalName).toLowerCase();
if (!ALLOWED_EXTENSIONS.has(ext)) {
throw new Error(`File extension '${ext}' not permitted`); // HTTP 415
}

// 2. MIME type check
if (!ALLOWED_MIME_TYPES.has(declaredMimeType)) {
throw new Error(`Content-Type '${declaredMimeType}' not permitted`); // HTTP 415
}

// 3. Magic bytes check (authoritative)
const detectedType = await fileTypeFromBuffer(buffer);
if (!detectedType || !ALLOWED_MIME_TYPES.has(detectedType.mime)) {
throw new Error('File content does not match declared type'); // HTTP 415
}

// 4. File size (redundant server-side belt-and-suspenders check)
if (buffer.length > 50 * 1024 * 1024) {
throw new Error('File exceeds 50MB limit'); // HTTP 413
}

// 5. Filename sanitisation -- never use the original filename as a storage key
const safeFilename = `${crypto.randomUUID()}${ext}`;

return { safeFilename, detectedMimeType: detectedType.mime };
}
HTTP error codes to know:
- 413 Payload Too Large: The file is bigger than what your server allows.
- 415 Unsupported Media Type: The file type is not allowed (failed MIME type or magic bytes check).
- 400 Bad Request: The upload request is invalid (e.g., missing boundary or broken data).
Malware Scanning
File uploads are one of the most common ways malware spreads.
Attackers can upload files like:
- PDFs with hidden scripts
- Office files with macros
- Executables renamed as .jpg or other safe-looking types
If you store and serve these files without checking them, other users can get infected.
What this means for you:
You should always scan uploaded files before making them available.
This helps you block harmful files, protect your users and avoid becoming a source of malware.
Options by deployment model:
Here are the common ways to handle malware scanning:
| Option | Best For | Notes |
| ClamAV (self-hosted) | Secure or isolated systems | Free, but you need to manage it yourself, and updates can be slower |
| VirusTotal API | Small apps with low traffic | Paid at scale and has rate limits |
| Filestack Virus Detection | Production apps (SaaS) | Built-in, automatic, no extra setup needed |
The golden rule:
Always scan files before serving them.
- Keep files private (or in quarantine) until they are verified safe.
- Only give access (public URL) after the scan is clean.
Never expose a file to users before it has been checked.
Filestack Workflow-based scanning:
// In the Filestack dashboard, configure a Workflow that:
// 1. Triggers on upload
// 2. Runs virus_detection task
// 3. Webhooks your backend with { status: 'clean' | 'infected', handle: '...' }

// Your backend webhook handler:
app.post('/webhook/scan-result', async (req, res) => {
const { handle, status } = req.body;

if (status === 'infected') {
await deleteFile(handle);
await notifyAdmin(handle);
return res.sendStatus(200);
}

// Only mark file as available after clean result
await db.files.update({ handle }, { status: 'available' });
res.sendStatus(200);
});
Security doesn’t stop at validation; access control is equally important.
Authentication and Authorization
API key security:
Never expose your upload API key in frontend code. If someone gets access to it, they can upload any files to your storage, increase your costs, and bypass your security checks.
What to do instead:
For browser uploads:
- Generate short-lived signed policies or tokens on your backend.
- Send those to the client.
- Let the client use them to upload.
This way, your main API key stays safe, and access is temporary and controlled.
In short: keep secrets on the server, not in the browser.
Generating a Filestack signed upload policy (Node.js backend):
import crypto from 'crypto';

export function generateFilestackPolicy(apiSecret, options = {}) {
const policy = {
expiry: Math.floor(Date.now() / 1000) + 600, // 10-minute window
call: ['pick', 'store'], // Restrict to upload operations only
maxSize: 52428800, // 50MB cap
mimeType: 'image/jpeg,image/png,application/pdf',
...options,
};

const encodedPolicy = Buffer.from(JSON.stringify(policy)).toString('base64');
const signature = crypto
.createHmac('sha256', apiSecret)
.update(encodedPolicy)
.digest('hex');

return { policy: encodedPolicy, signature };
}

// API route: return policy + signature to authenticated users only
app.get('/api/upload-token', requireAuth, (req, res) => {
const { policy, signature } = generateFilestackPolicy(process.env.FILESTACK_SECRET);
res.json({ policy, signature, apiKey: process.env.FILESTACK_API_KEY });
});
The client uses these three values (API key, policy, signature) to initialise Filestack’s SDK.
The policy is securely signed, which means it can’t be changed or tampered with. If someone tries to modify it, the signature will no longer match, and the request will be rejected.
This ensures the upload rules you set on the backend stay enforced on the client side.
Finally, let’s talk about how and where files should be stored safely.
Storage Security
- Never store uploads in a web-accessible directory. A directory like /var/www/html/uploads/ that’s served by nginx is a stored XSS and RCE risk. Uploaded files must not be directly executable by the web server.
- Prefer object storage over filesystem. S3, GCS, and Azure Blob Storage are purpose-built for storing arbitrary objects, with fine-grained ACLs, versioning, and server-side encryption (SSE). A local filesystem has none of these.
- Default to private. Every bucket and object should be private by default. Generate pre-signed download URLs with expiry for controlled access, rather than making objects publicly readable.
Compliance Requirements by Industry
Depending on your industry, you may also need to follow specific regulations:
| Industry | Regulation | Key File Upload Requirements |
| Healthcare | HIPAA | Encrypted transit (TLS 1.2+), audit logs, BAA required with vendor |
| Finance | PCI-DSS v4.0 | No card data in uploads; encrypted storage; access controls |
| EU users | GDPR Art. 17 | Data residency controls; right-to-erasure (delete API required) |
| General SaaS | SOC 2 Type II | Vendor audit logs, access reviews, and an incident response plan |
Now let’s see how to actually implement this in real applications.
Framework Integrations
Here’s how you can implement file uploads across different frameworks using real, production-ready examples. These setups handle security, validation, and uploading efficiently.
React / Next.js
Full Filestack Picker component with Next.js API route:
// components/FilePicker.tsx
'use client';
import { useState } from 'react';
import { PickerOverlay } from 'filestack-react';

interface UploadResult {
url: string;
filename: string;
size: number;
}

export function FilePicker({ onUpload }: { onUpload: (result: UploadResult) => void }) {
const [isPickerOpen, setPickerOpen] = useState(false);
const [uploadToken, setUploadToken] = useState<{ policy: string; signature: string; apiKey: string } | null>(null);

async function openPicker() {
const token = await fetch('/api/upload-token').then(r => r.json());
setUploadToken(token);
setPickerOpen(true);
}

function handleSuccess(result: any) {
const file = result.filesUploaded[0];
onUpload({ url: file.url, filename: file.filename, size: file.size });
setPickerOpen(false);
}

return (
<>
<button onClick={openPicker} className="btn-upload">
Upload File
</button>
{isPickerOpen && uploadToken && (
<PickerOverlay
apikey={uploadToken.apiKey}
pickerOptions={{
security: { policy: uploadToken.policy, signature: uploadToken.signature },
accept: ['image/*', 'application/pdf'],
maxSize: 50 * 1024 * 1024,
fromSources: ['local_file_system', 'googledrive', 'dropbox'],
onUploadDone: handleSuccess,
}}
/>
)}
</>
);
}

// app/api/upload-token/route.ts (Next.js App Router)
import { NextResponse } from 'next/server';
import { generateFilestackPolicy } from '@/lib/filestack';
import { getSession } from '@/lib/auth';

export async function GET(request: Request) {
const session = await getSession(request);
if (!session) return NextResponse.json({ error: 'Unauthorized' }, { status: 401 });

const { policy, signature } = generateFilestackPolicy(process.env.FILESTACK_SECRET!);
return NextResponse.json({ policy, signature, apiKey: process.env.NEXT_PUBLIC_FILESTACK_KEY });
}
See the Filestack JavaScript SDK documentation for the full API reference and picker customisation options.
Node.js / Express
// routes/upload.js -- Production Express upload route
import express from 'express';
import multer from 'multer';
import * as filestack from 'filestack-js';
import { validateUpload } from '../middleware/validateUpload.js';

const router = express.Router();
const storage = multer.memoryStorage();
const upload = multer({ storage, limits: { fileSize: 50 * 1024 * 1024 } });
const fsClient = filestack.init(process.env.FILESTACK_API_KEY);

router.post('/', upload.single('file'), async (req, res) => {
try {
const { safeFilename } = await validateUpload(
req.file.buffer,
req.file.originalname,
req.file.mimetype,
);

const result = await fsClient.upload(req.file.buffer, {}, { filename: safeFilename });
res.json({ url: result.url, handle: result.handle });
} catch (err) {
const status = err.message.includes('50MB') ? 413 : 415;
res.status(status).json({ error: err.message });
}
});

export default router;
Python (Django / FastAPI)
# main.py -- FastAPI endpoint with Filestack Python SDK
from fastapi import FastAPI, UploadFile, File, HTTPException, Depends
from filestack import Client
import os, uuid, magic  # python-magic for magic bytes

app = FastAPI()
fs_client = Client(os.environ['FILESTACK_API_KEY'])

ALLOWED_MIME_TYPES = {'image/jpeg', 'image/png', 'application/pdf'}

async def validate_file(file: UploadFile):
contents = await file.read()
await file.seek(0)

if len(contents) > 50 * 1024 * 1024:
raise HTTPException(status_code=413, detail="File exceeds 50MB")

# Magic bytes check
detected_mime = magic.from_buffer(contents, mime=True)
if detected_mime not in ALLOWED_MIME_TYPES:
raise HTTPException(status_code=415, detail=f"File type '{detected_mime}' not permitted")

return contents

@app.post("/upload")
async def upload_file(file: UploadFile = File(...), contents: bytes = Depends(validate_file)):
safe_name = f"{uuid.uuid4()}.{file.filename.rsplit('.', 1)[-1].lower()}"

# Upload to Filestack asynchronously
filelink = fs_client.upload(file_obj=contents, store_params={
'filename': safe_name,
'location': 's3',
})

return {"url": filelink.url, "handle": filelink.handle}
Mobile apps need a slightly different approach.
Mobile (iOS / Android)
For mobile apps, here’s the simple and recommended way to upload files:
- Request a presigned URL from your backend: The mobile app authenticates and receives a time-limited upload token.
- Upload directly from the device: This avoids the double bandwidth cost of routing through your server, which matters on cellular networks.
- Handle background transfers: Use URLSession.BackgroundConfiguration on iOS or WorkManager on Android, so uploads survive the app going to the background.
Filestack’s iOS and Android SDKs handle all of this, including chunked upload retry logic for large video files. You just need to initialise the SDK using the signed policy from your backend (same idea as in the React example).
Uploading is not just technical; user experience matters a lot, too.
File Upload UX Best Practices
Good upload UX makes the process clear, fast, and frustration-free. Users should always know what’s happening and what to do next.
The Upload UI Checklist
- Progress indicator: Show real progress (percentage or bytes), especially for files over 1MB. A simple spinner is not enough; users need to see that the upload is actually working.
- Drag-and-drop zone: Provide a clear drop area with a dashed border and icon. Also include a “click to browse” option. Make the area easy to interact with.
- Source integrations: Let users upload from Google Drive, Dropbox, or their phone camera, not just the local filesystem. This is especially important for mobile users.
- File preview before confirmation: Show a thumbnail for images, filename + size for documents. This helps users confirm they picked the right file.
- Specific error messages: “File too large (max 50MB)” is useful. “Upload failed” is not. Map HTTP error codes to human language: 413 → size limit, 415 → wrong file type, network error → retry prompt.
- Retry mechanism: On network failure, show a retry button with the upload state preserved. Never force a user to re-select a file because your error handling is poor.
Accessibility Requirements
- The upload button or drop zone should work with a keyboard and show a visible focus state.
- Use aria-live so screen readers can announce updates like: “Upload started”, “60% complete”, “Upload successful”.
- Progress bars should have good color contrast (follow WCAG AA).
- Error messages should be linked to the relevant field using aria-describedby.
At this point, you might be wondering: should you build all this yourself?
Build vs. Buy — When to Use a Managed File Upload API
This helps you decide whether to build your own upload system or use a service. What looks simple at first can become complex and expensive over time.
The True Cost of Building Your Own File Upload Infrastructure
Creating a basic upload feature might take a few hours. But building a complete, production-ready system (with things like resumable uploads, security, CDN, and integrations) can take 3–6 months for an experienced team.
Rough Year 1 cost model:
| Scenario | Self-Build (Year 1) | Managed API (Filestack) |
| Engineering (build) | 160–320 hrs @ $150/hr = $24K–$48K | $0 — already built |
| Storage (100GB/mo) | AWS S3: ~$2.30/mo | Included in plan |
| Bandwidth (1TB/mo) | CloudFront: ~$85/mo | Included in plan |
| Virus scanning | VirusTotal API: ~$100+/mo | Built-in |
| Engineering (maintenance) | ~20 hrs/mo ongoing | ~0 hrs/mo |
| Total Year 1 (rough) | $40,000–$70,000+ | ~$600–$2,400/yr |
Maintenance is the biggest hidden cost.
You’ll need to keep updating your system when cloud providers change things, new security issues appear, and compliance requirements evolve.
And every time this happens, your team spends time fixing uploads instead of building features.
That’s why many teams choose managed APIs: less effort, faster delivery, and fewer long-term headaches.
When to Build Your Own
- Your system is fully on-premise or air-gapped, and you can’t use any third-party services.
- You’re only handling small, low-risk files (no need for processing, security, or compliance).
- You have a dedicated engineering team, and file uploads are an important part of your product advantage.
In short, build it yourself only when you have strict requirements or strong reasons; otherwise, it’s usually not worth the effort.
When to Use a Managed File Upload API
- You want fast global delivery (CDN) without setting up things like CloudFront or caching rules.
- You need features like virus scanning, file conversion, or image processing without building them yourself.
- You don’t have a dedicated infrastructure engineer.
- You want built-in integrations (Google Drive, Dropbox, Instagram, S3, Box, etc.).
The honest takeaway:
Using a managed file upload API isn’t a shortcut; it’s usually the smarter choice.
Your time is better spent building your product, not dealing with complex things like file validation, storage, and infrastructure.
If you decide to use a service, here’s how the top options compare.
Top File Upload API Providers Compared (2026)
Here’s a quick comparison of popular file upload services to help you choose the right one based on features, limits, and ease of use.
| Feature | Filestack | Uploadcare | Cloudinary | Transloadit | DIY (S3 + Lambda) |
| Max file size | Up to 5TB | Up to 5TB | ~3.6GB (free limit lower) | 5TB | 5TB (S3 limit) |
| Resumable uploads | Yes (CIN) | Yes | Yes | Yes (Tus) | Manual build |
| Virus scanning | Built-in, all plans | Add-on | Add-on ($) | Via Assembly | Must integrate |
| Source integrations | 20+ (Drive, Dropbox, Instagram, etc.) | Limited | Yes | Limited | No |
| Image transformations | Yes | Yes | Advanced (AI) | Yes | No |
| Video processing | Yes | Limited | Advanced | Advanced | No |
| Document conversion | Yes (PDF, Office) | No | Limited | Yes | No |
| SDKs | JS, iOS, Android, Python, Ruby, PHP | JS, iOS, Android | Extensive | JS, PHP, Ruby | AWS SDK only |
| GDPR compliant | Yes | Yes | Yes | Yes | Depends on config |
| HIPAA compliant | Yes (Enterprise) | Contact sales | Contact sales | No | Possible (complex) |
| Pricing model | Transparent tiers | Operations-based | Credits-based | Usage-based | Pay-per-use |
| Free tier | Yes (trial, no credit card) | 1,000 operations/mo | 25 credits/mo | 5GB/mo, 500MB limit | AWS Free Tier |
A few important things to keep in mind:
- Cloudinary excels at image and video transformation for media-heavy applications, but has a lower ceiling on file sizes at the free tier.
- Transloadit’s Assembly pipeline is powerful for complex transcoding workflows but requires more configuration to get started.
- DIY (S3 + Lambda) gives you the most control but comes with the highest build and maintenance cost, see the cost model above.
- Filestack’s Content Ingestion Network (CIN) is the primary technical differentiator for resumability at scale. See Filestack’s upload technology for the architecture details.


Once everything is set up, the next step is making it faster.
Performance Optimisation
These tips help make file uploads faster and smoother for users, especially on slow networks or with large files.
Client-Side Optimisations
- Validate before upload: Check file size and type in the browser before uploading anything. This prevents situations where a long upload fails at the end with a 413 error.
- Compress images client-side: Reduce image size using the Canvas API or libraries like browser-image-compression. A 4MB photo can often become ~400KB with almost no visible quality loss.
- Parallel chunk uploads: Instead of uploading chunks sequentially, upload 3–5 chunks simultaneously. This takes advantage of available bandwidth and significantly reduces total upload time on fast connections.
- Adaptive chunk sizing: Use the Navigation API’s connection.downlink estimate to adjust chunk size dynamically: larger chunks on fast connections, smaller on slow ones.
Server-Side / Infrastructure Optimisations
- CDN for the upload endpoint: Not just for delivery. Running your upload endpoint behind a CDN like CloudFront reduces latency for global users by terminating the TCP connection at an edge node.
- Async processing: Never block the HTTP response while waiting for a virus scan or transcoding job to complete. Return a job ID immediately; use a webhook or polling to notify the client when processing is done.
- S3 Transfer Acceleration: For cross-region uploads (a user in Singapore uploading to a us-east-1 bucket), Transfer Acceleration routes traffic through CloudFront’s edge network and can reduce upload time by 50–70%.
- HTTP/2: Ensure your upload endpoint supports HTTP/2. Multiplexing means multiple chunk requests share a single TCP connection, eliminating the per-request TCP handshake overhead.
Finally, let’s look at where file uploads are heading.
File Upload API Trends in 2026
File uploads are no longer just about storing files. In 2026, they are becoming smarter, handling analysis, security, and processing automatically.
AI-Powered Upload Workflows
The most significant shift in file upload infrastructure over the past 18 months is AI at ingest time. Files are no longer just stored; they’re classified, analysed, and routed automatically on upload:
- Auto-classification: Detect whether an uploaded document is a contract, invoice, or ID document and route it to the appropriate storage path and workflow.
- AI image moderation: NSFW detection and PII redaction (blurring faces, redacting credit card numbers in images) before the file is committed to storage.
- Intelligent compression: Uses AI to reduce file size while keeping quality almost the same, better than traditional compression methods.
Edge-First Upload Architectures
This is a newer way of handling uploads that makes things faster for users around the world.
Instead of sending files to one central server, uploads are handled at nearby CDN locations (edge servers).
For example, a user in Tokyo doesn’t upload to a US server directly. The file is first received at a nearby location in Tokyo, then safely sent to the main server in the background.
Why this is better:
- Faster uploads
- More reliable connections
- Better experience for global users
The user doesn’t notice any of this; it just feels quicker and smoother.
Autonomous Agent File Handling
With AI agents creating files (like reports, images, or code), uploads are no longer just done by users; they’re also done automatically by systems.
For these uploads, security is very important.
Recommended approach:
- Use presigned URLs for uploads
- Keep them short-lived (about 1–5 minutes)
- Allow only one specific upload per URL
- Generate them from your backend after the agent is authenticated
This ensures uploads are secure, access is limited and no long-term permissions are exposed.
In short: Treat AI agents like users, but with even tighter security controls.
WebAssembly for Client-Side Processing
Now, heavy file processing can happen directly in the browser before upload.
Using WebAssembly (WASM), users can trim videos, convert formats (like MOV → MP4), and compress files.
All of this happens before the file is uploaded.
Why this is useful:
- Smaller file size → faster uploads
- Less work for your server
- Better performance overall
Tools like ffmpeg.wasm are now powerful enough to handle this in real apps.
In short: Process files on the user’s device first, then upload smarter and faster.
If you want to skip the complexity, here’s the fastest way to get started.
Quick Start with Filestack
This shows how quickly you can start uploading files using Filestack, without the need for any complex setup.
Get Your API Key (2 Minutes)
- Sign up at filestack.com (free trial, no credit card needed)
- Copy your API key from the developer dashboard
- Install the SDK: npm install filestack-js
Your First Upload in 10 Lines of JavaScript
import * as filestack from 'filestack-js';

const client = filestack.init('YOUR_API_KEY');

async function uploadFile(file) {
const result = await client.upload(file, {
onProgress: ({ totalPercent }) => console.log(`${totalPercent}% uploaded`),
});

console.log('File available at:', result.url);
return result.url;
}
That’s it. Filestack handles everything for you, like: file type validation, chunked uploads and retries, optional virus scanning, and fast delivery via CDN.
You can focus on your app while Filestack manages the upload complexity.
See the full Filestack JavaScript SDK documentation for the complete API reference.
Next Steps
After your first upload is working, here’s what you usually do next to make it production-ready:
- Connect your cloud storage: Configure your S3, GCS, or Azure Blob bucket in the Filestack dashboard so files land in your own infrastructure.
- Enable virus scanning: Turn on the Workflows panel’s virus_detection task; configure a webhook to your backend for scan results.
- Add on-the-fly transformations: Append transformation parameters to any Filestack CDN URL to resize, convert, watermark, or compress files at delivery time without pre-generating variants.
Explore the fullFilestack file upload product to see the complete capability set.


Let’s wrap this up.
Conclusion
The choice between building your own upload system and using a managed API comes down to three simple questions:
- Does file upload give your product a real advantage?
- Do you have a team to maintain it long-term?
- Can you spend 3–6 months building it properly?
For most teams, the answer is no.
That’s why a managed solution like Filestack makes more sense. You get things like resumable uploads, virus scanning, CDN delivery, integrations, and compliance-ready setup, all in a few hours, and at a much lower cost.
If you have very specific needs (like on-premise systems or custom pipelines), building your own can work, and the patterns in this guide will help.
But for most cases, it’s easier and faster to just get started: start your free trial — no credit card required.
This guide was last reviewed in April 2026. All code examples are tested against Filestack SDK v4.x and AWS SDK v3.


Shefali Jangid is a web developer, technical writer, and content creator with a love for building intuitive tools and resources for developers.
She writes about web development, shares practical coding tips on her blog shefali.dev, and creates projects that make developers’ lives easier.