


When you add receipt scanning to your app, reading text from the receipt image is only the first step. The harder part comes next.
The text you get is usually not perfect:
- Some numbers can be incorrect.
- Dates can be written in different formats.
- Item names can look weird or broken.
So before you save this data in your database, you must clean it and check if it’s correct.
Filestack’s Intelligence API helps you easily get text from receipts using advanced OCR technology. But to make your app work properly in real situations, you also need a robust system to clean and verify that data.
💡Tip: If you want to understand how receipt extraction works in detail, you can also explore the OCR and document data extraction overview.
In this guide, you’ll learn how to build a production-ready validation pipeline that ensures your app saves correct and reliable information.
Key Takeaways
- Reading text from a receipt is just the beginning. You must also clean and check the data carefully.
- OCR works well, but it can still make mistakes in dates, totals, and item names.
- Checking the data step by step helps catch errors before saving it to the database.
- A confidence score helps you automatically approve safe receipts and send risky ones for review.
- Good validation keeps your data accurate, reduces manual work, and increases user trust.
Before we talk about how to validate receipt data, let’s first understand why validation is so important.
Why Checking Receipt Data Is Important
Even though Filestack’s OCR is powerful, it is not 100% perfect. Real receipts can be messy, and the raw text you get is not always ready to save directly in your database.
Faded print and poor quality can cause mistakes.
For example, a date like 01/15/2024 might be read as 01/35/2024. If the ink is faded or damaged, the system may confuse numbers like 1, 3, or 7.
Bad lighting or tilted photos can also cause errors.
A shadow over 8.99 might make it look like 8.9 or even 8 99. This can break your number calculations.
Different receipt formats add more problems.
Every store prints receipts in its own way. Some put the total at the bottom. Others put it in the middle after ads or extra text. This makes it harder to reliably find important details.
Multiple languages can also confuse the system.
Some receipts mix English with another language or special symbols. This can make text parsing more difficult.
If you don’t check and clean this data, wrong information will go into your database. That can lead to:
- Incorrect totals
- Duplicate records
- Broken reports
- Loss of user trust
- Extra manual work to fix mistakes
That’s why validating and cleaning receipt data is not optional. It’s necessary if you want your app to be accurate and reliable.
So how do we solve all these problems in a structured way?
The answer is to validate receipt data step by step instead of all at once.
The Complete Validation Pipeline Architecture
For a real production app, receipt validation should not happen in one big function. It should happen step by step. Each step checks for different types of problems.
Here’s a simple example:
async function processReceiptData(extractedData, metadata) {
  // Stage 1: Schema validation: Check required fields
  const schemaValidated = validateSchema(extractedData);

  // Stage 2: Fix data types and formats
  const normalized = normalizeDataTypes(schemaValidated);

  // Stage 3: Business rule validation
  const businessValidated = validateBusinessRules(normalized);

  // Stage 4: Cross-field checks
  const consistencyChecked = validateCrossFieldConsistency(businessValidated);

  // Stage 5: Confidence scoring
  const scored = scoreConfidence(consistencyChecked, metadata);

  // Stage 6: Database preparation
  const dbReady = prepareDatabaseInsertion(scored);

  return dbReady;
}
This step-by-step approach is much better than putting everything in one big validation function. It makes debugging easier, testing simpler, and your system more reliable.
The diagram below shows how receipt data moves through each validation stage before reaching the database.
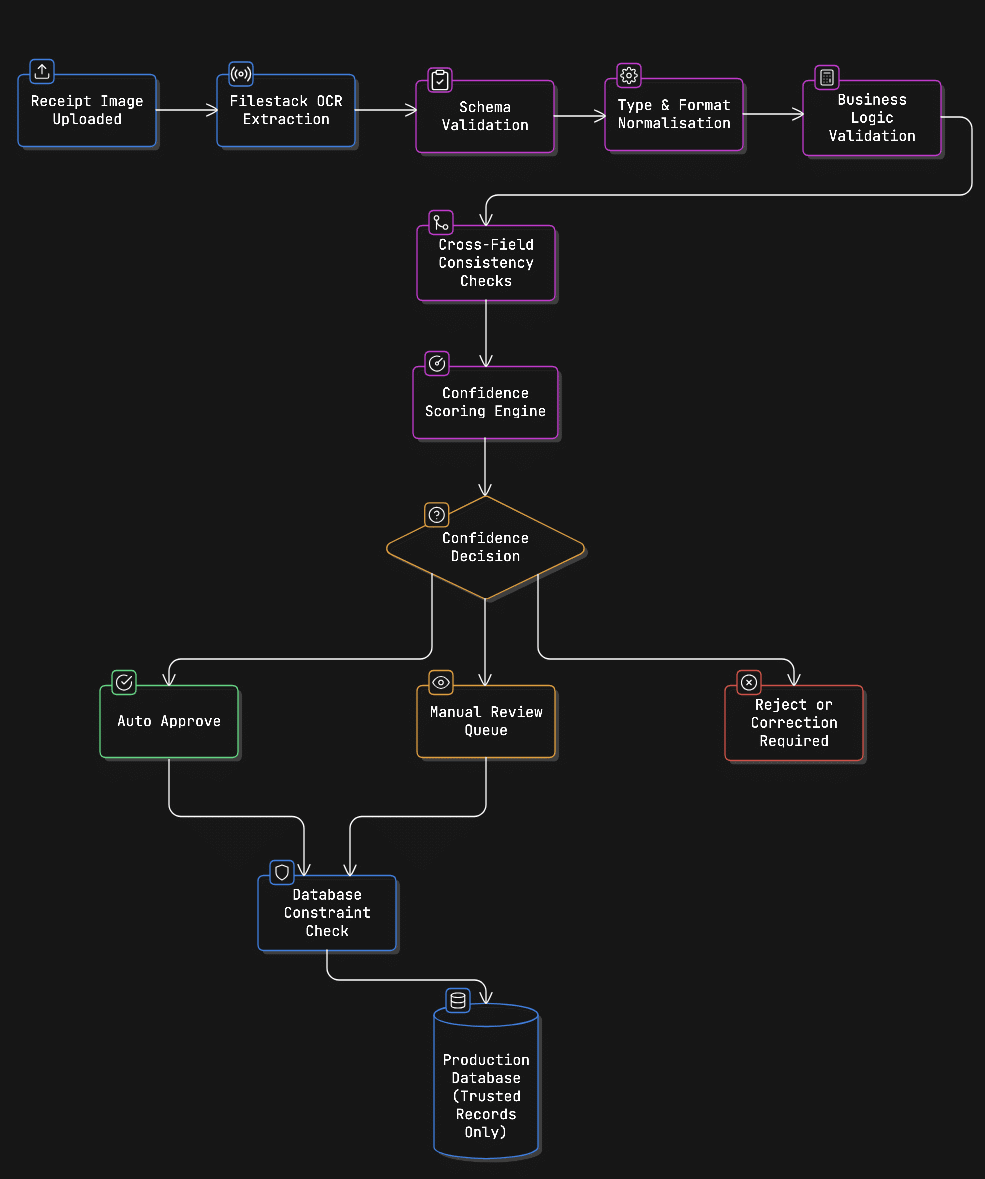

Let’s break down each stage and see what it actually does.
Stage 1: Schema Validation (Check Required Fields First)
The first step is simple: make sure the receipt data contains the fields your app really needs.
Even though Filestack returns structured data, some fields may be missing depending on the receipt quality. So you should always check before moving forward.
The complete stage-by-stage reference implementation is available in this GitHub repository.
function validateSchema(data) {
  ...
}
What this stage does:
1. Checks important fields
These are required:
- merchant_name
- transaction_date
- total_amount
- line_items
If any of these are missing, we mark them as an error.
2. Checks optional fields
These are helpful but not required:
- merchant_address
- tax_amount
- payment_method, etc.
If they are missing, we add a warning instead of stopping everything.
3. Look for unexpected fields
Sometimes, OCR extracts extra random fields.
We don’t fail the process, but we log a warning so we can inspect it later.
Why this is important:
If you skip this step:
- Later functions may crash because a field is undefined.
- You might store incomplete data.
- Debugging becomes harder.
By separating errors and warnings, you stay flexible.
For example:
- Missing total_amount: reject the receipt.
- Missing merchant_address: allow it, but maybe flag for review.
This stage makes sure your data structure is safe before you move to deeper validation.
Once we confirm the required fields exist, the next step is to fix their format and data types.
Stage 2: Type Normalisation and Format Standardisation
At this stage, we fix data types.
Receipts usually give everything as text (strings).
But your database needs proper types like:
- Dates: Date format
- Money: Numbers
- Time: Standard format
So we clean and convert the data carefully.
Date and Time Normalisation
Receipts can show dates in many formats:
- 01/15/2024
- 15/01/2024
- 2024-01-15
- Jan 15, 2024
Your function tries different patterns until one works.
function normalizeDateField(dateString, context = {}) {
  ...
}
What this function does:
1. Checks if date exists:
If empty: return error.
2. Fixes common OCR mistakes:
- O: 0
- I or l: 1
- S: 5
3. Tries multiple formats:
Since different stores use different date styles.
4. Validates the date:
- The month must be 1–12.
- The day must be valid for that month.
- Not in the future.
- Not extremely old.
5. Attempts correction:
If OCR reads 35 instead of 15, it tries to fix it instead of rejecting immediately.
6. Returns a confidence score:
- If something looks strange, confidence is reduced.
- This helps decide whether manual review is needed.
So instead of just accepting or rejecting, the system:
- Tries to fix.
- Tracks problems.
- Calculates how reliable the result is.
That’s called a smart validation.
Currency and Numeric Field Normalisation
Money values are tricky because:
- $8.99
- 8,999.50
- 8.999,50
- ₹ 1,200
- 8 99 (with space)
- 8.OO (OCR mistake)
Your function handles all this.
function normalizeMoneyField(amountString, currencyContext = 'USD') {
  ...
}
What it does:
1. Removes currency symbols:
- $, €, ₹, etc.
- Detects currency type.
2. Checks currency mismatch:
If the receipt says € but your system expects USD, reduce confidence.
3. Handles thousand separators:
- US: 1,000.50
- Europe: 1.000,50
It counts commas and periods to decide which is a decimal.
4. Fixes OCR mistakes:
- O: 0
- I: 1
- Removes extra spaces
5. Converts to number: Uses parseFloat.
6. Sanity checks:
- Negative amount? (suspicious).
- Zero? (maybe valid).
- Too large? (possible OCR duplication).
- More than 2 decimal places? (likely error).
7. Rounds to 2 decimal places: Standard currency format.
8. Returns confidence score + issues.
Why this stage is important:
Without normalisation:
- Dates may be stored in 5 different formats.
- Currency may break calculations.
- Reports may fail.
- Financial totals may be wrong.
This stage ensures:
- All dates look the same.
- All amounts are real numbers.
- All suspicious values are flagged.
- You have a confidence score for smarter decisions.
It transforms messy OCR text into clean, structured, database-ready data, safely and intelligently.
Now that everything is in the correct format, we need to check if the numbers actually make sense.
Stage 3: Business Logic Validation
Now that the data types are clean and standardised, the next step is checking if the numbers and values actually make sense.
This stage is about logic, not format.
A value can look perfectly valid (correct type, correct format) but still be wrong.
function validateBusinessRules(receipt) {
  ...
}
What it does:
1. Line items should match the subtotal:
If a receipt has multiple items:
- Add all item amounts.
- Compare the total with the subtotal.
If they don’t match (allowing small rounding differences), something is wrong.
Example:
- Items total = 500
- Subtotal = 550
That’s a problem.
Even if both are valid numbers, the math doesn’t work.
2. Final total should be correct:
The formula should usually be:
Subtotal + Tax + Tip - Discount = TotalIf this calculation does not match the reported total (within a small tolerance like 2 cents), it’s flagged as an error.
This catches common OCR mistakes like:
- Reading 8.99 as 3.99.
- Missing a digit.
- Doubling numbers.
3. Tax rate should be reasonable:
The system calculates:
tax_rate = tax_amount / subtotalMost sales tax rates fall between 0% and 15%.
If the tax rate is 40% or negative, that’s suspicious.
It may not always be wrong, but it should be flagged.
4. Duplicate line items:
If the same item appears multiple times, it may be:
- Legitimate (buying 2 items).
- Or an OCR duplication mistake.
So duplicates are flagged as warnings.
5. Transaction date should not be in the future:
If the receipt date is tomorrow or next year, that’s almost always an OCR error. This is marked as an error.
6. Merchant name should look real:
Checks include:
- Too short? (like “A”).
- Only numbers or symbols? (“12345@@@”).
That might mean OCR misread the header.
Why this stage is important:
Type validation checks the structure.
Business validation checks logic.
A receipt might pass all format checks, but still:
- Have wrong totals.
- Have incorrect tax.
- Have a corrupted merchant name.
- Contain duplicate extracted items.
This stage catches those deeper problems before saving to the database.
It’s the difference between “valid format” and “actually correct data.”
But checking each field individually isn’t enough. Some errors only appear when we compare fields with each other.
Stage 4: Cross-Field Consistency Validation
This stage checks if different fields match each other logically.
Sometimes, each field looks fine on its own. But when you compare them together, the mistake becomes clear.
function validateCrossFieldConsistency(receipt) {
  ...
}
What this does:
1. Cash payment vs tip amount:
If the payment method is CASH, and the tip is very high (like more than 25% of the total), that’s unusual.
Example:
- Total = 100
- Tip = 40
That’s 40%, possible, but unlikely.
This might mean:
- OCR misread the tip.
- A number was duplicated.
- A decimal point was misplaced.
So it gets flagged as a warning.
2. Quantity × unit price should equal line total:
If a receipt shows:
- Quantity = 2
- Unit price = 50
- Amount = 300
That’s clearly wrong because: 2 × 50 = 100 (not 300)
Each line item is checked like this.
If the math doesn’t match (within a small tolerance like 2 cents), it gets flagged.
This catches:
- Wrong extracted amounts.
- Wrong quantity detection.
- Decimal errors.
3. Date + Time should not be in the future:
If the receipt has both:
- transaction_date
- transaction_time
The system combines them into one full datetime.
If that combined value is in the future, it’s almost certainly an OCR mistake.
Example:
- Date: 2024-01-15
- Time: 11:59 PM
- But today is earlier
That’s an error.
4. Discount should not be bigger than the subtotal:
If:
- Subtotal = 500
- Discount = 600
That’s impossible.
The discount cannot exceed the subtotal.
This is marked as an error.
Why this stage is important:
Single-field validation checks each field separately.
Cross-field validation checks relationships.
Many OCR errors look valid alone, but fail when compared:
- Numbers extracted from the wrong lines.
- Decimal mistakes.
- Swapped values.
- Incorrect totals.
This stage catches those deeper logical problems before saving to the database.
It makes your validation smarter and much more reliable.
Even after all these checks, we still need to decide how much we trust this receipt.
Stage 5: Confidence Scoring and Flagging
Even after all validation steps, we still need to answer one important question: How confident are we that this receipt is correct?
Not every receipt can be 100% trusted. So instead of just saying “valid” or “invalid,” we calculate a confidence score between 0 and 1.
The closer to 1, the more reliable the receipt.
function scoreConfidence(receipt, extractionMetadata) {
  ...
}
What affects the confidence score?
1. OCR confidence:
If Filestack provides an OCR confidence score in metadata, we use it.
- High OCR confidence: higher overall score
- Low OCR confidence: reduce trust
If OCR says 85% confidence, we multiply that into our score.
2. Image quality:
If the image is blurry, dark, or tilted, the quality score reduces confidence.
- Clear image: high score
- Poor image: lower score
Good input = better output.
3. Field-level confidence:
During normalisation (like date and money cleaning), we already calculated confidence for individual fields.
For example:
- Date confidence = 0.9
- Total confidence = 0.8
- Merchant name confidence = 0.95
We average these and apply them to the final score.
If important fields look suspicious, overall trust drops.
4. Validation errors and warnings:
Errors reduce confidence more than warnings.
- Each error reduces the score significantly (around 30%).
- Each warning reduces the score slightly (around 10%).
More problems = lower confidence.
5. Missing optional fields:
Missing optional fields (like merchant address or receipt number) slightly reduce confidence.
This is not critical, but less complete data = slightly less reliable.
What should happen next?
After calculating the final score, we decide:
High confidence (≥ 0.8):
- Automatically approved.
- Saved directly to the database.
Medium confidence:
- Flagged for quick manual review.
Low confidence (< 0.6):
- Requires full manual verification.
Also:
- Any serious validation errors: manual review.
- Medium confidence + high total amount = review
This is called smart automation.
Why this stage is important:
Instead of manually checking every receipt:
- Clean, high-confidence receipts flow automatically.
- Suspicious ones are flagged.
- Very risky ones are blocked.
This saves time, reduces manual work, and still keeps data quality high.
It’s not just validation anymore; it’s intelligent decision-making.
Finally, before saving anything, we must ensure the data follows our database rules.
Stage 6: Database Check Before Saving
Before saving the receipt to the database, we must make sure it follows all database rules.
Even if the data passed earlier validation steps, it can still fail at the database level.
This step checks everything in advance so the database doesn’t throw errors.
function prepareDatabaseInsertion(receipt) {
...
}
What this does:
1. Required fields:
If the database says a field is required (like merchant_name or total_amount), it must not be:
- null
- undefined
- Empty string
If it is missing, we flag it before insertion.
2. Maximum length for text fields:
Databases limit how long text can be.
Example:
- merchant_name: max 255 characters
- merchant_address: max 500 characters
If the text is too long, we catch it here instead of letting the database fail.
3. Decimal precision rules:
For money fields like:
- total_amount
- tax_amount
- tip_amount
The database might allow:
- Total digits: 10
- Decimal places: 2
So:
- 12345678.99: valid
- 12345678901.99: too many digits
- 10.999: too many decimal places
We check both:
- Total digits (precision).
- Decimal digits (scale).
4. Allowed values (enums):
Some fields only allow specific values.
Example:
payment_method = CASH, CREDIT, DEBIT, OTHERIf OCR extracts something like:
payment_method = CARDIt will be rejected because it’s not in the allowed list.
5. Duplicate receipt check:
To prevent saving the same receipt twice, you can check:
- receipt_number
- merchant_name
- transaction_date
If a similar record already exists in the database, you can flag it as a duplicate. (This usually requires a database query.)
Why this stage is important:
If you skip this step:
- Database insertion may fail.
- Transactions may roll back.
- Performance may drop.
- Error messages may be unclear.
By validating against database rules before insertion:
- You avoid crashes.
- You get cleaner error handling.
- You improve system performance.
- Debugging becomes much easier.
This is the final safety layer before the receipt is officially stored.
Now that we’ve built the full validation pipeline, let’s see how it connects with Filestack in a real implementation.
How Everything Works Together with Filestack
Here’s how these stages integrate with Filestack’s intelligence API using the Filestack JavaScript SDK:
const filestack = require('filestack-js');

async function processReceiptWithFilestack(imageUrl) {
  const client = filestack.init('YOUR_FILESTACK_API_KEY');

  // Step 1: Extract receipt data using Filestack intelligence
  const intelligenceResponse = await client.intelligence({
    url: imageUrl,
    type: 'receipt'
  });

  const rawData = intelligenceResponse.receipt_data;
  const extractionMetadata = {
    ocr_confidence: intelligenceResponse.confidence,
    image_quality: intelligenceResponse.image_quality,
    extraction_timestamp: new Date().toISOString()
  };

  // Step 2: Run through validation pipeline
  try {
    const result = await processReceiptData(rawData, extractionMetadata);

    if (result.database_ready && result.auto_approved) {
      // High confidence, no errors - insert directly
      await insertReceiptToDatabase(result);

      return {
        status: 'SUCCESS',
        receipt_id: result.id,
        confidence: result.confidence_score
      };

    } else if (result.requires_manual_review) {
      // Flag for manual review
      await queueForManualReview(result);

      return {
        status: 'PENDING_REVIEW',
        receipt_id: result.id,
        confidence: result.confidence_score,
        review_reason: result.review_reason
      };

    } else {
      // Has errors - reject or queue for correction
      await logReceiptError(result);

      return {
        status: 'FAILED',
        errors: result.database_errors || result.validation_errors,
        warnings: result.validation_warnings
      };
    }

  } catch (error) {
    console.error('Receipt processing failed:', error);

    return {
      status: 'ERROR',
      message: error.message
    };
  }
}
What this code does:
- Imports the Filestack SDK to use its API.
- Creates a Filestack client using your API key.
- Sends the receipt image URL to Filestack’s Intelligence API.
- Filestack:
- Extracts structured receipt data (merchant, date, total, line items, etc.).
- Returns OCR confidence and image quality info.
- Stores:
- Extracted receipt data (rawData).
- Metadata like OCR confidence and image quality.
- Sends the data through the full validation pipeline:
- Checks required fields.
- Normalises dates and amounts.
- Validates business logic (totals, tax, etc.).
- Runs cross-field checks.
- Calculates confidence score.
- Verifies database constraints.
- Based on the result:
- If high confidence and no errors: saves directly to the database (SUCCESS).
- If medium confidence or flagged: sends for manual review (PENDING_REVIEW).
- If serious errors: logs failure (FAILED).
- Catches unexpected errors and returns an ERROR status instead of crashing the app.
Best Practices
To make this system reliable in production, keep these best practices in mind:
- Always check that important fields are present before doing advanced checks.
- Convert dates and money into one standard format before calculating anything.
- Allow small rounding differences when comparing totals, so tiny decimal errors don’t cause problems.
- Use confidence scores to decide whether to approve automatically or send for review.
- Start with strict rules, then adjust them as you learn how real receipts behave.
With these principles in place, your receipt processing system becomes both automated and reliable.
Conclusion
Receipt data validation helps turn Filestack’s OCR results into clean, reliable database records.
Filestack is very good at extracting text from receipts. But the raw data still needs to be checked before saving. That’s why we use a six-step pipeline:
- Check required fields (schema validation)
- Fix data types and formats
- Apply business rules (like totals matching)
- Compare related fields for consistency
- Calculate a confidence score
- Make sure the data follows database rules
These steps catch mistakes at different levels while still keeping the system fast.
It’s a good idea to start with strict rules. As you learn more about the types of receipts your users upload, you can adjust and relax some rules if needed. Keep tracking validation results and update your logic when you discover new edge cases.
When validation is done properly:
- You get fewer support issues
- Financial reports stay accurate
- Users trust your receipt scanning feature
Let Filestack handle the hard OCR work. Then use strong validation to make sure only clean, correct data is saved in your database.


Shefali Jangid is a web developer, technical writer, and content creator with a love for building intuitive tools and resources for developers.
She writes about web development, shares practical coding tips on her blog shefali.dev, and creates projects that make developers’ lives easier.