
Have you ever taken a cool pic but got shocked by red eyes ruining it? We get it! That’s where Filestack comes in with its excellent Red Eye Removal feature to save your day! Imagine snapping a picture, and then those creepy red eyes show up. No worries, Filestack’s got your back! Our Red Eye Removal can help you eliminate red eyes in the images.
First, we will explain what a red eye is. Next, we will show you the best method for red eye removal. The exciting part is that we will also show you the implementation of our red eye removal feature. Let’s start our journey now!
What is red eye removal?
Red eye happens when you take a photo with a flash in a place with little light, like a dark room or outside at night. People’s eyes open wide in the dark to let in more light. When you use the flash, the light goes through their big pupils. Then, it bounces off the back of their eyes and comes back towards the camera. As a result, it causes the red-eye effect.
👉Red-eye removal is a feature in cameras and photo editing tools that fixes the red-eye effect in pictures.
The removal process involves identifying the red areas in the eyes. Then, it adjusts the color to a more natural tone. This helps to enhance the overall appearance of the eyes in the photo.
What is the best method to remove red eyes from images?
Filestack offers the easiest way to remove the red-eye effect from your photos. Filestack’s red eye removal feature works through the following URL:
https://process.filestackapi.com/redeye/%20+%20filestack_handle
As you can see in the URL above, no other parameters are required except redeye. It is important to note that the redeye removal feature for Filestack is available only on pro and higher plans.
Benefits of using Filestack for red-eye removal
✔️Filestack swiftly handles red-eye removal, saving time.
✔️Its simple interface suits both beginners and experts.
✔️Filestack automates red-eye removal for optimal results.
✔️It blends smoothly with various platforms and applications.
✔️Access red-eye removal without heavy local processing.
✔️Scales well for individual users or larger business needs.
✔️Filestack’s reliability ensures consistent, high-quality results.
Let’s create a simple app for enhancing your images using the red eye removal by Filestack.
How do you use the Filestack red eye removal feature?
👉Create an account at Filestack.
👉Log in to your account and get the API key.
👉Create an index.html file to write the code for API key implementation. Let’s understand the code step by step:
HTML
<!DOCTYPE html>
<html lang="en">
<head>
    <meta charset="UTF-8">
    <meta name="viewport" content="width=device-width, initial-scale=1.0">
    <title>Your Web Page</title>
    <script src="https://static.filestackapi.com/filestack-js/3.x.x/filestack.min.js"></script>
    <style>
        /* CSS styles go here */
    </style>
</head>
<body>
    <!-Body content goes here -->
    <script>
        // JavaScript code goes here
    </script>
</body>
</html>- `<!DOCTYPE html>` declares the document type and version of HTML.
- `<html lang=”en”>` is the root element of the HTML document, indicating that the language is English.
- `<head>` contains meta-information about the HTML document, such as character set, viewport settings, and linked scripts.
- `<meta charset=”UTF-8″>` sets the character set to UTF-8.
- `<title>Your Web Page</title>` sets the title of the webpage.
- `<script src=”https://static.filestackapi.com/filestack-js/3.x.x/filestack.min.js“></script>` includes the Filestack JavaScript library.
- `<style>` defines the internal CSS styles for the webpage.
- `<body>` contains the content of the HTML document.
- `<script>` includes JavaScript code within the HTML document.
CSS
<style>
    body {
        display: flex;
        align-items: center;
        justify-content: center;
        height: 100vh;
        margin: 0;
        background-color: #FEFEFE;
        background-size cover;
        background-image: url('https://helpx.adobe.com/content/dam/help/en/lightroom/how-to/red-eye-remover_1408x792.jpg');
    }

    button {
        /* Styles for buttons go here */
    }

    #filestackEnhanceButtonContainer {
        /* Styles for the container of Filestack buttons go here */
    }

    #redeyeButton {
        display: none;
    }
</style>- `body` styles applied to the `<body>` element.
- `display: flex;` uses a flex container for positioning elements.
- `align-items: center;` centres content vertically.
- `justify-content: center;` centers content horizontally.
- `height: 100vh;` sets the body height to 100% of the viewport height.
- `margin: 0;` removes default margin.
- `background-color`, `background-size`, and `background-image` are the styles for the background image.
- `#filestackEnhanceButtonContainer` is the style for the container of Filestack buttons.
- `# redeyeButton’ is initially set to `display: none;` to hide the red-eye removal button.
JavaScript
<script>
    const apikey = 'ADD YOUR API KEY HERE';
    const client = filestack.init(apikey);
    let uploadedFileHandle;
    let enhancedFileHandle;

    function openFilestackEnhancePicker() {
        // Function to open Filestack picker and handle the uploaded file
    }

    function applyRedEyeRemoval() {
        // Function to apply red-eye removal using Filestack and update UI accordingly
    }

    function redirectToEnhancedImage() {
        // Function to redirect to the enhanced image's URL
    }
</script>- `const apikey’ sets the Filestack API key.
- `const client = filestack.init(apikey);` initializes the Filestack client using the API key.
- `let uploadedFileHandle;` is the variable to store the handle of the uploaded file.
- `let enhancedFileHandle;` is the variable to store the handle of the enhanced file.
- `function openFilestackEnhancePicker() { … }` is the function to open the Filestack picker and handle the uploaded file.
- `function applyRedEyeRemoval() { … }` applies red-eye removal using Filestack and updates UI accordingly.
- `function redirectToEnhancedImage() { … }` is the function to redirect to the enhanced image’s URL.
Final code
<!DOCTYPE html>

<html lang="en">

<head>

    <meta charset="UTF-8">

    <meta name="viewport" content="width=device-width, initial-scale=1.0">

    <title>Your Web Page</title>

    <!-Include the Filestack library -->

    <script src="https://static.filestackapi.com/filestack-js/3.x.x/filestack.min.js"></script>

    <style>

        body {

            display: flex;

            align-items: center;

            justify-content: center;

            height: 100vh;

            margin: 0;

            background-color: #FEFEFE;

            background-size: cover;

            background-image: url('https://helpx.adobe.com/content/dam/help/en/lightroom/how-to/red-eye-remover_1408x792.jpg');

        }

        button {

            padding: 50px;

            font-size: 50px;

            font-family: 'Times New Roman', Times, serif;

            cursor: pointer;

            margin: 10px;

            border: none;

            border-radius: 10px;

            background-color: #EF4A25;

            color: white;

            z-index: 1;

        }

        #filestackEnhanceButtonContainer {

            display: flex;

            flex-direction: column;

            align-items: center;

        }

        #redeyeButton {

            display: none;

        }

    </style>

</head>

<body>

<div id="filestackContainer" style="display: none;"></div>

<div id="filestackEnhanceButtonContainer">

    <button id="filestackEnhanceButton" onclick="openFilestackEnhancePicker()">Remove Red Eye with Filestack</button>

    <button id="redeyeButton" onclick="applyRedEyeRemoval()">Red Eye Removal</button>

    <button id="accessUpscaledButton" onclick="redirectToEnhancedImage()" style="display: none;">Access Image</button>

</div>

<script>

    const apikey = 'A18L3T2eWRemxYIGwGlZsz';

    const client = filestack.init(apikey);

    let uploadedFileHandle;

    let enhancedFileHandle;

    function openFilestackEnhancePicker() {

        const options = {

            onUploadDone: (res) => {

                uploadedFileHandle = res.filesUploaded[0].handle;

                alert('File uploaded successfully. Now click "Red Eye Removal" to apply the enhancement.');

                document.getElementById('filestackEnhanceButton').style.display = 'none';

                document.getElementById('redeyeButton').style.display = 'block';

            },

        };

        const picker = client.picker(options);

        picker.open();

    }

    function applyRedEyeRemoval() {

        alert('Applying red-eye removal...');

        const fileHandle = uploadedFileHandle;

        const redEyeRemovalUrl = `https://process.filestackapi.com/redeye/${fileHandle}`;


        alert('Red-eye removal applied successfully.');

        enhancedFileHandle = fileHandle;

        document.getElementById('accessUpscaledButton').style.display = 'block';

        document.getElementById('accessUpscaledButton').setAttribute('data-url', redEyeRemovalUrl);

    }

    function redirectToEnhancedImage() {

        const enhancedUrl = document.getElementById('accessUpscaledButton').getAttribute('data-url');

        window.location.href = enhancedUrl;

    }

</script>

</body>

</html>
Output
Run the code in the Visual Studio Code. It will show you the following web page:

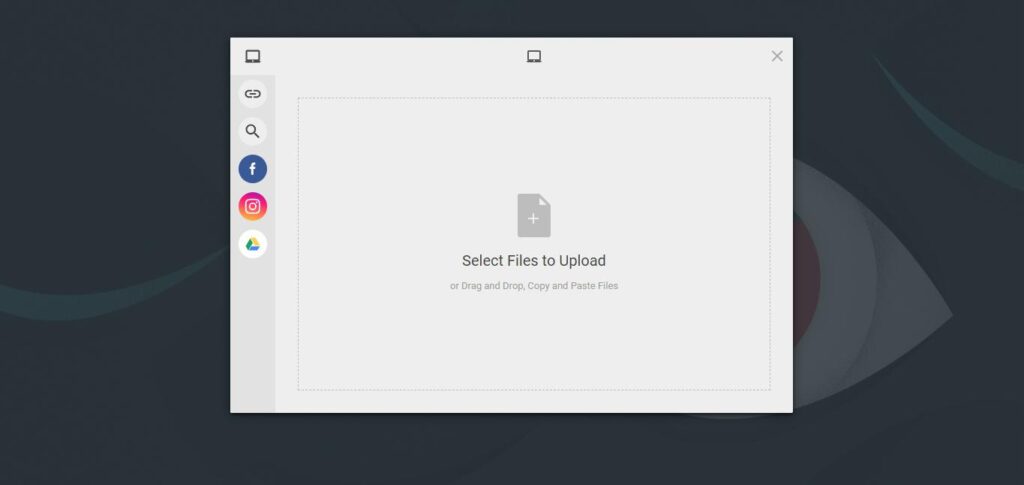
Click on the button “Remove Red Eye with Filestack”. It will open the file picker. You have to upload the image with the red-eye effect under
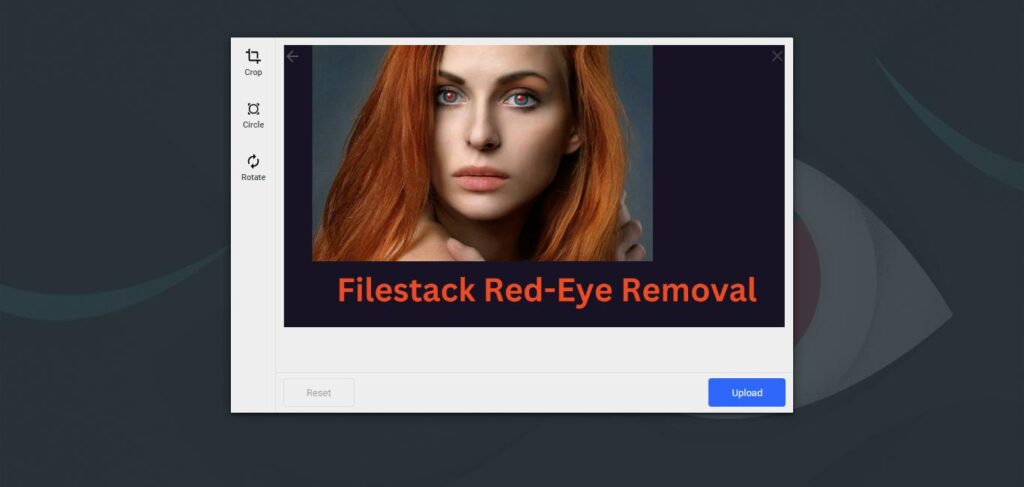
Click on upload, and it will bring you to the following page.

Click on the “Red Eye Removal” button to get the following page:
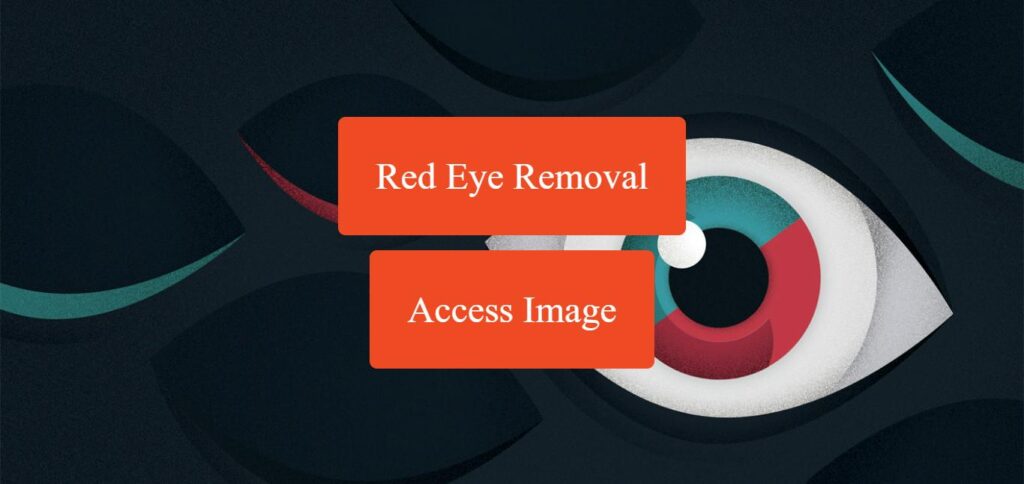
When you click “Access Image”, it will give you the original image without the red-eye effect. Here are our results for the uploaded image:

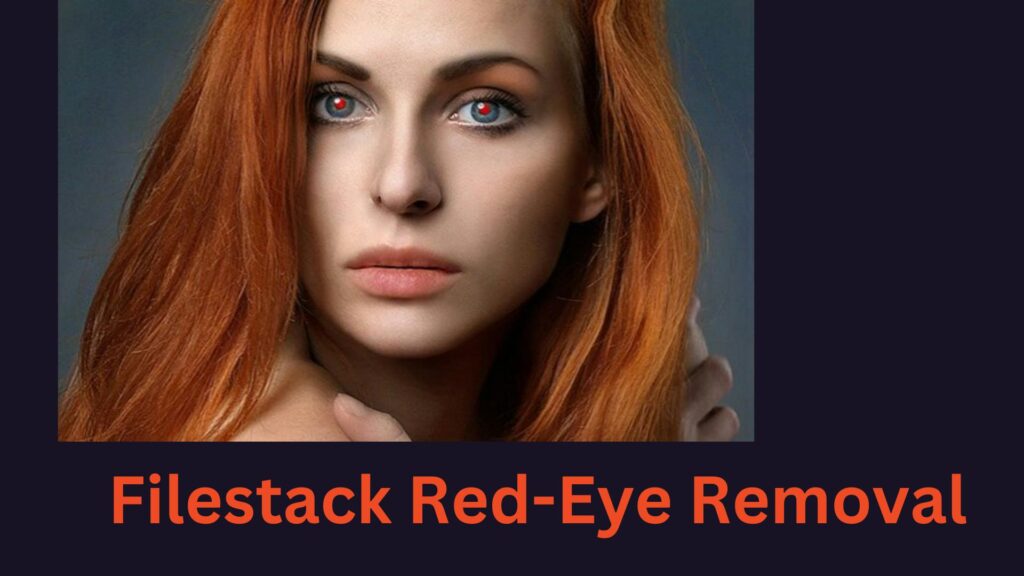
The original image is given below:
Conclusion
In the above article, we have made it easier for you to get rid of red eyes. We introduced the most efficient method for red eye removal in your images. Besides we also showed the implementation of Filestack to make things clear for you. For this purpose, we created an application that uses Filestack to remove red eyes.
FAQs
How can I remove red-eye?
You can use the Filestack red eye removal feature to remove red eyes.
Why do we use red-eye removal?
Red-eye removal helps us enhance images by eliminating the red-eye effect from the images taken in dim light.
Is red-eye permanent?
The red-eye effect is not permanent. Rather, you can get rid of it by using the Filestack.
What app removes red-eye?
Filestack app helps you to enhance images through easier red-eye removal process.
Sign Up for free at Filestack – Remove the red-eye effect from your images more effectively.
Ayesha Zahra is a Geo Informatics Engineer with hands-on experience in web development (both frontend & backend). Also, she is a technical writer, a passionate programmer, and a video editor. She is always looking for opportunities to excel in her skills & build a strong career.
Read More →