

Every time someone uploads an image to your platform, you have to decide what to do with it. You can add a watermark manually, write your own code to do it, or leave the image without protection. But none of these options work well as your platform grows.
If you run a marketplace, content website, or any app where users upload images, you might have seen this problem. Adding watermarks manually is time-consuming. Writing your own server code makes things complicated and harder to maintain. And if images are not protected, anyone can use them without permission.
A better solution is automatic watermarking. The watermark gets added instantly whenever someone uploads an image. Without any manual work, extra code, or server management.
Key Takeaways
- Manual or custom-coded watermarking becomes difficult to manage as image uploads grow.
- Automated watermarking adds protection instantly whenever images are uploaded.
- Filestack Workflows lets you set simple rules instead of writing complex processing code.
- Event-driven automation improves reliability, scalability, and performance.
- A one-time setup saves developer time, reduces maintenance, and keeps images protected automatically.
To understand why automation matters, let’s first look at the challenges of traditional watermarking methods.
The Problem with Traditional Watermarking Approaches
Most developers start by applying watermarks client-side in their app code. This works when the number of uploads is small, but it can cause problems later.
- Code becomes complicated: Uploading images and adding watermarks are two different tasks. When both are handled in the same code, the project becomes harder to manage.
- Hard to scale: If your server adds watermarks, every upload uses server power. When many people upload images at once, your app can slow down.
- Difficult to maintain: Watermarks may change over time. Maybe the logo changes or the design gets updated. Every change means updating code, testing it, and deploying again.
- Risk of errors: Sometimes, watermarking can fail. To fix this, you need to build error handling, retry systems, and logging, which takes extra effort.
For example, if a marketplace gets 1,000 image uploads daily or a blog allows guest authors to upload images, these problems grow fast. What seems like a simple feature can turn into something difficult to manage.
Since manual and custom-coded watermarking creates these challenges, developers often look for a more scalable and hands-off solution.
The Declarative Alternative: Event-Driven Watermarking
Filestack Workflows works in a different and easier way. Instead of writing step-by-step code that tells your app what to do, you simply set rules. These rules tell the system to automatically add watermarks whenever a file is uploaded.
This means you don’t have to manually control everything. You just describe what should happen, and it runs on its own.
The setup is simple:
- Your app manages the upload screen and user experience.
- Filestack Workflows manages what happens after the upload.
- Both connect using events, so they work smoothly without being tightly connected.
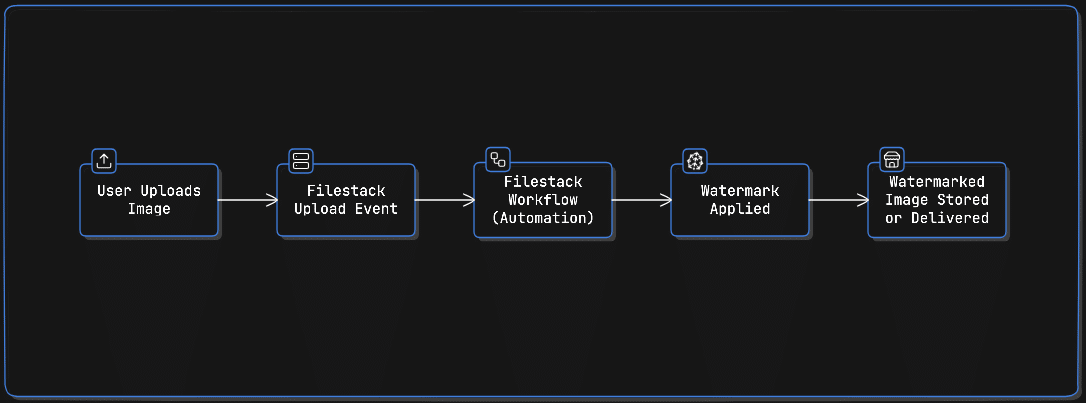
When someone uploads an image using the Filestack file picker or API, an event is triggered. The Workflow detects that event, adds the watermark, and saves the final image automatically. You don’t need to write extra processing code.

This automated approach is powered by workflows. Let’s quickly understand what a workflow is and how it helps automate image processing.
What is a Filestack Workflow?
A Workflow is a set of automatic tasks that run when files are uploaded to your Filestack account. Here’s what you need to know about it for automatic watermarking:
- Runs automatically when files are uploaded: Workflows start working as soon as someone uploads a file. You don’t need to check uploads manually or run scheduled tasks.
- No server management needed: Filestack handles all the technical setup. You only decide what should happen after a file is uploaded.
- Built-in image tools: You can easily add watermarks, resize images, change file formats, and do other image edits using simple settings instead of code.
- Works well even with many uploads: It doesn’t matter if you get 10 uploads or 10,000 uploads per day. The system processes them smoothly.
For watermarking, this means every uploaded image gets your watermark automatically, quickly, and in the same way every time.
💡Tip: If you want a deeper understanding of how workflows operate, you can explore the core concepts of Filestack Workflows.
Separation of Concerns: Keeping Your System Clean and Simple
One big benefit of this approach is that it clearly separates responsibilities. Your app handles user-related tasks, while Filestack Workflows handles file processing automatically. This keeps your system easier to build and maintain.
What Your Team Handles
Your application focuses only on user experience and business rules, such as:
- User login and permissions.
- Upload screen and file picker setup.
- Form validation and input handling.
- Rules like who can upload files and when.
- Showing watermarked images in your app.
Your developers can focus on building features that users see and use. They don’t need to worry about image processing or server scaling.
What Filestack Handles
Filestack Workflows takes care of all the technical processing tasks:
- Detecting file uploads and triggering workflows.
- Processing images and applying watermarks.
- Placing watermarks correctly on images.
- Automatically scaling when uploads increase.
- Handling errors and retries.
- Optimising performance.
Your team does not need to maintain this part. Updates, security fixes, and performance improvements are handled automatically.
Real-World Benefits
This clear separation gives your team several advantages.
- Faster development: Frontend developers can improve upload features without touching watermark logic. Features can be released faster.
- Quick updates: If your brand logo changes, you can simply upload a new watermark image and update the workflow settings, without any code changes or deployments.
- Less complexity: Your app stays focused on business logic. You don’t need extra image processing libraries, scaling logic, or retry systems.
- Better team productivity: Developers can focus on building product features. Operations teams can update watermark rules from the dashboard. Designers can test watermark styles without waiting for engineering support.
This setup allows different teams to work independently while keeping your system simple and reliable.
Setting Up Your Automated Watermarking Workflow
Let’s build an automatic watermark system that is ready for real use. The setup process is straightforward, but each step matters.
What You Need Before Starting
Before you begin, make sure you have:
- An active Filestack account with Workflows enabled.
- A watermark image (usually a transparent PNG file).
- Your Filestack API key.
💡Tip: If you are new to watermark design, you can first learn the basics of creating a watermark before moving ahead.
Step 1: Upload Your Watermark Asset
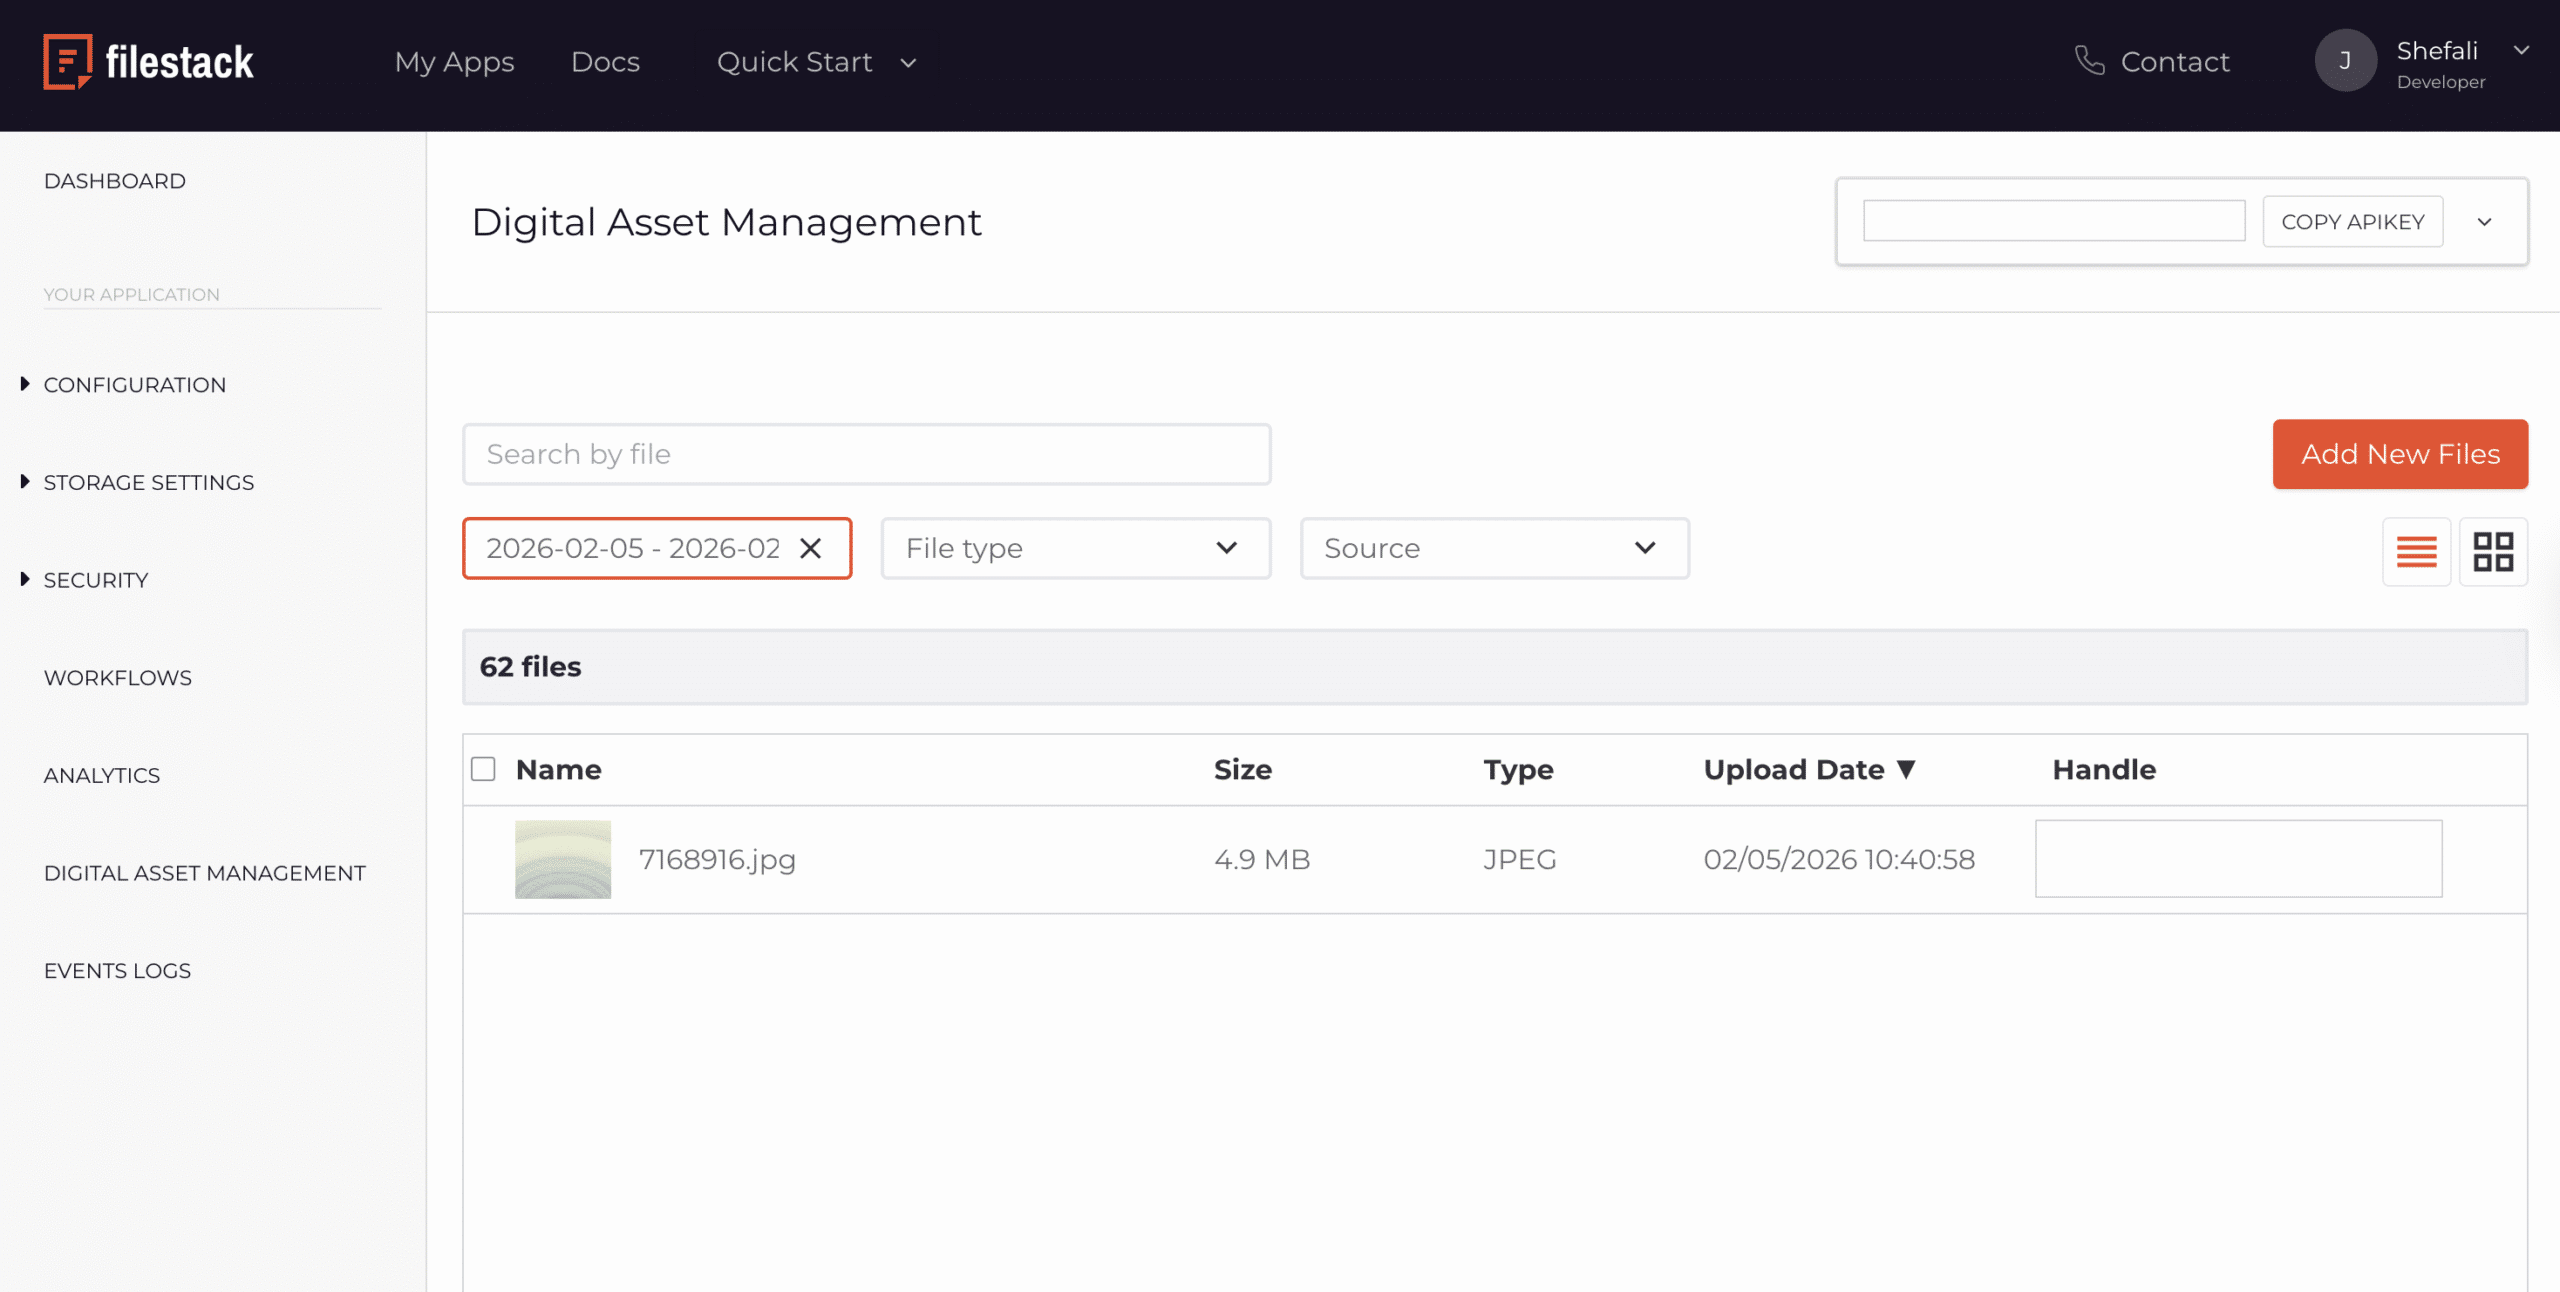
First, upload your watermark image to Filestack. This image will be placed on top of every uploaded image.
Go to your Filestack dashboard and upload your watermark file. After uploading, you will get a file handle. You will need this handle later while setting up your Workflow.
It is a good idea to save this file handle in your environment variables or configuration settings, because you will use it every time you apply the watermark.

Step 2: Create Your Workflow
In your Filestack dashboard, go to the Workflows section and create a new Workflow. Give it a clear name like Auto-Watermark Uploads so you can easily find it later in logs and analytics.
Step 3: Configure the Trigger
Now, you need to tell your Workflow to add a watermark to uploaded images. In Filestack, you can do this using the built-in Watermark Task.
Follow these steps:
- Open your Workflow in the Filestack dashboard.
- Click Add Task.
- Select Watermark from the list of available tasks.
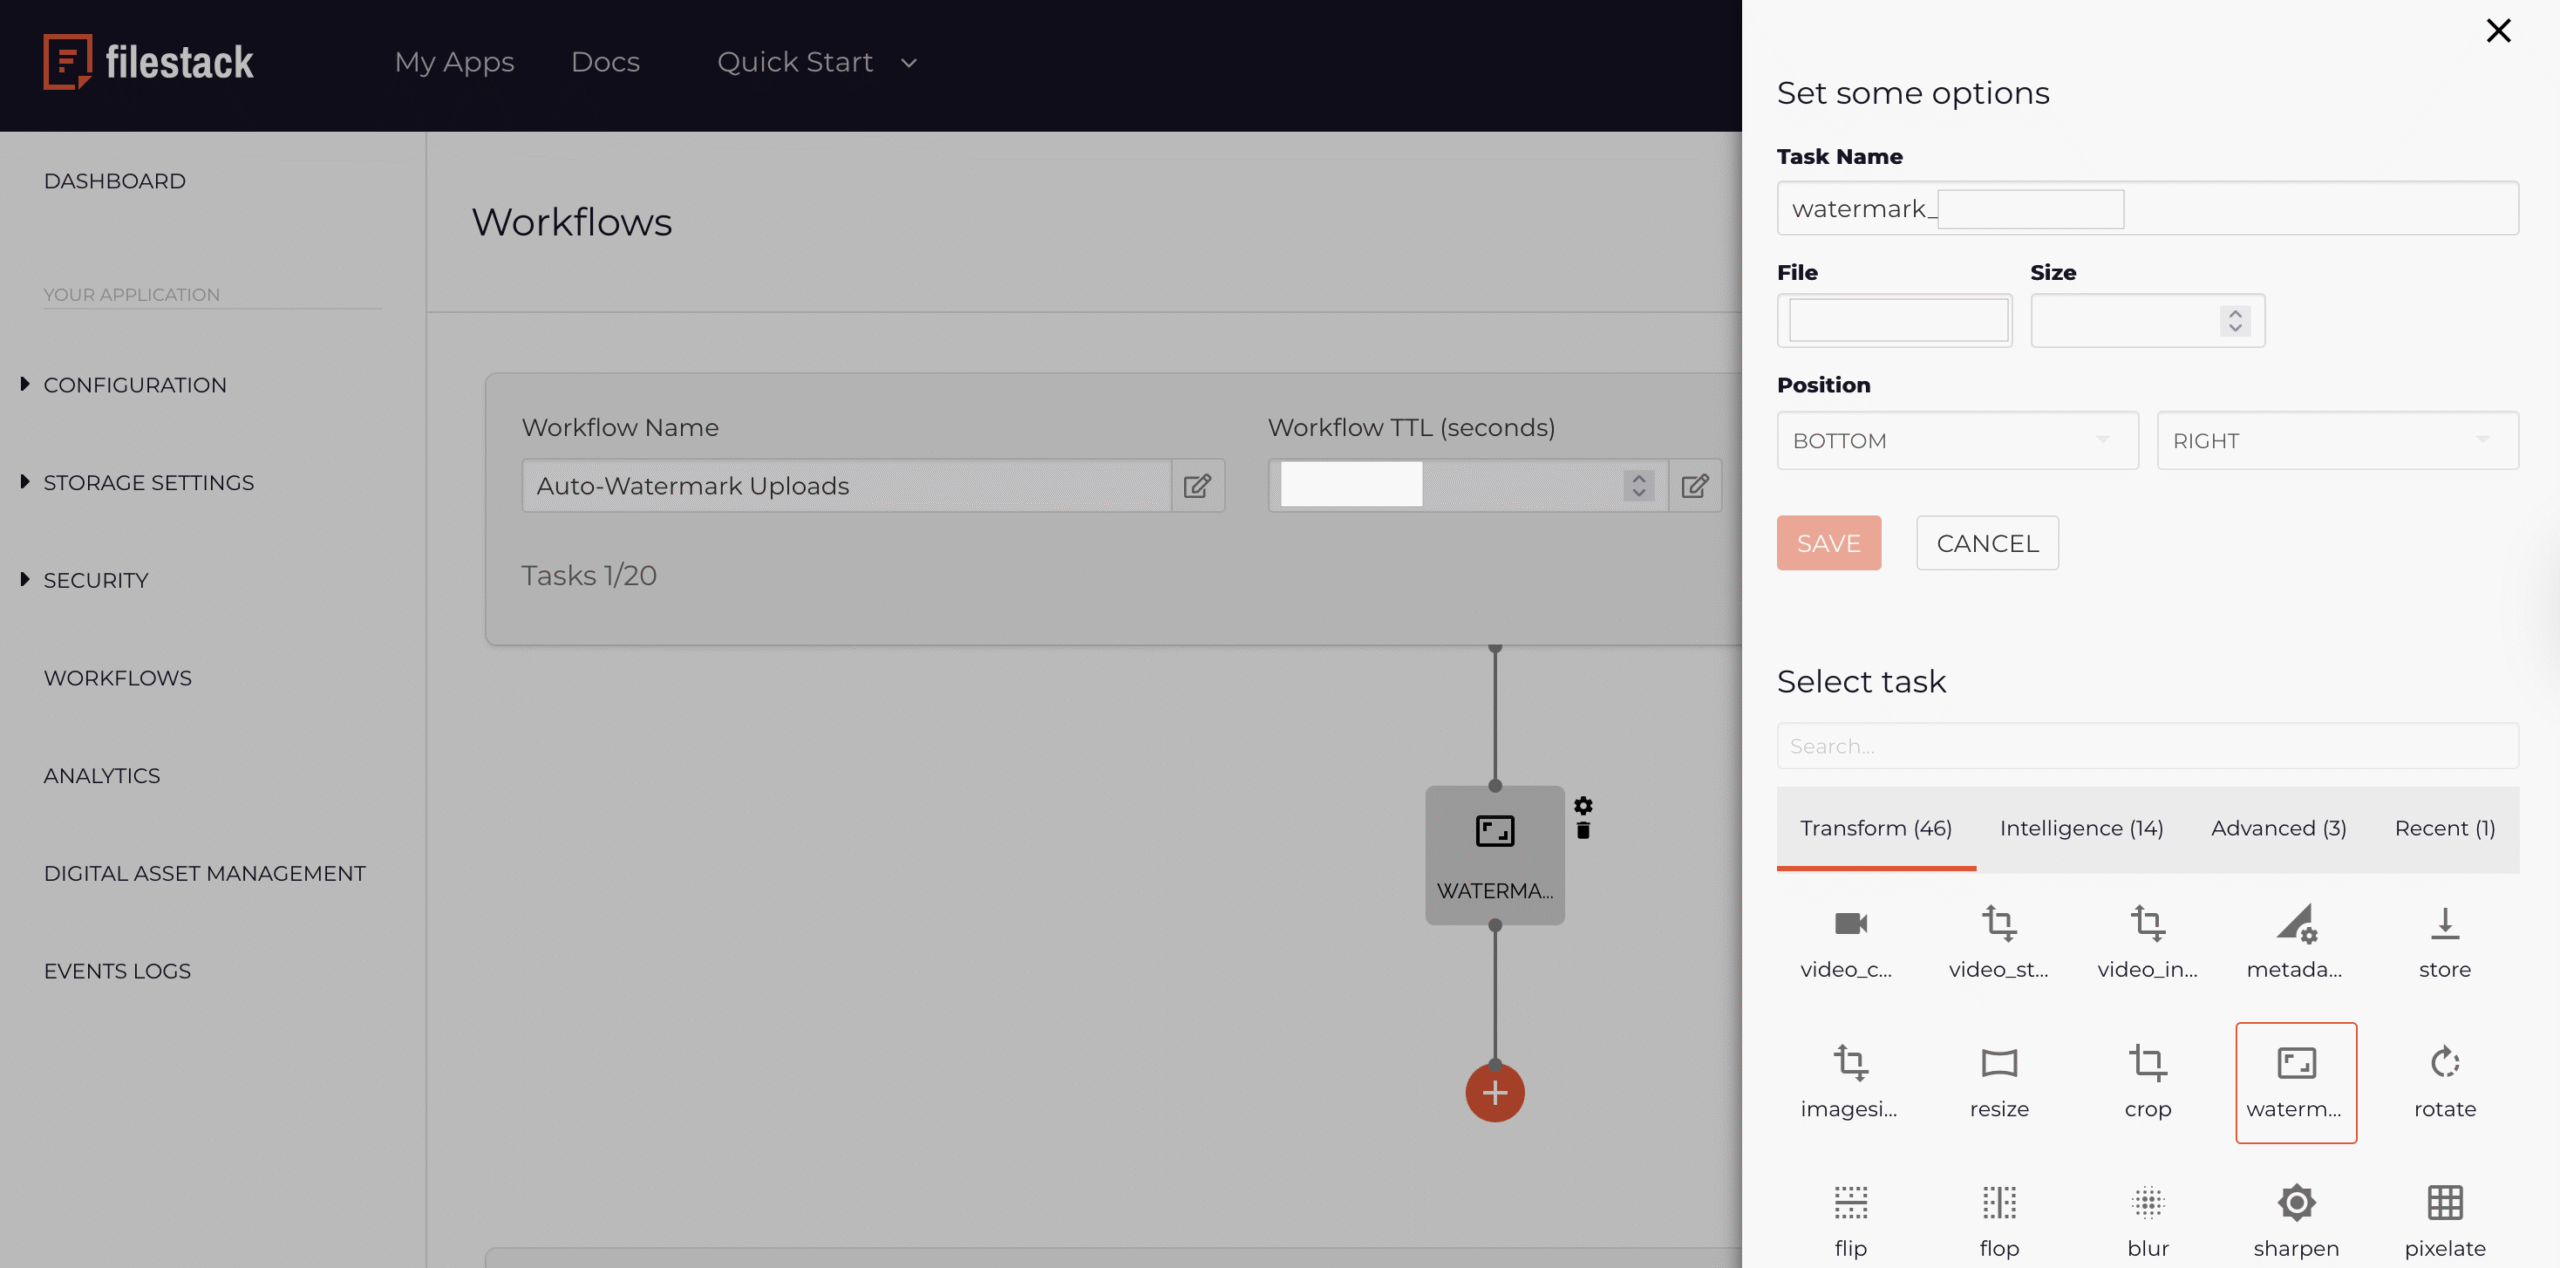
Configure the Watermark Task
After selecting the Watermark task:
- Enter the file handle of the watermark image you uploaded earlier.
- Choose the watermark position (for example: bottom-right, center, or top-left).
- Adjust size if needed.
- Save the task.

💡Tip: The Watermark task uses Filestack’s built-in image processing features. For advanced customisation options, you can check the Filestack Transformation API documentation.
Once your automation is set up, it’s important to understand how it improves performance and reduces maintenance effort.
Reliability and Scalability Benefits
Now, let’s compare the Workflow approach to a self-hosted microservice:
Self-hosted Watermarking Service
If you build your own watermark system:
- You need to set up and manage servers.
- You must write code to detect upload events.
- You have to handle scaling when more users upload files.
- You need to track failures and build retry systems.
- You must maintain updates, dependencies, and security.
- You may still pay for servers even when no files are uploaded.
Filestack Workflows
With Filestack Workflows:
- Filestack handles servers and infrastructure automatically.
- You just set rules and tasks instead of writing complex code.
- The system automatically handles traffic spikes.
- Error handling and retries are already built in.
- Filestack manages updates and security.
During a traffic spike, say, if a marketing campaign suddenly increases uploads by 5 times, the Workflow automatically handles the extra traffic. You don’t need to scale servers or worry about performance issues.
And when uploads are low, you don’t pay for unused server resources.
This serverless approach reduces maintenance work while still providing reliable and scalable processing.
After deployment, you should regularly check that your automation continues working correctly.
Monitoring and Verification
After setting up automated watermarking, it’s important to check that everything is working properly.
- Spot checks: Periodically review recently uploaded images and confirm the watermark appears in the correct position and size.
- Analytics monitoring: Keep an eye on Workflow activity and execution metrics. If you notice many failures, it could mean there is a configuration issue or a problem with uploaded images.
- Storage checks: Make sure watermarked images are saved in the correct location and follow the expected naming pattern.
The Filestack dashboard shows logs for each Workflow run. These logs help you quickly find and fix issues if something goes wrong.
Along with reliability and scalability, cost is another important factor when choosing an automation approach.
Cost Considerations
Using automated watermarking with Filestack Workflows does have processing costs. However, it is usually cheaper than building and maintaining your own system.
Here’s why:
- You save developer time because you don’t need to build and maintain custom infrastructure.
- You reduce server costs since image processing happens outside your app.
- You avoid downtime or emergency fixes caused by traffic spikes.
- You can launch watermarking features faster.
For most platforms, managed automation is more cost-effective. For example, a marketplace handling 1,000 image uploads per day usually spends less using Workflows than running its own watermarking service with proper monitoring and backup systems.
If you are already using a manual or custom watermarking setup, you can still move to automation gradually.
Migration from Existing Systems
If you are already adding watermarks using custom code, you can slowly move to Filestack Workflows without breaking your current system.
Here is a simple and safe way to migrate:
- Run both systems together: Keep your current watermarking system running. Start using Workflows only for new uploads so you can compare results.
- Check the results: Make sure images processed by Workflows have the correct watermark size, position, and quality.
- Switch gradually: Slowly stop using manual watermarking for certain upload features. Move more uploads to Workflows once you are confident.
- Remove old code: After Workflows handle all new uploads, you can remove old watermarking code and stop using related servers or tools.
This step-by-step approach helps you move to automation safely without affecting users or breaking existing features.
Automated watermarking is usually just the beginning. Once workflows are in place, many other automation opportunities become possible.
What’s Next?
Automated watermarking is often the first Workflow developers build, but many teams use Filestack Workflows for other automation tasks as well. Once you start using event-based processing, it becomes easier to automate more parts of your file handling system.
For example, you can also automate:
- Creating thumbnails for uploaded images.
- Converting file formats for better compatibility.
- Scanning content for moderation or safety checks.
- Extracting metadata and adding tags automatically.
If you want to take Workflows further, you can also learn about triggering Workflows programmatically from your application code.
This allows you to run different Workflows based on things like user roles, subscription plans, or content types.
Conclusion
Watermarking doesn’t have to be hard. Instead of writing and managing a lot of code, you can use simple settings to do the job. This saves time and makes your system more reliable and easier to scale.
Filestack Workflows turns watermarking into a one-time setup instead of a repeated manual task. When someone uploads an image, the watermark is added automatically. This lets your team focus on building features instead of handling servers and processing logic.
For platforms where users upload images, protecting content is very important. Automated watermarking is quickly becoming a basic requirement. The main choice is whether you want to build and maintain this system yourself or use a managed solution built for automation.
Automation gives many benefits. It is faster to set up, costs less to maintain, works more reliably, and keeps your system simple.
Set it up once, and it keeps working automatically.
If you’re looking to simplify image processing and automate watermarking without managing extra infrastructure, you can explore automated workflows with Filestack and see how easily it fits into your upload pipeline.


Shefali Jangid is a web developer, technical writer, and content creator with a love for building intuitive tools and resources for developers.
She writes about web development, shares practical coding tips on her blog shefali.dev, and creates projects that make developers’ lives easier.