



Three lines do the work, whatever you connect Filestack to. You initialise a client with your API key, you open the picker, and you read the handle out of the callback. Below, that pattern is wired into an existing stack three ways, plain HTML, React and Next.js, under 20 lines in each case. Every snippet was run on 6 August 2026 against the versions named beside it.
Key takeaways
- Three calls do the work in every framework: initialise a client, open the picker, read the handle from the callback.
- The Filestack API key is public and belongs in an environment variable, while the app secret stays on your server.
- Create the client outside a React component, because re-initialising it on every render is the common mistake here.
- A Next.js picker component needs
'use client'and aNEXT_PUBLIC_key, while a route handler uses the unprefixed one. - Store the handle rather than the delivery URL, and keep the API key out of cdn.filestackcontent.com URLs.
What you need first
An API key from the developer portal. It is public by design, since browser uploads carry it, so it belongs in an environment variable rather than a secret store. The app secret is a separate value and none of this needs it.
One package, filestack-js, currently 3.51.6. There is a filestack-react wrapper as well, but the plain SDK is fewer moving parts and the same code then works in every framework in this article.
Plain HTML, no build step
Load the script from the CDN and you have a working upload with no bundler, no npm install and no framework:
<script src="https://static.filestackapi.com/filestack-js/3.x.x/filestack.min.js"></script>
<button id="pick">Upload a file</button>
<img id="out" alt="">

<script>
  const client = filestack.init('YOUR_API_KEY');

  document.getElementById('pick').onclick = () => {
    client.picker({
      accept: ['image/*'],
      maxFiles: 5,
      onUploadDone: ({ filesUploaded }) => {
        document.getElementById('out').src =
          'https://cdn.filestackcontent.com/resize=width:400/' + filesUploaded[0].handle;
      },
    }).open();
  };
</script>
Twelve lines of script, and the button opens this:

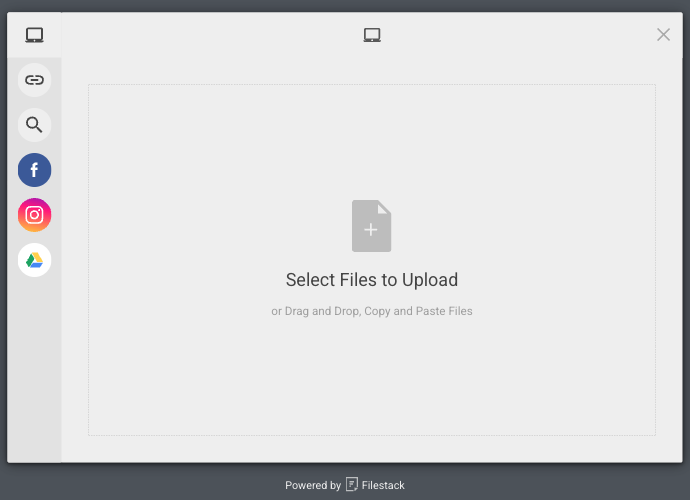
The drop zone accepts dragging, dropping and pasting as well as the file dialog, so drag and drop file upload in plain HTML and JavaScript is the default behaviour rather than something you build. maxFiles: 5 is what makes it a multiple file upload; drop it and you get one.
The 3.x.x in that URL resolves to the current 3.x release, which is why the snippet does not go stale. Pin a full version instead when you need reproducible builds.
React, using the picker from a component
React 19.2.8 and Vite 8.2.0 below. The client is created once outside the component, because re-initialising it on every render is the usual mistake here:
import { useState } from 'react';
import * as filestack from 'filestack-js';

const client = filestack.init(import.meta.env.VITE_FILESTACK_API_KEY);

export default function Uploader() {
  const [handle, setHandle] = useState(null);

  const open = () =>
    client.picker({
      accept: ['image/*'],
      onUploadDone: ({ filesUploaded }) => setHandle(filesUploaded[0].handle),
    }).open();

  return (
    <>
      <button onClick={open}>Upload a photo</button>
      {handle && <img alt="" src={`https://cdn.filestackcontent.com/resize=width:400/${handle}`} />}
    </>
  );
}
Sixteen lines. Upload a portrait photograph through it and the img renders at 400 by 520, resized on the way out rather than in the browser.
The reason a React file upload component ends up this short is that the picker owns the parts that usually take the code. Chunked uploads, retries on a dropped connection and the progress bar are inside picker(), so there is no FormData to assemble and no fetch to write.
Handle the upload in one place and pass the handle down. Storing the whole result object in state works too, but the handle is the only field the rest of your app needs.
If the picker interface is more than you want, client.upload() takes a File straight from an ordinary input and returns the same result object:
const onChange = async (e) => {
  const { handle } = await client.upload(e.target.files[0], {
    onProgress: ({ totalPercent }) => setPercent(totalPercent),
  });
  setHandle(handle);
};

return <input type="file" accept="image/*" onChange={onChange} />;
That gives you your own file upload button with a progress bar and none of the picker’s interface, at the cost of the cloud sources and the review step. onProgress fires with a totalPercent you can put straight into a progress element.


Next.js, one client component and one route
Next.js 16.3.0 with the App Router. The picker needs the browser, so the component carries 'use client' and the key uses the NEXT_PUBLIC_ prefix so it reaches the bundle:
'use client';

import { useState } from 'react';
import * as filestack from 'filestack-js';

const client = filestack.init(process.env.NEXT_PUBLIC_FILESTACK_API_KEY);

export default function Uploader() {
  const [handle, setHandle] = useState(null);

  const open = () =>
    client.picker({
      accept: ['image/*'],
      onUploadDone: ({ filesUploaded }) => setHandle(filesUploaded[0].handle),
    }).open();

  return (
    <>
      <button onClick={open}>Upload a photo</button>
      {handle && <img alt="" src={`https://cdn.filestackcontent.com/resize=width:400/${handle}`} />}
    </>
  );
}
Import it from a server component and it renders as a normal child. Nothing else in the page has to become a client component.
When the file comes from your backend rather than a person, a route handler stores it without a browser at all:
import { init } from 'filestack-js';

export async function POST(request) {
  const { url } = await request.json();
  const client = init(process.env.FILESTACK_API_KEY);
  const result = await client.storeURL(url);
  return Response.json(result);
}
Posting a web address to that route returned the stored file in one response:
{
  "filename": "bird1.jpg",
  "handle": "boEtpJsSSCW8W67hPUKY",
  "size": 34441,
  "type": "image/jpeg",
  "url": "https://cdn.filestackcontent.com/boEtpJsSSCW8W67hPUKY"
}
Note the key name has no NEXT_PUBLIC_ prefix there, because that code runs on the server and the value should stay there.
The handle is the whole integration
Every one of those callbacks hands you the same thing, a 20 character handle. It is the file, and it is all you need for delivery:
https://cdn.filestackcontent.com/TASK/HANDLEYour API key does not belong in that URL. The handle already identifies the application that owns the file, and putting a credential in front of readers buys nothing.
Tasks run left to right, so the resize in every snippet above happens before the file is sent. Chain another on the end and the encoder works on the smaller image:
https://cdn.filestackcontent.com/resize=width:400/output=format:webp/HANDLEMeasured on 6 August 2026, a square 400 pixel crop of a 319,136 byte photograph came back at 43,804 bytes as JPEG and 33,856 as WebP. Which format to reach for is covered in the guide to convert to webp, the full task list is in the image editing api guide, and face detection is a URL away if you need to blur faces in user photographs.
Crop, resize, rotate, watermark, compress, format conversion and face detection all run on the free plan. The operations that read and interpret a file, such as text recognition, tagging and captioning, run on the higher plans. Work out which of those two your product needs before you design the pipeline.
When it does not work
The CDN answers in plain text, so read the body rather than inferring from the status.
| What went wrong | Status | Body |
|---|---|---|
| Handle does not exist | 400 | Bad Request |
| Task name misspelled | 400 | validation error: task not found: “resiz” |
| Parameter misspelled | 400 | validation error: invalid parameter widht for resize task |
| Operation your plan does not include | 403 | You don’t have permission to perform this task: ocr. Please check your access settings |
Two failures happen before you ever reach the CDN. If the picker does not open at all, the script did not load, and the console will say so. If it opens and uploads fail only from your deployed domain, you have domain whitelisting switched on in the developer portal without your production origin in the list. Whitelisting is off until you turn it on, so this is a deployment day problem rather than a first run problem, and the fix is adding both localhost and your live origin under the application’s security settings.
Going to production
Three things change when this stops being a prototype.
Decide who can read the files. Uploads are public by default, which is right for avatars and portfolio images and wrong for anything private. Signed policies are the switch for that, and they need the app secret, which means they belong on your server.
Set an expiry that matches your content. The default response carries a long cache-control and a custom one is a task like any other, cache=expiry:3600, in front of the handle. What the edges do with those values is covered in the Filestack CDN guide to file delivery.
Store the handle, not the URL. URLs get rebuilt when you change a size or a format. The handle never changes, so it is the value that belongs in your database, and the rest of the pipeline stays a string you can edit. That is also what makes it straightforward to fold uploads into a wider file delivery workflow later.
The free plan carries 500 uploads, 1,000 transformations, 1 GB of bandwidth and 1 GB of storage a month, checked on 6 August 2026, which covers building and demoing all of this. Start is the plan people move to when real traffic arrives.


Joshua is a web developer with over 4 years of experience building responsive, high-performance websites and web applications. Currently working as an AI Automation Specialist, he combines modern web development with automation to create efficient, scalable digital solutions. He shares practical insights on WordPress, web development, and emerging technologies.