


Image recognition enables computers to recognize objects, shapes, and textures in images. This technology is used in healthcare, security, e-commerce, and autonomous vehicles, among other applications. It has become an essential part of modern technology due to the advances made in AI and machine learning (ML).
Python is the most popular language for image recognition due to its simplicity and versatility. Python has a rich ecosystem of libraries for implementing machine learning (ML) and deep learning (DL) algorithms. Object detection and image classification are supported by TensorFlow, PyTorch, and OpenCV. NumPy and Matplotlib are used for data processing and visualization, respectively. The efficiency of building image recognition systems is further enhanced by using pre-trained models and deep convolutional neural networks (CNNs).
In this article, we will learn the basics of how image recognition works, the main Python libraries used in this process, and how to build a model for image recognition.
Key takeaways
- Python is the go-to language for image recognition due to its simplicity, flexibility, and powerful ecosystem of machine learning (ML) and deep learning (DL) libraries.
- Image recognition systems mimic human vision by extracting and analyzing visual features such as edges, textures, and shapes to classify or detect objects.
- Core Python libraries like TensorFlow, PyTorch, OpenCV, and Keras streamline the process of training, testing, and deploying accurate image recognition models.
- Convolutional Neural Networks (CNNs) play a key role in feature extraction and classification, forming the foundation of most modern image recognition systems.
- Developers can boost performance through techniques like transfer learning, data augmentation, and hyperparameter tuning to achieve higher accuracy with less data.
What is image recognition?


Image recognition is a sub-branch of pattern recognition and is also a case of unsupervised learning. It is the process of enabling machines to identify, characterize, and classify different kinds of objects within given images. It is used in various applications, such as face detection, medical diagnosis, autonomous driving, and security systems. Thus, with techniques such as AI (Artificial Intelligence) and ML (Machine Learning), image recognition systems can operate similarly to human vision and make on-the-spot decisions.
How does image recognition work?
At its core, image recognition is about teaching a computer to “see” and understand visual data — just like the human brain does, but using mathematical models.
The process typically involves these steps:
1. Image Acquisition
The system first takes in visual input — either from a camera, a file upload, or an online source. Tools like Filestack’s file uploader or OpenCV can handle this step.
2. Preprocessing
Before feeding the image into a model, it must be cleaned and standardized:
- Resize all images to a consistent dimension (e.g., 224×224)
- Normalize pixel values (scaling between 0 and 1)
- Convert color formats (e.g., RGB to grayscale, if needed)
This helps improve model accuracy and training speed.
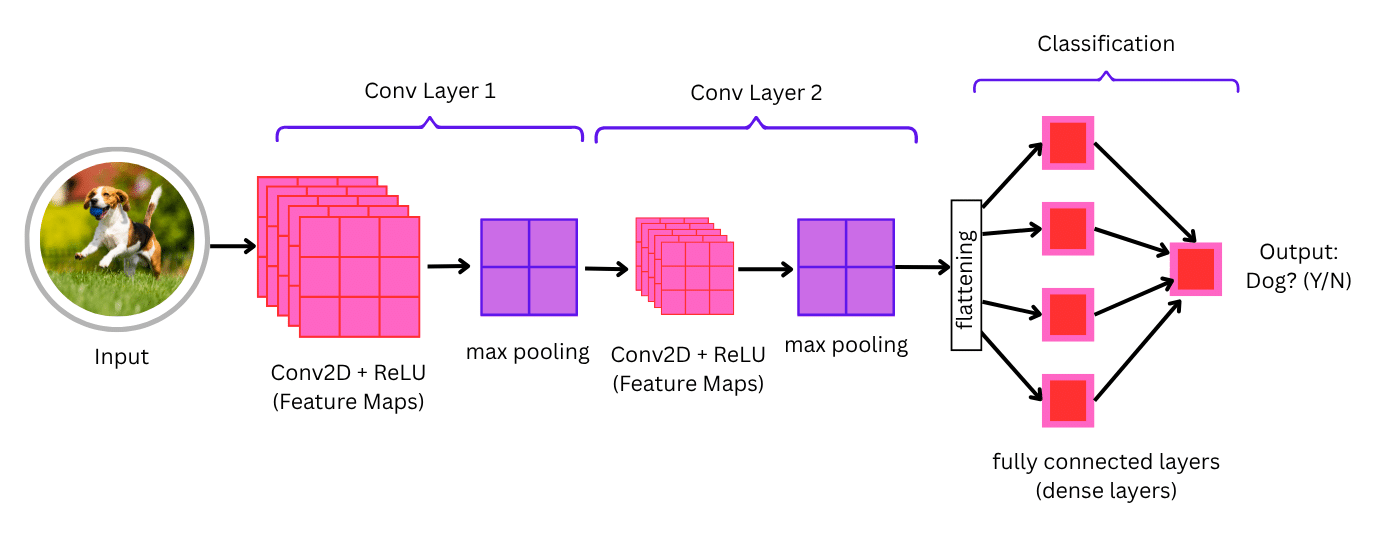
3. Feature Extraction (via Convolutional Layers)
Using a technique called Convolution, the model scans the image with filters to detect features like:
- Edges
- Corners
- Shapes
- Textures
These extracted features form a feature map — a condensed, abstract version of the original image.
4. Classification (via Dense Layers)
After feature extraction, the data flows through one or more fully connected layers (dense layers). These layers process the patterns and assign probabilities to different labels (e.g., “cat” = 95%, “dog” = 3%).
5. Prediction Output
Finally, the model returns the most likely label based on the trained patterns — identifying the object(s) in the image.
Bonus Tip
Modern models like ResNet, YOLO, and EfficientNet improve accuracy by using deeper layers, skip connections, and real-time detection strategies.
In short, image recognition combines computer vision, deep learning, and lots of training data to turn raw pixels into meaningful insights.

Key Python libraries for image recognition
The wide range of readily available modules makes Python popular for building image recognition models. Some of the most popular libraries include:
TensorFlow: An open-source library developed by Google, commonly used for training image recognition models. It employs CNNs (Convolutional Neural Networks) and transfer learning to improve model accuracy.
PyTorch: It is developed by Facebook and is characterized by a flexible tensor computation graph that assists in the construction and tuning of deep learning models for tasks like image classification and object detection.
OpenCV: OpenCV is a prominent open-source library for integrating computer vision capabilities such as image processing, feature extraction, and object detection, which are necessary for real-time applications.
Keras: Keras is an API on top of TensorFlow, which offers a higher-level, more concise, and abstracted interface for building deep learning models, including image classification models.
These libraries, along with the flexibility of Python, enable developers to create image recognition systems that can be used in various parts of life.
Setting up your Python environment
Before building an image recognition system in Python, you need to set up your development environment with the necessary tools and libraries. This section will guide you through the essential software and installation steps to get started.
Software and tools required
To develop an image recognition system in Python, you need the following:
Python (3.x) – The dominant programming language for the development of image recognition models.
Jupyter Notebook or IDE (e.g., VS Code, PyCharm) – A coding environment for writing and running Python scripts.
Machine Learning Libraries – The frameworks chosen for building and training models are TensorFlow, PyTorch, Keras, and OpenCV.
NumPy and Matplotlib – These are very useful libraries for data handling, visualization, and preprocessing images, respectively.
PIP (Python Package Installer) – This makes it easier to install dependencies.
Installing Python and relevant libraries
Follow these steps to set up your environment:
1. Install Python
Download and install the latest version of Python from the official website: Python.org. Make sure to check the box for “Add Python to PATH” during installation.
2. Install Required Libraries
Once Python is installed, open a terminal or command prompt and run the following commands to install the necessary libraries:
pip install numpy matplotlib tensorflow keras torch torchvision opencv-python- NumPy & Matplotlib – Used for handling numerical data and visualizing images.
- TensorFlow & Keras – Used for building and training deep learning models.
- PyTorch & Torchvision – Alternative deep learning framework for model development.
- OpenCV – Used for image processing and feature extraction.
Note: Python 3.11.x and above versions might not support these libraries. If your current Python version does not support these libraries, you can install Python 3.10.x and run the above command. You can use a virtual environment to install Python 3.10.x for this project while having the latest version for the other projects.
Learn how to install packages in a virtual environment using pip and venv.
3. Verify Installation
To ensure everything is installed correctly, open a Python shell or Jupyter Notebook and run:
import tensorflow as tf

import torch

import cv2

import numpy as np

import matplotlib.pyplot as plt
print(“All libraries installed successfully!”)
If no errors appear, your environment is set up and ready to build an image recognition system in Python.
Exploring image recognition techniques
Image recognition is built on the grounds of machine learning (ML) and deep learning (DL) to identify and categorize images. ML models, however, require us to extract features manually, while DL models such as Convolutional Neural Networks (CNNs) learn features for themselves for complex tasks.
Machine learning vs. deep learning
Let’s see the difference between machine learning and deep learning.
Machine learning (ML): Uses algorithms like Support Vector Machines (SVMs) and k-Nearest Neighbors (k-NN) that classify images based on features we define. It is suitable for simpler tasks but has limited accuracy.
Deep learning (DL): CNNs are employed to learn the features from the data and have produced better results in object recognition, facial recognition, medical imaging, and object detection tasks.
Popular image recognition algorithms
- CNNs: The most widely used architecture for object detection and image classification tasks.
- Transfer Learning: Involves fine-tuning pre-trained models like VGG16 and ResNet to accelerate training and improve performance with less data.
- YOLO (You Only Look Once): Known for real-time object detection, it processes the entire image in one go.
- R-CNNs: Can detect multiple objects within a single image, offering higher accuracy in complex scenes.
For basic tasks, traditional ML models may suffice. However, for large-scale and high-accuracy image recognition, deep learning models—particularly CNNs—are the preferred choice.
Key CNN components explained
- Convolution
The foundational operation in a CNN. Convolution uses filters (kernels) that slide across an image to extract spatial features like edges, textures, and patterns. These generate feature maps that preserve essential visual details.
- Pooling
This process reduces the spatial dimensions of feature maps to improve efficiency and prevent overfitting. Max pooling, the most common type, retains only the highest value from each region—keeping critical information while discarding noise.
- Activation Functions
These introduce non-linearity into the model, enabling it to learn complex patterns. The most popular is ReLU (Rectified Linear Unit), which replaces negative values with zero, making the network faster and more effective.
Step-by-step guide to building your first image recognition model
Developing an image recognition model entails data collection, image preprocessing, model training using deep learning, and model evaluation. Here are the steps that will be described in detail in this paper using Python and TensorFlow.
1. Data collection and preprocessing
The first step in designing an image recognition application is to get and prepare a dataset. You can use other people’s datasets, for example, ImageNet, CIFAR-10, or MNIST, or use your own images for the training set.
Steps to prepare data:
Collect Images – Make sure that the images you select are taken in different angles, different lighting conditions, and with different variations.
Label the data – Put the images into categories (For example, for a classification task, “Cats” and “Dogs”.
Resize and normalize – Convert all images to the same size (For example, 224×224 pixels) and normalize the pixel values (Between 0 and 1).
Data augmentation – The process of rotating, flipping, and zooming images to increase the size of the dataset and increase the accuracy of the model.
Using TensorFlow’s Keras API, you can load and preprocess images:
import tensorflow as tf

from tensorflow.keras.preprocessing.image import ImageDataGenerator

datagen = ImageDataGenerator(rescale=1./255, rotation_range=20, horizontal_flip=True)

train_data = datagen.flow_from_directory("dataset/train", target_size=(224, 224), batch_size=32, class_mode="categorical")
2. Training the model with Python
When the data is ready, we can create a model that can recognize images using a Convolutional Neural Network (CNN).
Steps to train a model:
Design the CNN architecture – Convolutional, pooling, and fully connected layers are combined.
Compile the model – Determine the optimizer, the loss function and the evaluation metrics.
Train the model – Use the training dataset for learning the weights of the model.
Here is the code that can help you create and train a simple CNN using TensorFlow:
from tensorflow.keras.models import Sequential

from tensorflow.keras.layers import Conv2D, MaxPooling2D, Flatten, Dense

model = Sequential([

    Conv2D(32, (3,3), activation='relu', input_shape=(224, 224, 3)),

    MaxPooling2D(2,2),

    Conv2D(64, (3,3), activation='relu'),

    MaxPooling2D(2,2),

    Flatten(),

    Dense(128, activation='relu'),

    Dense(2, activation='softmax')  # Adjust for the number of classes

])


model.compile(optimizer='adam', loss='categorical_crossentropy', metrics=['accuracy'])


model.fit(train_data, epochs=10)
3. Coding walkthrough using TensorFlow
Once you have trained the model, you need to see how it performs on images that it has not seen before. The following code can be used to evaluate accuracy and make predictions:
import numpy as np

from tensorflow.keras.preprocessing import image

# Load an image for testing

img = image.load_img("dataset/test/cat1.jpg", target_size=(224, 224))

img_array = image.img_to_array(img) / 255.0

img_array = np.expand_dims(img_array, axis=0)


# Make a prediction

prediction = model.predict(img_array)

class_index = np.argmax(prediction)


print(f"Predicted class: {class_index}")
This will help you create a simple image recognition model in Python using TensorFlow. You can enhance the accuracy by employing a larger number of samples, transfer learning, or optimizing the hyperparameters.
Testing and improving your model
After you train your image recognition model, you first need to evaluate its performance and improve it for higher accuracy. This section will also assist you in applying the model in real life, testing its reliability, and enhancing its efficiency so it can be applied effectively.
How to evaluate the accuracy of your model
To assess the effectiveness of your model, you can evaluate it on a test dataset that it has not seen before. The key evaluation metrics include:
- Accuracy: The percentage of correctly classified images.
- Precision & Recall: Measures how well the model distinguishes between different classes.
- Confusion Matrix: A table showing correct and incorrect predictions for each class.
Evaluating model performance in Python
Use TensorFlow to evaluate the model on a test dataset:
test_loss, test_acc = model.evaluate(test_data)

print(f"Test Accuracy: {test_acc:.2f}")

To generate a confusion matrix, use Scikit-learn:

import numpy as np

from sklearn.metrics import confusion_matrix


y_true = test_data.classes

y_pred = np.argmax(model.predict(test_data), axis=1)


cm = confusion_matrix(y_true, y_pred)

print(cm)
Tips for improving model performance
If the accuracy of your model is low, you should consider the following optimization techniques:
- Increase Dataset Size: It also helps to have more training images because it improves model generalization.
- Data Augmentation: We flip, rotate, zoom, and crop the training images to include varying possibilities.
- Use Transfer Learning: It means that you can use the preprocessed data and start with the model that was already trained on similar tasks (e.g., VGG16, ResNet or MobileNet) to achieve better accuracy with fewer images.
- Hyperparameter Tuning: This is the process of adjusting the learning rate, batch size, and the depth of the network to enhance the performance.
- Reduce Overfitting: We also turn to dropout layers or L2 regularization to tell the model not to learn the details of the training data but rather to learn the general pattern.
Example code for model testing
To test the model on a single image, use the following Python script:
import numpy as np

from tensorflow.keras.preprocessing import image


# Load and preprocess a test image

img = image.load_img("dataset/test/dog.jpg", target_size=(224, 224))

img_array = image.img_to_array(img) / 255.0

img_array = np.expand_dims(img_array, axis=0)


# Predict the class

prediction = model.predict(img_array)

class_index = np.argmax(prediction)


# Class labels (adjust based on your dataset)

class_labels = ["Cat", "Dog"]

print(f"Predicted Class: {class_labels[class_index]}")
Conclusion
In this article, we have discussed the basics of image recognition in Python, including the basics of the concepts, creation, testing, and enhancement of a deep learning model. We discussed the primary Python libraries, the distinctions between the machine learning and deep learning approaches, and a step-by-step guide on how to develop an image recognition system using TensorFlow.
Continuous learning and experimentation are necessary to build good image recognition models. Retraining your dataset, performing transfer learning, and adjusting model parameters can improve performance and address more complex recognition challenges. Stay curious, keep trying, and never stop questioning what is possible in computer vision and AI!
References
https://nix-united.com/blog/how-does-image-recognition-work-its-tools-and-use-cases/
https://en.wikipedia.org/wiki/Convolutional_neural_network
https://aws.amazon.com/compare/the-difference-between-machine-learning-and-deep-learning/
https://packaging.python.org/en/latest/guides/installing-using-pip-and-virtual-environments/
https://www.ibm.com/think/topics/knn
https://medium.com/@danushidk507/max-pooling-ef545993b6e4
FAQs
Can Python do image recognition?
Yes, Python is one of the best languages for image recognition tasks. Its rich ecosystem of libraries—such as TensorFlow, Keras, PyTorch, and OpenCV—makes it easy to build, train, and deploy image recognition models. Whether you’re detecting objects, classifying images, or building custom computer vision applications, Python offers powerful tools and frameworks for both beginners and experts.
What are the best Python libraries for image recognition?
Python offers a range of powerful libraries for image recognition, including TensorFlow, Keras, PyTorch, OpenCV, and scikit-image. These tools help developers build models for tasks like object detection, image classification, and facial recognition with ease.
Do I need a GPU for image recognition in Python?
Not necessarily. While a GPU can significantly speed up training deep learning models, especially with large datasets, it’s not required for basic image recognition tasks or inference using pre-trained models. Many lightweight applications run just fine on a CPU.


Shamal is a seasoned Software Consultant, Digital Marketing & SEO Strategist, and educator with extensive hands-on experience in the latest web technologies and development. He is also an accomplished blog orchestrator, author, and editor. Shamal holds an MBA from London Metropolitan University, a Graduate Diploma in IT from the British Computer Society, and a professional certification from the Australian Computer Society.