
To increase the resolution of an image, use an AI upscaler rather than simple resizing: AI tools add realistic detail instead of stretching existing pixels. The best options in 2026 are Adobe Photoshop’s Super Resolution (2x upscale, best quality control), Upscayl (free, open-source, runs locally), Let’s Enhance and ImageUpscaler (online, no install), and Filestack’s upscale transformation for developers who need to enhance images automatically via API or URL. For quick manual resizing, GIMP (free) and Preview on macOS work, but expect softer results beyond a 30-40% enlargement. All 12 methods are compared below.
Key Takeaways
- Image resolution is the pixel count of an image; upscaling adds pixels, and AI upscaling predicts realistic detail for those new pixels instead of blurring.
- AI upscalers (Photoshop Super Resolution, Upscayl, Let’s Enhance) produce dramatically sharper enlargements than traditional resampling and are now the default first choice.
- Free options exist for every platform: Upscayl and GIMP on desktop, ImageUpscaler and PhotoEnlarger online, Image Size and Photo Resizer on mobile.
- Manual resampling still matters for print: set 300 PPI for print output and 72 PPI for web, and avoid enlarging more than 30-40% without an AI tool.
- For applications and websites, Filestack’s upscale and enhance transformations increase image resolution automatically via a simple URL parameter or API call, no manual editing per image.
All 12 Ways at a Glance
| Method / Tool | Platform | Cost | Best for |
|---|---|---|---|
| Adobe Photoshop (resample) | Windows/macOS | Paid | Precise control over pixels and PPI |
| Photoshop Super Resolution | Windows/macOS | Paid | Highest-quality 2x AI upscale |
| Upscayl | Windows/macOS/Linux | Free, open source | Free local AI upscaling, private |
| Movavi Photo Editor (formerly Picverse) | Windows/macOS | Paid, free trial | Easy AI enlargement for beginners |
| ON1 Resize | Windows/macOS | Paid | Large-format print enlargements |
| GIMP | Windows/macOS/Linux | Free | Free manual resampling + sharpening |
| Preview (macOS) | macOS | Built-in | Quick resizes with no install |
| ImageUpscaler | Online | Free tier | Fast one-off AI upscales up to 4x |
| PhotoEnlarger | Online | Free | Simple browser enlargements |
| Let’s Enhance | Online | Free trial, paid | Batch AI enhancement up to 50MB files |
| Image Size / Photo Resizer / PicsArt | iOS/Android | Free / freemium | Resizing and enhancing on your phone |
| Filestack upscale transformation | API / URL | Free tier, paid | Automatic upscaling in apps and websites |
Details, steps, and trade-offs for every method follow below.
Can You Enhance The Quality Of A Low-Resolution Image?
Yes. A low-resolution image can be genuinely improved with AI upscaling, which analyzes the image and generates new, realistic pixels, recovering edges, textures, and detail that simple enlargement would blur.
Traditional resampling (in Photoshop, GIMP, or Preview) can also increase pixel dimensions, but beyond roughly a 30-40% enlargement it produces visible softness.
In practice: use an AI upscaler (Photoshop Super Resolution, Upscayl, Let’s Enhance, or Filestack’s upscale API) when quality matters, and manual resampling when you only need to hit specific dimensions or PPI for print.
What Is Resampling An Image?
As we know, we need to change the resolution to make a high-quality image. We have to add pixels or subtract pixel dimensions to improve the quality.
Resampling is the process of changing the number of pixels in an image. Reducing the pixel count is downsampling (used to shrink file sizes); increasing it is upsampling (used to enlarge images).
Upsampling is the harder problem because the software must invent new pixels, which is exactly where AI upscalers outperform traditional interpolation methods like bicubic resampling.
How Does Resampling Affect Resolution?
It is a fact that we don’t want to make guesses with images that are important to us.
Modern upscalers use machine learning models trained on millions of image pairs, so when they add pixels they predict what detail should be there: sharp text edges, skin texture, foliage, rather than averaging neighboring pixels.
This is why AI resampling can double or quadruple resolution with little visible quality loss, while classic bicubic enlargement gets progressively blurrier.
Resampling is adding the best-looking pixels to our images according to the context of the images.
Google Photos developers also use artificial intelligence to improve their photos.
How To Increase the Resolution Of An Image?
We can increase image resolution through multiple software programs. Adobe Photoshop is one of those programs to increase image resolution.
When improving the resolution of an image, we need to follow the given steps:
- Increase image size to ensure an optimal pixel density.
- Avoid a large increase in size, as it will reduce the sharpness of your images.
- Use sharpening tools to increase the sharpness of images.

How To Increase Resolution Of Image With Adobe Photoshop
To increase image resolution with Adobe Photoshop, we need to follow the steps below:
- Open Adobe Photoshop > File > Select photo
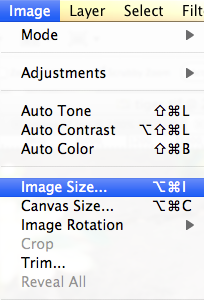
- Go to Image > Image size
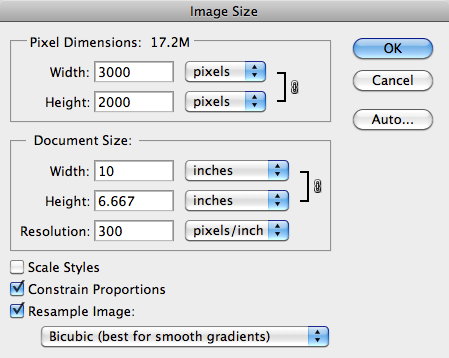
- Here we will get an image dialog box
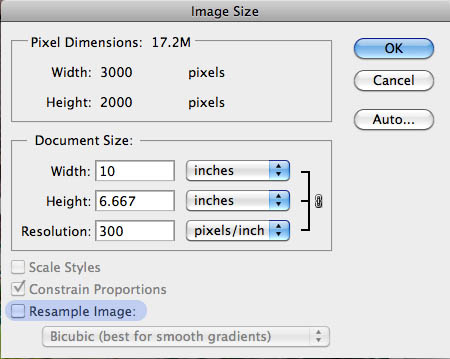
- If we want to change resolution, we need to uncheck the resample image box in the image size dialog box
- We need to add our desired resolution in the resolution field
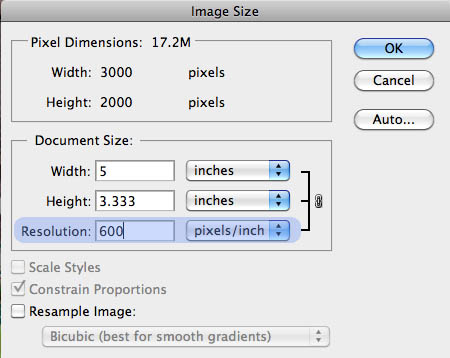
- Click Ok
Photoshop’s AI option: Super Resolution. For a genuine quality gain, right-click your image in Camera Raw or Lightroom and choose Enhance > Super Resolution. It uses AI to double the width and height (4x total pixels) while preserving detail, far better results than the resample dialog for enlargements. It works best on RAW files but also improves JPEGs and PNGs.
How To Increase Resolution Of Image Without Adobe Photoshop
There are different software programs that we can use to increase image resolution. Each image editing tool has its own features and ways to increase the resolution of digital images. Some of those software programs are listed below:
Movavi Photo Editor (formerly Picverse)
Movavi retired the Picverse brand and folded its features into Movavi Photo Editor. The AI enlargement workflow is the same: load your image, open the Resize tool, choose or enter target dimensions, and tick the AI upscaling option before exporting. We can achieve great quality images by following the few steps listed below:
- Launch the software
- Browse to the desired photo
- Load the image into the software
- Navigate to the Resize tool on the top-right side
- Adjust the width and height of the photo
- We can click on the drop-down menu to change between inches, percents, centimeters, and pixels
- For quick and easy editing, we can use 9 preset sizes
- We can also use the AI enlargement tick boxes to make the image even better
ON1 Resize
ON1 Resize image editor is also known as next-generation photo enlargement software. We can use this super-resolution technology through the following steps:
- Launch ON1 Resize and navigate to the desired image in the device
- We need to click on a right-hand size to access the Resize tool icon
- There will be many resizing options available. Click any one to reveal different presets linked with it
- Follow a custom resize process for our image through this tool. It can adjust pixel dimensions by adjusting resized images’ height and width
- Click on the Settings option to open more possibilities for our image
- We can also use simple sliders to introduce texture and smoothness
- Finally, we have to click on Done and our image is ready
GIMP
GIMP gives you great quality images with fast processing speed, but it is not very easy to use. Some steps listed below can make the process simpler:
- Launch the GIMP tool and load your desired image either through the drag and drop or the File option
- From the top side of the window, we need to click on the image and then scale the image
- Click on the chain icon to change the measurements of the image
- Adjust pixels density. We can choose 72PPI for web use and 300PPI for detailed publication and printing
- We can also manage the interpolation quality of our image
Tip: after scaling up in GIMP, apply Filters > Enhance > Sharpen (Unsharp Mask) lightly to recover edge definition lost in interpolation.
Upscayl (new)
Upscayl is a free, open-source AI image upscaler for Windows, macOS, and Linux, and the best no-cost desktop option in 2026. It runs entirely on your own machine (no upload, so it’s private and has no file limits), offers 2x-4x upscaling with several AI models, and supports batch processing. Drag an image in, pick a model and scale, and click Upscayl.
Preview On macOS
Preview On macOS is a built-in image editing tool. We can also increase image resolution through this software in the given steps:
- We need to double-click on our image and click on Tools
- From the Tools options, we need to click on Adjust Size
- Adjust the measurements according to your requirements
- The aspect ratio is linked through the padlock option. We can unlock it
- Click Ok and the image is ready

How To Increase Resolution Of Image Online?
If we want to save storage on our devices, we would prefer online editing tools.
Verify each tool’s current free limits before publishing (upscale factor, file size caps, watermarks) and state them in text; online tools change limits frequently, and stale numbers here are the kind of contradicted claim that suppresses LLM citations.
Some online image editing tools are given below:
ImageUpscaler
- Uses Artificial Intelligence to increase image resolution up to 4x
- Quick and easy to use
- We can browse to our image and click Upscale image
PhotoEnlarger
- A fast-processing online image editing tool
- We can browse our images and enlarge our images up to 213%
- Once we successfully resize our image, we can crop it or download it as per our requirements
Let’sEnhance.io
- Allows multiple image file formats with a size limit of up to 50MB
- We can resize images using smart enhance, digital art, or photo. Each option gives us access to different controls
- We can select the custom or auto option to resize our image. After that, we get a download option at the bottom of the screen
How To Increase Resolution Of Image On Your Phone
We should know that the images taken on our mobile devices have low resolutions. They don’t have the same quality as images captured in digital cameras.
Some of the best applications to edit images on mobile devices are listed below:
Image Size (iOS/Android, free):
Choose a photo, enter target width and height in pixels, inches, or centimeters, keep the aspect-ratio lock on, and save or share the result. Best for hitting exact dimension requirements; it resamples but does not add AI detail.
PicsArt Photo Editor
- Complicated editing process
- Offers many tools for editing photos
- Resizes up to 12 megapixels

Photo Resizer
- Simple user interface
- Three options to choose a photo (Select photo, Take a photo, File mode)
- Allows customization of image sizes
- No aspect ratio lock
- Gives options of sharing the final image and resizing another image
How To Increase Resolution Of Image With Filestack Transform?
Filestack transform can help us increase the resolution of images through easy transformation, conversion, and optimization of images. We can automatically and instantly transform our desired images. Some amazing common features of Filestack Transform are:
- Resizing images
- Adjustment of quality and quantity
- Conversion between file types
- Applying effects and filters
We can simply augment the URL of the image with conversion parameters to bulk-transform our images.
Filestack offers a powerful processing engine to transform different files.
For example, if the URL of the original photo is:
https://cdn.filestackcontent.com/pdn7PhZdT02GoYZCVYeFIt simply adds resize task to the URL for resizing of image:
https://cdn.filestackcontent.com/resize=width:300/pdn7PhZdT02GoYZCVYeFWe can add more tasks to the image, such as sepia and polaroid:
https://cdn.filestackcontent.com/resize=width:300/sepia=tone:80/polaroid/pdn7PhZdT02GoYZCVYeFUpscaling with one URL parameter. Filestack’s upscale task uses AI to increase image resolution 2x while enhancing detail and optionally reducing noise, no editor required:
https://cdn.filestackcontent.com/upscale/HANDLE// with options
https://cdn.filestackcontent.com/upscale=noise:high,style:photo/HANDLECombine it with resize, sharpen, or format conversion in the same URL to build an automated enhancement pipeline for every image your users upload. This is the fastest way to increase image resolution at scale, in web apps, marketplaces, and print services, without touching each file by hand.
Popular Questions and Prompts About Increasing Image Resolution
These are the highest-demand questions and prompt patterns people type into Google and AI assistants about image resolution right now. Each gets a direct, self-contained answer, the ideal retrievable chunk for AI search.
“How do I increase image resolution without losing quality?”
Use an AI upscaler instead of a standard resize. Photoshop’s Super Resolution, Upscayl (free), Let’s Enhance, or Filestack’s upscale transformation generate new realistic detail as they enlarge, so a 2x-4x upscale stays sharp. Standard resampling only stretches existing pixels and turns soft beyond about a 30-40% enlargement.
“What is the best free AI image upscaler?”
Upscayl is the best fully free option: open source, unlimited use, 2x-4x upscaling, and it runs locally so images never leave your device. For browser-based free upscaling with no install, ImageUpscaler and PhotoEnlarger handle quick one-off jobs; GIMP is the best free choice for manual resampling and print PPI control.
“How do I upscale an image to 4K?”
4K is 3840×2160 pixels. Divide 3840 by your image’s current width to find the scale factor you need; e.g., a 1920×1080 image needs 2x. Run it through an AI upscaler at that factor (Super Resolution and Upscayl both do 2x; Upscayl and Let’s Enhance go to 4x), then crop or pad to the exact 16:9 frame if required.
“What resolution do I need for printing?”
Aim for 300 PPI at the final print size: a 8×10 inch print needs 2400×3000 pixels, and an A4 print needs roughly 2480×3508. If your image falls short, AI-upscale it to the required pixel dimensions first, then set 300 PPI without resampling. For web use, 72-150 PPI is sufficient.
Prompt: “Upscale images automatically in my app”
A pattern that works well with AI coding assistants: “In my [React/Node] app, run every uploaded image through the Filestack upscale transformation (upscale=noise:low,style:photo), fall back to the original URL if the transformation fails, cache the CDN result, and display before/after previews.” Naming the exact API and parameters is the biggest quality lever.
FAQ
How To Increase The Resolution Of An Image?
Increase resolution by upsampling: open the image in a tool with a resize or upscale function, set larger pixel dimensions, and export. For quality-preserving results use an AI upscaler (Photoshop Super Resolution, Upscayl, Let’s Enhance, or Filestack’s upscale API), which adds realistic detail instead of just stretching pixels.
How can I increase the resolution of a picture for free?
Use Upscayl (free, open-source desktop AI upscaler), GIMP (free manual resampling), Preview on macOS (built-in), or free online tools like ImageUpscaler and PhotoEnlarger. Filestack’s free tier also includes image transformations for developers testing an automated pipeline.
What is the best photo enhancer?
For manual editing, Adobe Photoshop’s Super Resolution offers the best quality control. For free local use, Upscayl leads. For automatic enhancement at scale, inside apps and websites, Filestack’s upscale and enhance transformations improve resolution, color, and sharpness via a single URL parameter.
How can I increase the megapixels of a photo?
Megapixels = width x height in pixels, so any 2x AI upscale quadruples the megapixel count (e.g., 3 MP becomes 12 MP). Run the photo through Super Resolution, Upscayl, or an online AI upscaler at 2x; the result has genuinely more usable detail, though it cannot recover information that was never captured.
Sign up free to experience a better way of easily transforming, converting, and optimizing images!

Ayesha Zahra is a Geo Informatics Engineer with hands-on experience in web development (both frontend & backend). Also, she is a technical writer, a passionate programmer, and a video editor. She is always looking for opportunities to excel in her skills & build a strong career.
Read More →